Unlocking Your Scanner to Get Great Scans from Film

B&W fine art image of the Nez Perce River in Yellowstone NP
“A Moment on the Nez Perce” by J Riley Stewart

Why Scan Film?

This tutorial covers how I manage my film scanning to get every bit of tonal information from a negative and avoid clipped shadows and highlights, which ensures I get great scans from my film images.

Scanning film is a necessary evil if you shoot using film cameras and want to convert the film image into digital format for proofing, sharing to the web, making a digital negative for alternative processes, or for inkjet printing. Scanning film requires a special machine (a transparency scanner) that passes light through the film and to the scanner’s sensor, and records minute differences in density and color at millions of sampling points on the film, and records those differences in a digital file.

For some images on film, we can relay on automatic settings in scanning software to adequately read and convert the film image to an acceptable digital image. But there will always be those film images that fail miserably during scanning; automatic settings and presets just can’t provide a digital image that we can process into a fine image for printing or sharing. For those film images, we need to learn how to force the scanner and scanner software to do the best job possible to get all the useful information from the film. 

Software can make a big difference in user experience. I’ve tried Epson Scan®, SilverFast®, and VueScan®. By far, I’ve found VueScan is the most flexible and effective, and what I say below relates to its use. VueScan, because it includes so many controls for so many scanners, can be frustrating to use sometimes, but if you follow my workflow, and refrain from experimenting too much, you’ll be okay (I think). Try VueScan® here: (I have no association with it). I have no doubt that if all your negatives (color or B&W) are perfectly exposed and developed, you won’t need the advanced tools built into VueScan (however, it will take care of those too) and so the basic scanning software like Epson Scan will work fine. But there are those times when things don’t go as planned, and you’re left with a great composition on a crappy negative. That’s when you need the tools and the skill to get every bit of useful information from the negative before you can make a great image. I’ve compared Epson Scan to VueScan in scanning B&W film here. Take a read if interested.

Take Home Points

  • Scanning film is a craft that requires learning, but folks, it’s not rocket science. You don’t need a degree in scanning to get the job done. 
  • Scanning film is a technical task. There is little usefulness for creativity during scanning.
  • Don’t ask too much of your scanner and scanning software: it’s only good for one thing, and that’s to get every bit of useful information from the film image as is possible.
  • There is no reason a properly exposed and developed negative can’t be scanned without clipping any shadow details or any delicate highlights, even specular highlights. But to scan some film images, you must know how to control the scanner and its software.

Unleashing the power of the film scanner

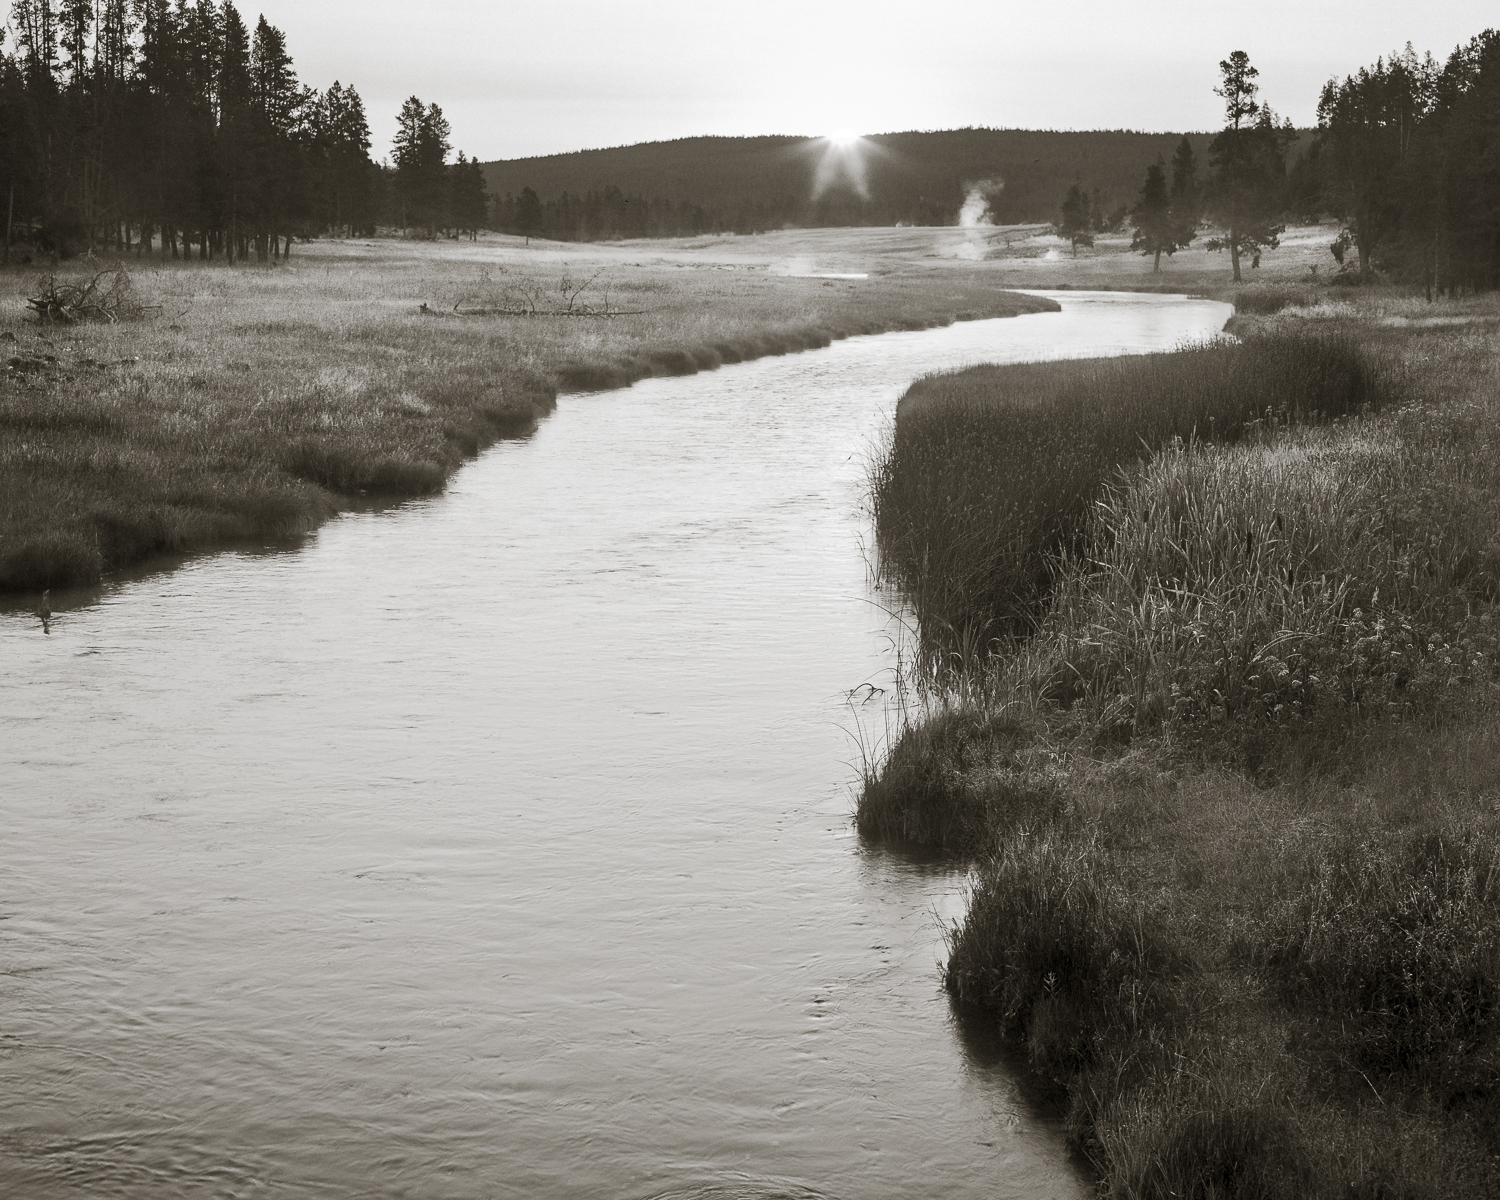
The image above (“A Moment On the Nez Perce River”) is an example from a scene having extreme dynamic range that can give automatic scanner settings the fits. Automatic scanner settings will often assume a perfectly exposed negative, perfectly developed negative, a ‘common’ film or type of film, a ‘common’ type of scene, and/or it assumes you want sharpening, dust removal, color balance, resolution, and any number of other assumptions. Perfect rarely happens in real life photography.

Scanning film is a technical task. There is little room for creativity, so don’t try to make it that. But, because it’s technical, realize that you must control the machine (i.e., the scanner and its software) to get the most out of it. Luckily, controlling the machine isn’t difficult if you use the right scanning software. Like any consumer machine, its controlling software has built-in defaults and automatic settings for folks who just want something fast. If you’re serious about getting great scans, you need to know to turn off all/most of the built-in presets.

Effective Scanning Workflow (VueScan®)

Initial settings:

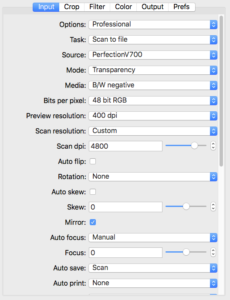
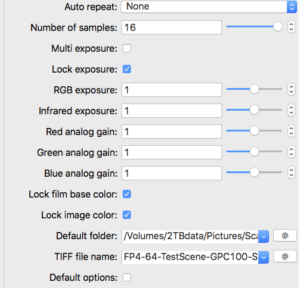
  I scan the negative as a negative, both for color and B&W films. I sometimes deviate from this with color negatives I’m having issues with, but that’s not common.  Here’s my initial settings in VueScan using my Epson V700.

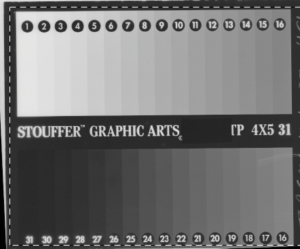
  Using these settings, click <Preview> and it will give a quick scan of the negative converted to a positive (like normal). Here’s what I’m scanning. It’s a Kodak Tri-X negative that’s been exposed through a Stouffer’s Step Wedge®. The step wedge has a minimum optical density at step 1 of 0.05 and a max density at step 31 of 3.05 in 1/3 stop increments. So it can mimic a scene having exactly 10 stops of luminance range.  Much of this is altered by negative development, which I won’t discuss here. The step wedge is merely a tool I’m using here to give you a standard ‘negative’ to talk about. Development of the negative can alter the actual densities from those 10 stops of light (i.e., by pushing or pulling exposure and development). But you’ll notice that while the darkest step (Step 31) is nearly black, the lightest step (Step 1) is far from pure white. The Epson V700 scanner has the latitude to record the 10 stops of density on film, and so does yours, probably.

Now the fun starts. We’ll set the scanner to capture every bit of information from a negative having 10 stops of density range (and more).  

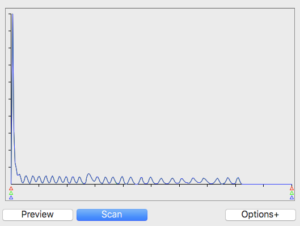
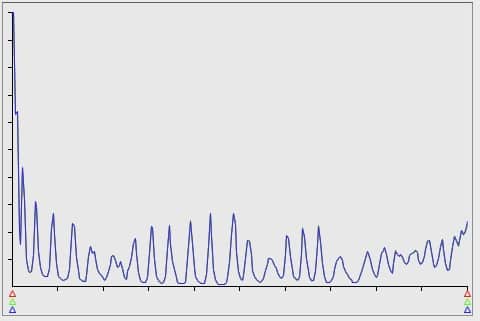
This is a histogram VueScan produces using these initial settings. You can change this histogram (and the resulting image) remarkably by adjusting certain settings. I’ll show you.

  The initial histogram produced an image from 0% Luminance (L) to Zone VIII (82% L) above film-base + fog (FB+F). Shadows are on the left; highlights are on the right, just like a normal histogram. I count 27 separate peaks, including all tones that are combined within the largest peak at the far left of the histogram. So, I’ve lost 4-5 stops in the shadow areas of the step wedge negative. If I printed this image as scanned, it would clip the darkest 6 zones or so to black. That’s not good enough for me, and it’s important to know that we can get more information from the shadows than the initial scan provided.

You probably know that film development modifies the overall contrast of densities on the film. The measure of contrast is called the Contrast Index (CI). The more development you give a specific film, the greater its CI will be, normally from 0.4 (low contrast negative) to 0.8 (very contrasty) or so. Vuescan includes  several models (target film profiles), including many that enable matching of actual negative CI to model CI for B&W films. Go into the <COLOR> tab and you’ll see you can change the target film profile to several “model” renderings. The initial histogram above shows a <Generic Color Negative> model even tho I’m scanning a B&W step wedge. 

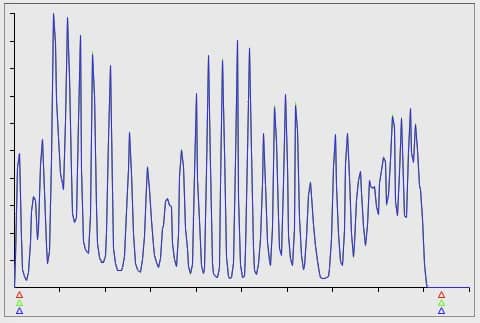
  You can experiment with varying film models under the <Color> tab. I like the Kodak TMAX 400 model as it allows me to select different contrast index (CI) levels so that I can better capture the shadows and highlights. Below is exactly the same scan, but using a different setting in the <COLOR> tab.

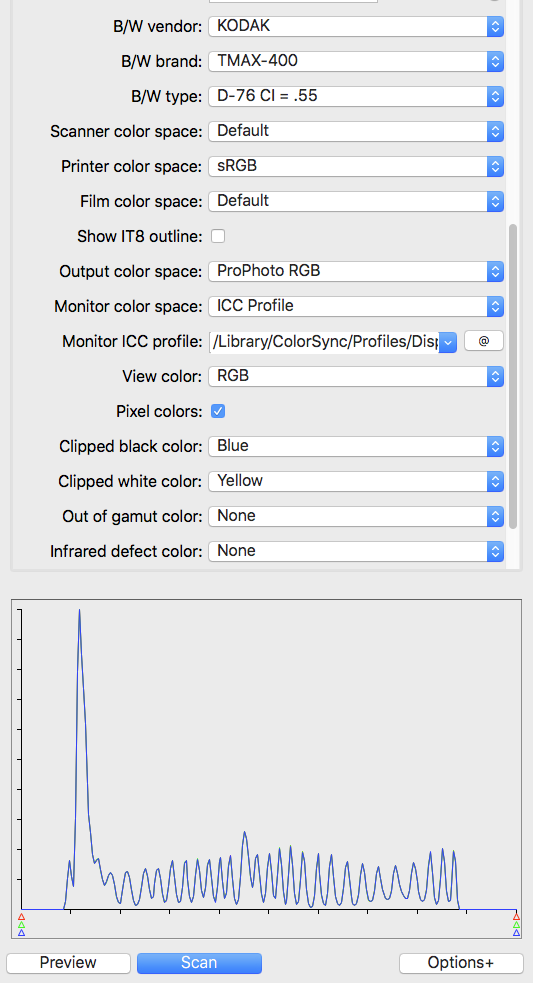
  You notice the left and right side of the range are now completely inside the extremes (levels) shown by the little red-green-blue triangles. You can stop here and be assured you’re getting every bit of data from the negative, with plenty of room to adjust levels and curves in post without clipping.

  If I do anything beyond this, it’s to set RGB Exposure (<Input> tab) to move the film FB+F peaks as far left as possible without clipping any important shadows. I want to eliminate FB+F as it has no useful information. In other words, during scanning I want to “expose to the left,” just the opposite of shooting a digital camera. Remember that when scanning a negative, digital noise (if any) will occur on the far left of the histogram, where negative densities are least. So don’t be too aggressive about this setting; don’t move your deepest important shadows too far to the left. When done right, you should still still the FB+F peak.

Setting RGB Exposure in VueScan is the one of the pre-scan settings  (i.e, machine settings) you can select on the Epson Vxx models. VueScan is the only software I’ve tried that is able to direct the scanner to slow the light emitter bar based on the RGB Exposure setting.  All other adjustments you make in software is performed on the image after scanning it, similar to PS or Lightroom does, which adjusts pixels and can cause artifacts. So there’s value in adjusting the RGB exposure to fit the negative.

The other important machine setting enabled by VueScan is the R-G-B analog gain controls that can become important when scanning color films. Film models will often presume specific R-G-B gain settings, so you need to check to see if those settings are causing your histogram to ‘dump’ tones.

Below is the exact same negative scanned using 20% more exposure so that the film base plus fog (FB+F) falls as near to the left as possible: That first little peak is FB+F.

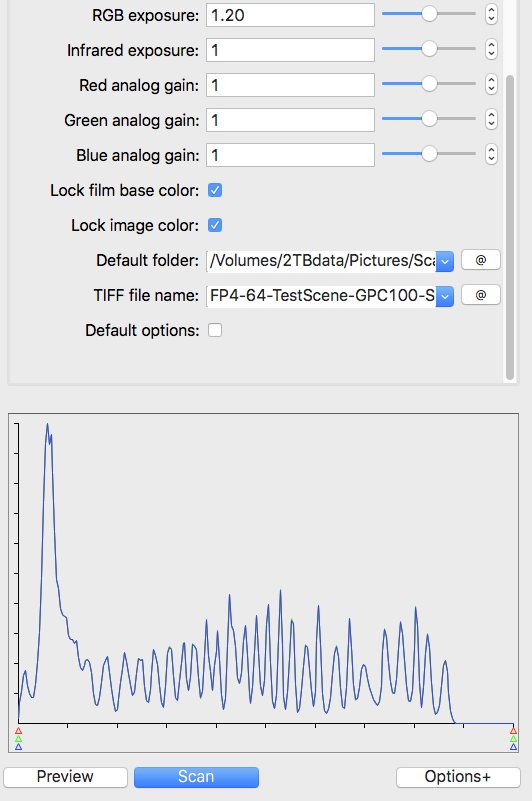
  To recap, I’ve selected a film model that gets the shadows away from the left edge so I can clearly differentiate their peaks on the histogram, then I’ve increased RGB Exposure to ease them back to the left without clipping any important shadows (FB+F is not important).

  This is where I stop and hit <SCAN>. It’s the best I can do with this negative under any circumstances. Granted, I may need to optimize my exposure and development of TXP to get the deepest shadows away from the film base.

I’ll give another example of an Ilford FP4 negative exposed through the Step Wedge and given my standard development for FP4.

The first histogram results by scanning the film using a <GENERIC FILM> preset. Note how both the shadows (empty areas + Steps 1-3 on left of histogram) and the highlights (Steps 29-31 and blocked areas on right of histogram) are not well separated. In a final image or final print, this “automatic” scan would have clipped shadows and highlights. 

The next histogram is from the exact same negative, but the settings have been explicitly set to optimize the output image file to separate the various step wedge densities. In this scan, the RGB Exposure was set to 1.12 to move everything (all densities) to the left. Then I chose a film model having a contrast index (CI) of 0.70 to best match the actual CI of the negative. You’ll see now that every one of the 31 steps of the step wedge is discerned in the histogram, and can therefore be realized in a post-processed image or print. No important shadows nor any highlights will be clipped in the image.

I hope this was helpful, and I hope it doesn’t sound too complicated; it’s really not. It takes some time to learn the essentials of scanning negatives, but once you’ve invested in that time, you’re good to make great scans forever.

 I wrote a tutorial on how to easily convert your flatbed scanner to do wet mount scanning without buying special holders. I can perfectly wet mount 2 strips of 120 or 2 4×5 negatives using this technique in about 30 seconds. Here’s the tutorial:

https://www.jrileystewart.com/blog/2018/03/02/easily-convert-your-flatbed-scanner-to-a-wet-mount-workflow/

Happy scanning!

Subscribe to my newsletter “Under the Darkcloth” here.


Creative Photography: Making Snow Look (and feel) Like Snow

Along Lime Kiln Road in Winter

I like photographing snow because snow can create settings that are absolutely beautiful and very photogenic. My favorite rendering of snow scenes is in black and white. I think the absence of cold colors lets the textural and tactile beauty of snow really shine through.

Texture in any fine art photograph is critical to our acceptance of the scene as something worthy of our interest and engagement.  In wintry snow scenes, we need to see the texture before our brain really recognizes snow as snow instead of just white blobs. Once your brain recognizes snow as snow, it then encourages you to enter the scene and become a part of it, and then you can enjoy it!

It’s somewhat of a paradox, but to recognize snow as snow, it can’t be pure white. In fact, my favorite snow scenes have many shades of gray, from very light to very dark. Here’s a general tip: It’s the gray tones in a B&W photograph that make it beautiful; all you need is a very little bit of pure white to give a sense of light to the scene.

As an example of what I’m talking about, I offer “Along Lime Kiln Road in Winter.” I took this picture during 1/30 second just after our snow storm of December 2003. It was a beautifully calm snow fall, allowing the delicate white flakes to cling to the smallest branches of the barren trees. As they say, timing is everything: 15 minutes later the wind came up and caused the flakes to lose their grip and fall to the road, turning the page from the story I’d seen when I clicked the shutter. Does the snow look (and feel) like snow to you? How much pure white do you see?

At this time of year we see lots of snow scenes on Flickr, Facebook, and Pinterest. As they catch your eye and your emotions, ask yourself why that happened. Chances are, it’s because the snow actually looked like snow, full of texture and details that give it identity!

Stay warm!

Jim

The downside to the digital photography revolution

Update Oct 2019: I wrote the article below in 2012, and much has changed in the digital photography realm since then. Unfortunately, much has stayed the same.  First, hi-end digital camera resolution has improved greatly, and has surpassed 35mm film captures. But that has very little to do with art photography. Second, processing software now enables anyone with a digital image to ‘stitch’ captures and make huge digital files capable of huge prints. But that also has very little to do with art photography. Third, we now have very good graduated filters that help manage the luminance range of landscape scenes to accommodate the (still) limited dynamic range (DR) of digital cameras. I have nothing critical to say about DR management filters; I never use them; never need them with my analog workflow.

But the biggest change in digital photography has been, in my opinion, that many digital photographers have learned how to create magnificent images from digital cameras. There are more photographic artists who have converted from analog to digital and forced themselves to learn how to use the digital tool, and they’ve done it very very well.


Article from 2012..

I was recently talking with a friend about digital photography. As we discussed the differences between digital capture and film capture, I blurted “..I think digital photography is the worse thing that could have happened to photography as art.”

The conversation went on, “blah, blah, blah…” and we finally went on about our business. Later, however, I thought “why did I say that? Did I really mean it?”

Those of you who follow my blog know I consider myself to be among the shrinking class of photographers who still use film primarily. I use my Nikon D200 digital camera for some things, but if I’m taking a picture of something I think is important, I’ll use my Nikon F5, my Mamiya RB67 medium format (film) camera, or my Cambo 4×5.

“Purple Mountains Majesty”  Captured using a Mamiya RB67 Pro S camera onto Kodak Portra 120 size film and scanned using an Epson V700 film scanner.

But back to my topic: why did I say such a terrible thing about digital photography? Here’s a list of serious consequences that I think represent the downside to the digital revolution; you be the judge how important they are to the art of photography as you practice it.

First a caviat: I consider photography to be the technique of creating an image that depends on light reflecting off a physical entity(ies), striking a light sensitive surface, and thus creating a 2-dimensional representation of that physical entity. Significant manipulation of the 2D representation  after capture can cause a departure from photography and into digital art (each artist defines his/her own limits in this regard.)  While digital art may use a camera as a tool to create such art, I do not consider digital art and photography to be synonymous.

My other bias is that I also have a personal dislike for what we used to call “chalk and soot” in fine art images.  These are large spaces in a photograph that are devoid of any detail in the shadows (soot) or in the highlights (chalk). In either case, such artifacts become distractions because our brain sees them as “unbelievable.” If you’re creating landscape photographs that have distractions, and there are many types, it will discourage many viewers from further engaging in the image. In digital terms, “chalk and soot” is the same thing at “clipping” at the extremes of the light spectrum.

So, here’s my list of reasons why I think digital technology, as applied to photography, has destroyed the art of photography:

1.Tiny, low resolution pictures are the norm. There was a time when most pictures we saw were at least 4×6 inch prints; and commonly 8×10 (the size of a magazine cover) and larger, and printed at 300 dots per inch or greater. The norm today is 3×3 (or less) shown on an excessively contrasty monitor showing us  much lower resolutions of 76 dpi.

I believe one of the great human values that photography provides is the opportunity to see and explore real, factual subjects with much greater depth than is possible in the ‘blink of an eye.’  Studying a low-resolution 3×3 inch thumbnail on our display monitors is just, well, impossible. It’s a superficial study at best, and therefore misses the whole point of the value of photography in our lives. While many photographers who post images to the internet exceed 3×3 inch (thankfully), resolution is still largely limited by the display technology. To really see an image for what it is, you need to see it in print, big, and in Hi-Def.

2. It’s not about getting good pictures now, it’s about getting fast pictures. There was a time when most people who took pictures truly wanted the picture to be “good.” Sadly, the norm today is to snap the damn thing, get it up on Facebook to share, and don’t worry about fuzziness, poor lighting, distracting objects, etc. It’s fun to share, but the ease of taking pictures today that don’t cost a dime has certainly reduced incentives to ‘make a good photograph.’ If you want to see an example of my point, just scan a few Facebook galleries of your friends. I’ll bet you’ll agree with me that the vast majority are really bad photographs (but we’ll never say that in public; nor should we I guess.)

3. With a digital camera, “this is the best I can do”. There was a time when skilled photographers took great care to avoid distracting artifacts in their imagery. Proper exposure, proper placement of the camera, and proper selection of camera and lens were fundamental considerations any serious photographer made for every click of the shutter.  Today it’s common to see artifacts such as distracting, featureless blacks and pure blown-out whites, fuzziness, photographic noise, and others that are typical with digital capture,  even from experienced, well-known photographers. This is, perhaps, my biggest gripe: that serious photographers seem to have compromised photographic quality for ease in ‘picture taking.’ Some say digital is the form that today’s photographic art has taken. And based on the popularity of digital cameras over film cameras, perhaps they’re right…. but I hope not.

4. Digital is a plastic technology. Digital photography is very “digital.”  Our eyes don’t see things in digital format, they see things in analog format. So does film, by the way, it responds to light in analog form.  WIth digital image capture we get super crisp lines and sharp transitions between colors. Perhaps the best way of characterizing this effect is “plastic.” Yet our eyes see and interpret lines and colors  having smooth transitions.  If you want to produce images that most closely mimic what our eyes and brains see, you must capture the subject using an analog technology, not a digital one.

This list is a start. While digital technology has given us the ability to take and share pictures so much more easily than before (and this is a good thing, much like the Kodak Brownie introduction in 1888), digital’s popular adoption for fine art photography, and especially for landscape photography, has so far been overwhelmingly bad. As the technology develops further it may overcome its present limitations for capturing subjects having wide latitude, with minimal noise, and excessive “plastic” character.

But that day isn’t here….. yet.

Subscribe to our mailing list

* indicates required

Email Format

View previous campaigns.


We can learn a lot from other artists

As a developing photographer, I found it very difficult to find advanced lessons in color theory, composition, and artistic design related to the art of photography.  EVERYBODY seems to want to talk about photography gear…cameras, lenses, software, etc., etc. Likewise, articles and books that discuss the basics of photographing are abundant. But once you’ve grasped the basics, where does a photographer turn to learn the advanced techniques so critical to becoming an accomplished fine art photographer??

I’ve mentioned before that I’m not formally trained… what I know I learned from other photographers/artists and by experimentation with my own work. Lots of experimentation.

I decided some time ago that I wasn’t going to find what I needed to know about ‘what makes a great fine art photograph‘ by reading photography magazines and photography web sites (a few exceptions aside). So now I spend more time reading blogs and newsletters that cater to fine art painters than I do to those that cater to photographers. I’ve found I can learn a lot from advanced artists, regardless of which tools they use to express their art.  

From painters: neutral whites and grays, being devoid of color (by definition), typically fail to add anything to a colorful presentation of a  landscape scene, a bowl of fruit, or even a portrait. In real life, shadows are rarely dark neutral gray or pure black and whites are rarely neutral light gray or pure white–shadows and highlights are affected by surrounding colors. Painters think about the various hues (colors) and values (‘lightness’) that their shadows and highlights must have to produce the intended emotion in their paintings before they even paint the first brush stroke.

What can we photographers learn from this? After all, this appears to conflict with the common, albeit important, basic rule of photography to white balance our photographs to reduce tinting artifacts that might appear otherwise. Unless intended for artistic reasons, a tinted photograph will more likely be accepted as distracting/disturbing instead of pleasing.

So we all white balance our photographs. And the way we do this is to find a subject in our image that “should” be without color, and remove all color from that subject, which then removes the same color globally from the image. This makes everything balanced colorwise. Whites are neutral white and grays are neutral gray, just as they should be, right?

Well…..sometimes this is right, but it may come at a cost to your creation. As fine art artists, we need to consider color confluence as Lori describes in her article. I do, and have for a long time, so let me describe how I approach this lesson with an example.

Morning light is typically warm on the landscape, and shadows are deep and cool (meaning they don’t get much of the direct warm sunlight). Under these conditions, there is no single best white balance…any setting you use will compromise the other end of the spectrum. So balancing on the cloud tops produced the resulting image below. It is generally cold, comprised largely of cyan and blue green, with just a weak hint of the warm sunlight that inspired me to capture the image in the first place.

  As photographers, we should to be aware that rarely are shadows and whites truly neutral in the environment. Neutral subjects pick up the colors of surrounding articles, even sky. We can create images of much greater impact and beauty if we exploit this lesson. Let’s not be victim to the dumb white balance algorithms in our cameras/ scanners.

The other lesson I want to return to is that fine art photography is, in fact,  art. I continue to learn more about creating art from fine art painters as I do from fine art photographers. Go where the lessons are, and your photography will reap the benefits.

If you enjoyed this article, please let me know by creating a comment and ‘liking” my FB page here:

And subscribe to my Free Articles from “Under the Darkcloth” using this link.

Best regards,

Jim

Using film in a digital world…not such a strange thing.

My mother-in-law, a wonderful person, has always enjoyed taking pictures. Her first camera was a Kodak Box Camera when she was a little girl. She’ll turn 89 this October. I’ve rarely seen her without a camera since I’ve known her these past 39 years.

Today she owns two cameras, one a digital and the other a film 35mm. She’s had the film camera for many years; the digital was a recent gift. So guess which one she uses the most: Her favorite is the film camera. She’s hardly used the digital.

Most of us take the differences between digital and film workflow (meaning the procedures necessary to generate a picture for viewing) for granted. We’ve either grown up with computers or have been using them long enough that the use of computers to capture digital images, print them, mail them, etc is no big deal. But to someone in my mother-in-law’s generation, accepting that the picture you just snapped now resides on a small “chip” in the camera that you then have to somehow get into another device that can print it….well, that can be a big hurdle. Especially when they know how easy it is to snap the picture and take film to the drug store for processing and printing. Her biggest problem today is finding a place that sells film. So I recently hooked her up with my preferred film supplier, B&H Photo in NYC (www.bhphotovideo.com). Now she can just call them when she needs refills on film.

Wait. Did he say “his preferred film supplier??” Yes, I did. You see, I shoot more film than digital, even though I have a perfectly capable digital camera (a Nikon D200) and I know digital workflow inside and out. Nor am I an octogenarian like my mother-in-law. I’m a mere quintagenarian (is that what they call “50 somethings?”).

So why am I using film in this digital age?

I get that question alot from my photography friends, usually it comes with that “what a dinosaur” look to their faces. To be honest, sometimes even I wonder why I’m hanging onto this 20 Century technology, and am tempted many times by the simplicity and ease of using a fully digital workflow. Yet, I haven’t, and likely never will, give in to these temptations. Why not? Here’s my top six reasons:

1. I get higher quality images using film. With film, I get better resolution than my 10mp digital camera when I need bigger prints. Film lets me capture a much longer scale with film- I strive to capture in my images both deep shadow details and sunlit cloud details, a look that I adore in photographs. There are technical reasons why, but digital sensors aren’t as sensitive at both shadow and highlight ends of the light scale to create the same tonal range as film.

2. I never have to worry about electronic failures that cause me to lose my images forever. Erased files, hard drive crashes, card failures–not a worry to me with film. Once I get the film developed I have it forever to rescan.

3. Film is extremely flexible since it’s a Write-Once-Read-Many format. For a single negative, I can scan it into digital form an unlimited number of times. I can scan it to 10mpixels for routine web or small print presentation, then later rescan them to 35mp (35mm negatives) or 75mp (120 medium format and 4×5 large format films) in true 16bit color. Thus, I can create huge prints (40″ x 60″ or more) this way, and those prints are high quality prints comparatively free of pixelation or other “overenlargement” artifacts that we get with 35mm digital cameras. You can buy the larger format digital cameras, but the cost compares to buying a car. No thanks.

4. Shooting film slows me down when shooting and speeds me up when processing my images. When shooting, I take more time composing each shot and shoot far fewer pictures of the same scene. By slowing down when shooting, I realize a greater appreciation for the scene; I’ve taken more time to analyze what’s before me and what inspired me to stop in the first place. I enjoy shooting more because of this. When I shoot digital, I know I have space on my memory cards for over 700 pictures. So like most digital photographers, I just snap away, taking perhaps dozens of pictures of one subject. It can be argued that this is an advantage, and in some ways it is. But–and here’s where film speeds me up– when I get home my job of culling my film shots is quicker than it is with digital. After all, I have far fewer (but better) images to deal with. I throw away alot more of my digital shots. And when I throw them away, I mean I delete them from my camera and computer, never to be seen again (see #2 above).

5. I love working with film. After thousands of times doing it, I still get a thrill seeing the negatives (both B&W and color) when I take them from the wash and hang them to dry. I get another thrill when I scan (i.e., digitize) them. And I always have the thrill when printing, which is my preferred way to present my final images. Yes, developing and scanning film is more work (actually I consider it play), and it takes experience to develop a reliable workflow for developing and scanning, and a bit of cost. But to me the thrills are worth the effort of working with film. I agree such hands-on approach is not for everyone. But, you don’t have to do it this way to use film (keep reading).

Like many professional fine art photographers, I use both film and digital cameras. While I prefer film for most of my professional work, I will use my digital camera when:
– it’s the only camera I have with me (this is ALWAYS the best camera available: the one you have with you!)
– when I don’t trust myself to make the right exposure. I sometimes need immediate feedback after I shoot the frame (we call it ‘chimping’). Sometimes it’s difficult to meter sunrise/sunset conditions or when shooting into the sun, so rather than miss the shot I will shoot it with digital, making adjustments and multiple shots until I get it just right. One day I hope to learn a better way.
– related to the point just above, I use my digital camera like photographers-of-old used polaroids, to evaluate a shot before investing the time to set up the big cameras.
– when I am shooting subjects for which I don’t expect to need large, high quality prints. These include corporate work, family shots, social events, and such.
– when I want (or need) a quick product– this doesn’t happen very often and it’s usually a matter of preference rather than need. Sometimes I just want to post a pretty picture on my Facebook page to say “look what I saw today!”

A digital camera is a great invention for many of our picture-taking situations. But it’s a mere rumor that “film is dead.” In many ways, film is superior. In a few ways, digital is superior. If quality and flexibility is important to you, film is the way to go.

I use 35mm, 6×7 medium format, and 4×5 large format film cameras in my work. You can still take rolls of 35mm to your local Costco or CVS Store and pay about $1 per roll for them to develop. They will scan it  at 2400 ppi for about $3 per roll of 36.

So try this. Chances are good that you have a 35mm film camera sitting in a drawer somewhere. Dig it out and shoot a few rolls of film. When you get the prints back (or have your developer scan them to CD for you), compare the pictures with your more recent digital camera shots. I think you’ll be amazed at how much better film captures the essence of your experience. We’re so accustomed to seeing blocked out whites in our digital pictures today that I think we’ve lost appreciation for those delicate soft wispy whites and very fine tonal changes that our eyes actually see. Film is much more capable of capturing those attributes.

Let me know if you’re happy with the result. If you are, keep the film camera handy, chances are you’ll be using it more and more.

Happy shooting.

Jim