Wet Mount Scanning: The Undermount – Overmount Dilemma

Lowcountry Cypress, J. Riley Stewart, High resolution 40×32″ fine art print.

Let’s talk about different ways to wet-mount negatives on a scanner for the best scanning results.

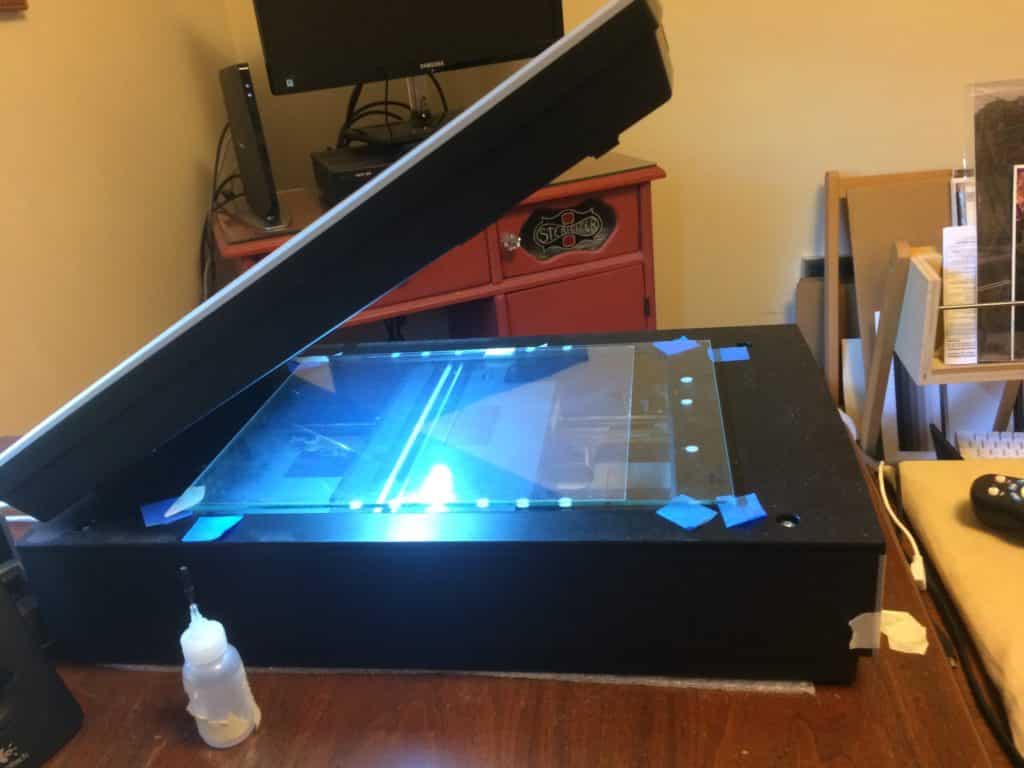
For years I’ve been scanning my 35mm, 120, and 4×5 negatives using a wet mount workflow, using either a drum scanner or an Epson V700. I made the move to wet mount on my V700 following testing that indicated a slight improvement in image resolution, a slight lessening of dust spots, and since I could wet mount sections of 120 size film easier than using the native MF carrier.  Plus, after a bit of practice, I realized that wet mounting was just as easy as anything else.

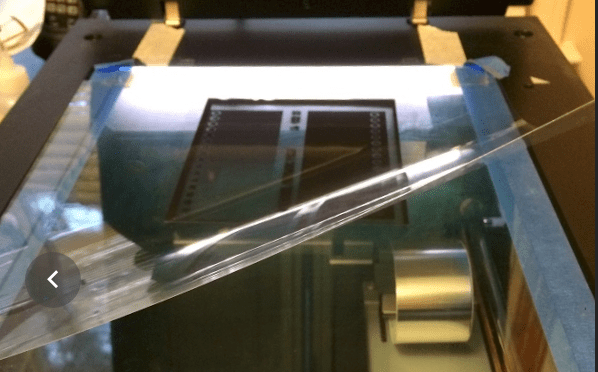
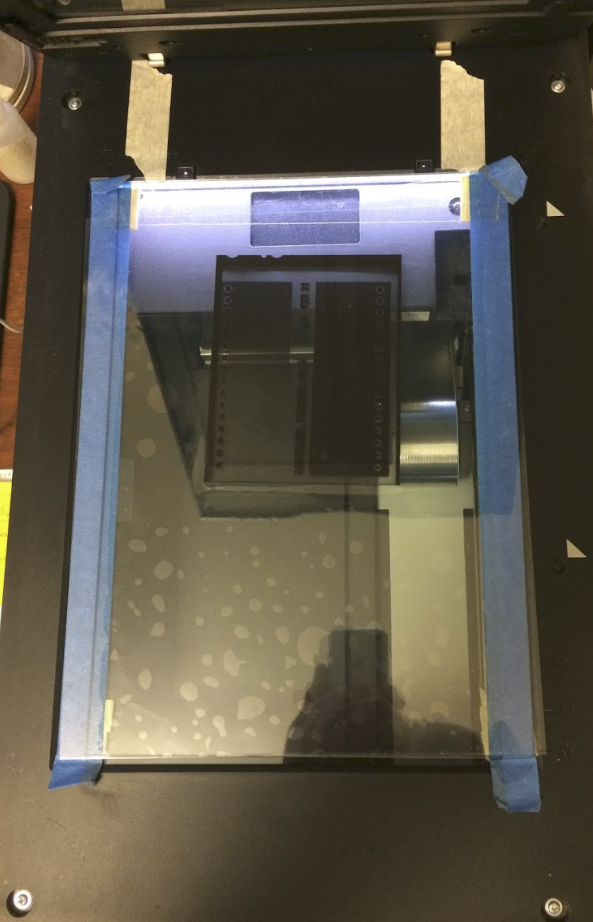
To wet mount on any scanner, you need a mounting base (i.e., platen), the negative, mounting fluid, and a clear cover sheet. I use Kami wet mount fluid and high grade mylar cover sheets, both from Aztek. The film lies on a rigid platen. Between the film and platen is applied a thin coat of mounting fluid. Over the film lies the cover sheet. Between the film and cover sheet is a thin coat of mounting fluid. This set up provides an optically correct path for the illumination light to pass through the negative to the sensor, with (ideally) no diffraction and reflection as it passes through the platen, mounting fluid, or mylar.

Since any disruption to the light path could affect resulting image quality, carrier system design (i.e., platen, fluid, and cover) must minimize their inherent bad effects on  image quality. Thus, it’s worth talking about undermounting vs overmounting on a flat bed scanner.

By far, the drum scanner does the best job, but that’s because drum scanners use adjustable apertures and photomultiplier tubes instead of CCD sensors to record the data from the negative. Like flatbed scanners, drum scanners use a carrier system of platen (usually made of acrylic), fluid, and mylar to hold the negative during the scan.

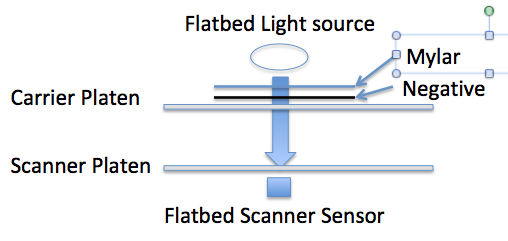
How you sequence the  light source->>sensor is fixed when using a drum scanner. The sequence is always source->platen->negative->mylar->sensor. 

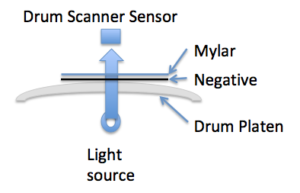
When applied to a flatbed scanner, this same sequence is referred to as undermounting, i.e., the negative is illuminated by the light source after the light has passed through 1 pane of glass (i.e., the negative carrier glass or platen) then the negative, the mylar, and finally the scanner’s platen glass before reaching the sensor. 

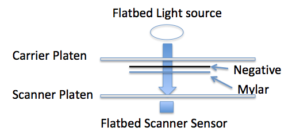
But typically, most negative carriers adapted for wet mounting employ the overmounting sequence, i.e., source->mylar (or cover glass)->negative->carrier platen> scanner platen-> sensor.

For my own work, I’ve adapted my V700 to permit wet mounting as described here and typically use the undermount method.

Betterscanning(TM) offers a new wet mounting carrier for the Epson V7xx/V8xx scanners and claims that with under mounting  “.. sharpness can be improved compared to other methods.”

I was intrigued about the undermount vs overmount dilemma and its potential difference on resolution of the resulting image.  Theoretically, either overmounting or undermounting wouldn’t seem to affect resolution. The single largest factors on a scanner’s ability to record with precision is the size of the light source (which is fixed on a flatbed scanner) and light scatter (a collective term to account for diffraction and reflection of light) between its source and the sensor.

Whether you overmount or undermount, the potential light scatter is the same (i.e., 2 layers of glass, 2 layers of fluid, the negative, air spaces, and the mylar. Resolution should (theoretically) be the same. But it’s possible that undermounting might be better if the mylar has significantly less post-negative scatter of the data then the carrier platen.

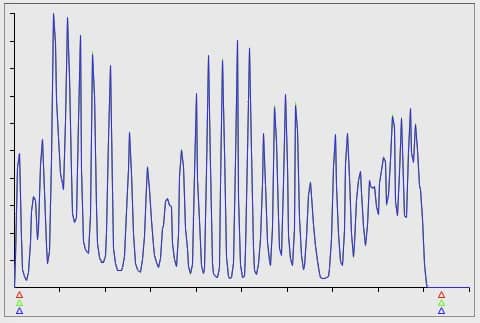
I wondered how much difference this phenomenon would make on my own V700 (wet mount with Kami fluid; neg mounted to plate glass with a  mylar overlay), and film planes equal at focal distance of my scanner. I scanned part of the film mark from a sheet of TXP 320 both ways (VueScan) at 4800 ppi. This is a screen shot from a LR comparison of the two scans; 100% view; no sharpening. On the left is the overmount scan and on the right, the undermount scan. Conclusion: No appreciable difference in resolution. 

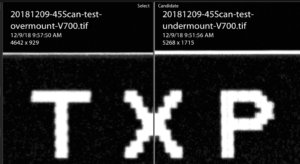
Undermounting may have other important benefits; perhaps to reduce chromatic aberrations, but it didn’t affect resolution in my short test. I’m still intrigued, tho, and will explore further.

Other possible reasons to explain a lack of difference between overmounting and undermounting might be that other factors are limiting resolution, regardless of the configuration of the carrier system.  In my case, that could include the quality of my carrier (a piece of window glass), and internal flare.

-Carrier platen: For years I used a plain piece of window glass as my carrier platen. Because of this study, I wanted to rule out its quality being a limiting factor in image resolution. So I bought the V700 platen assembly, which includes the platen glass and holder that screws into the scanner bottom (Epson Part #1432338 housing assy., upper (includes glass), then carefully removed the glass from the assembly and set the distance to the correct focal length of the V700 lens. I re-scanned several negatives using the new glass in an undermount configuration, and then compared the results between old and new carrier platens and between overmount and undermount techniques.

Conclusion:  The benefits of the new optical glass over the old window glass were subjectively insignificant. I could not compare overmounting and undermounting using the optical glass, but that comparison was already made using the window glass, and since the optical glass and window glass were the same, I would not expect any difference between the configurations using optical glass.

-Internal flare:  Some have suggested that internal system flare caused by extraneous light (from the illuminator) around the negative might affect data quality coming from the negative. It makes sense, and Betterscanning(TM)’s new system includes a mask to apply around the negative to reduce internal system flare.  I’ve tried in the past to mask negatives using my own device, but found that it made no difference in image quality.

I recommend you test your own system of wet mounting to see if undermounting, carrier platen quality, or masking makes a difference in your scans.

See more J. Riley Stewart images here.

Unlocking Your Scanner to Get Great Scans from Film

B&W fine art image of the Nez Perce River in Yellowstone NP
“A Moment on the Nez Perce” by J Riley Stewart

Why Scan Film?

This tutorial covers how I manage my film scanning to get every bit of tonal information from a negative and avoid clipped shadows and highlights, which ensures I get great scans from my film images.

Scanning film is a necessary evil if you shoot using film cameras and want to convert the film image into digital format for proofing, sharing to the web, making a digital negative for alternative processes, or for inkjet printing. Scanning film requires a special machine (a transparency scanner) that passes light through the film and to the scanner’s sensor, and records minute differences in density and color at millions of sampling points on the film, and records those differences in a digital file.

For some images on film, we can relay on automatic settings in scanning software to adequately read and convert the film image to an acceptable digital image. But there will always be those film images that fail miserably during scanning; automatic settings and presets just can’t provide a digital image that we can process into a fine image for printing or sharing. For those film images, we need to learn how to force the scanner and scanner software to do the best job possible to get all the useful information from the film. 

Software can make a big difference in user experience. I’ve tried Epson Scan®, SilverFast®, and VueScan®. By far, I’ve found VueScan is the most flexible and effective, and what I say below relates to its use. VueScan, because it includes so many controls for so many scanners, can be frustrating to use sometimes, but if you follow my workflow, and refrain from experimenting too much, you’ll be okay (I think). Try VueScan® here: (I have no association with it). I have no doubt that if all your negatives (color or B&W) are perfectly exposed and developed, you won’t need the advanced tools built into VueScan (however, it will take care of those too) and so the basic scanning software like Epson Scan will work fine. But there are those times when things don’t go as planned, and you’re left with a great composition on a crappy negative. That’s when you need the tools and the skill to get every bit of useful information from the negative before you can make a great image. I’ve compared Epson Scan to VueScan in scanning B&W film here. Take a read if interested.

Take Home Points

  • Scanning film is a craft that requires learning, but folks, it’s not rocket science. You don’t need a degree in scanning to get the job done. 
  • Scanning film is a technical task. There is little usefulness for creativity during scanning.
  • Don’t ask too much of your scanner and scanning software: it’s only good for one thing, and that’s to get every bit of useful information from the film image as is possible.
  • There is no reason a properly exposed and developed negative can’t be scanned without clipping any shadow details or any delicate highlights, even specular highlights. But to scan some film images, you must know how to control the scanner and its software.

Unleashing the power of the film scanner

The image above (“A Moment On the Nez Perce River”) is an example from a scene having extreme dynamic range that can give automatic scanner settings the fits. Automatic scanner settings will often assume a perfectly exposed negative, perfectly developed negative, a ‘common’ film or type of film, a ‘common’ type of scene, and/or it assumes you want sharpening, dust removal, color balance, resolution, and any number of other assumptions. Perfect rarely happens in real life photography.

Scanning film is a technical task. There is little room for creativity, so don’t try to make it that. But, because it’s technical, realize that you must control the machine (i.e., the scanner and its software) to get the most out of it. Luckily, controlling the machine isn’t difficult if you use the right scanning software. Like any consumer machine, its controlling software has built-in defaults and automatic settings for folks who just want something fast. If you’re serious about getting great scans, you need to know to turn off all/most of the built-in presets.

Effective Scanning Workflow (VueScan®)

Initial settings:

  I scan the negative as a negative, both for color and B&W films. I sometimes deviate from this with color negatives I’m having issues with, but that’s not common.  Here’s my initial settings in VueScan using my Epson V700.

  Using these settings, click <Preview> and it will give a quick scan of the negative converted to a positive (like normal). Here’s what I’m scanning. It’s a Kodak Tri-X negative that’s been exposed through a Stouffer’s Step Wedge®. The step wedge has a minimum optical density at step 1 of 0.05 and a max density at step 31 of 3.05 in 1/3 stop increments. So it can mimic a scene having exactly 10 stops of luminance range.  Much of this is altered by negative development, which I won’t discuss here. The step wedge is merely a tool I’m using here to give you a standard ‘negative’ to talk about. Development of the negative can alter the actual densities from those 10 stops of light (i.e., by pushing or pulling exposure and development). But you’ll notice that while the darkest step (Step 31) is nearly black, the lightest step (Step 1) is far from pure white. The Epson V700 scanner has the latitude to record the 10 stops of density on film, and so does yours, probably.

Now the fun starts. We’ll set the scanner to capture every bit of information from a negative having 10 stops of density range (and more).  

This is a histogram VueScan produces using these initial settings. You can change this histogram (and the resulting image) remarkably by adjusting certain settings. I’ll show you.

  The initial histogram produced an image from 0% Luminance (L) to Zone VIII (82% L) above film-base + fog (FB+F). Shadows are on the left; highlights are on the right, just like a normal histogram. I count 27 separate peaks, including all tones that are combined within the largest peak at the far left of the histogram. So, I’ve lost 4-5 stops in the shadow areas of the step wedge negative. If I printed this image as scanned, it would clip the darkest 6 zones or so to black. That’s not good enough for me, and it’s important to know that we can get more information from the shadows than the initial scan provided.

You probably know that film development modifies the overall contrast of densities on the film. The measure of contrast is called the Contrast Index (CI). The more development you give a specific film, the greater its CI will be, normally from 0.4 (low contrast negative) to 0.8 (very contrasty) or so. Vuescan includes  several models (target film profiles), including many that enable matching of actual negative CI to model CI for B&W films. Go into the <COLOR> tab and you’ll see you can change the target film profile to several “model” renderings. The initial histogram above shows a <Generic Color Negative> model even tho I’m scanning a B&W step wedge. 

  You can experiment with varying film models under the <Color> tab. I like the Kodak TMAX 400 model as it allows me to select different contrast index (CI) levels so that I can better capture the shadows and highlights. Below is exactly the same scan, but using a different setting in the <COLOR> tab.

  You notice the left and right side of the range are now completely inside the extremes (levels) shown by the little red-green-blue triangles. You can stop here and be assured you’re getting every bit of data from the negative, with plenty of room to adjust levels and curves in post without clipping.

  If I do anything beyond this, it’s to set RGB Exposure (<Input> tab) to move the film FB+F peaks as far left as possible without clipping any important shadows. I want to eliminate FB+F as it has no useful information. In other words, during scanning I want to “expose to the left,” just the opposite of shooting a digital camera. Remember that when scanning a negative, digital noise (if any) will occur on the far left of the histogram, where negative densities are least. So don’t be too aggressive about this setting; don’t move your deepest important shadows too far to the left. When done right, you should still still the FB+F peak.

Setting RGB Exposure in VueScan is the one of the pre-scan settings  (i.e, machine settings) you can select on the Epson Vxx models. VueScan is the only software I’ve tried that is able to direct the scanner to slow the light emitter bar based on the RGB Exposure setting.  All other adjustments you make in software is performed on the image after scanning it, similar to PS or Lightroom does, which adjusts pixels and can cause artifacts. So there’s value in adjusting the RGB exposure to fit the negative.

The other important machine setting enabled by VueScan is the R-G-B analog gain controls that can become important when scanning color films. Film models will often presume specific R-G-B gain settings, so you need to check to see if those settings are causing your histogram to ‘dump’ tones.

Below is the exact same negative scanned using 20% more exposure so that the film base plus fog (FB+F) falls as near to the left as possible: That first little peak is FB+F.

  To recap, I’ve selected a film model that gets the shadows away from the left edge so I can clearly differentiate their peaks on the histogram, then I’ve increased RGB Exposure to ease them back to the left without clipping any important shadows (FB+F is not important).

  This is where I stop and hit <SCAN>. It’s the best I can do with this negative under any circumstances. Granted, I may need to optimize my exposure and development of TXP to get the deepest shadows away from the film base.

I’ll give another example of an Ilford FP4 negative exposed through the Step Wedge and given my standard development for FP4.

The first histogram results by scanning the film using a <GENERIC FILM> preset. Note how both the shadows (empty areas + Steps 1-3 on left of histogram) and the highlights (Steps 29-31 and blocked areas on right of histogram) are not well separated. In a final image or final print, this “automatic” scan would have clipped shadows and highlights. 

The next histogram is from the exact same negative, but the settings have been explicitly set to optimize the output image file to separate the various step wedge densities. In this scan, the RGB Exposure was set to 1.12 to move everything (all densities) to the left. Then I chose a film model having a contrast index (CI) of 0.70 to best match the actual CI of the negative. You’ll see now that every one of the 31 steps of the step wedge is discerned in the histogram, and can therefore be realized in a post-processed image or print. No important shadows nor any highlights will be clipped in the image.

I hope this was helpful, and I hope it doesn’t sound too complicated; it’s really not. It takes some time to learn the essentials of scanning negatives, but once you’ve invested in that time, you’re good to make great scans forever.

 I wrote a tutorial on how to easily convert your flatbed scanner to do wet mount scanning without buying special holders. I can perfectly wet mount 2 strips of 120 or 2 4×5 negatives using this technique in about 30 seconds. Here’s the tutorial:

https://www.jrileystewart.com/blog/2018/03/02/easily-convert-your-flatbed-scanner-to-a-wet-mount-workflow/

Happy scanning!

Subscribe to my newsletter “Under the Darkcloth” here.


DIY: Convert your flatbed scanner to a wet-mount workflow

Wet Mount Carrier on Epson V700
DIY Wet Mount Carrier on the Epson V700 Scanner

This article describes a simple, cheap, and effective way to convert any flat bed film scanner to implement a wet mount scanning workflow. While there are commercial wet mount assemblies you can buy, this approach is just as effective.

I’ve been shooting on film for nearly 47 years. In 2010, I mothballed my wet darkroom and began scanning my negatives instead. Using this workflow, I’ve created and sold hundreds of large-scale high fidelity prints from 35mm, 120, and 4×5 color and b&w negatives.

I believe that before you offer lessons to someone, you should establish credibility in the topic. I’ve scanned thousands of negatives over the past 10 years. I invite you to explore my portfolio of my best images by going to my online gallery.

Now the lesson on how to make your own DIY Wet Mount Negative Carrier.

Facts:

  1. Wet mount workflow flattens the negative without causing Newton rings.
  2. Wet mounting negatives fixes them in place and prevents buckling/warping during a scan.
  3. Wet mount workflow reduces the problem of small dust particles and may eliminate water marks on negatives, making spotting less troublesome.
  4. Some wet-mount practitioners report greater resolution possible with wet mount scanning: Quite frankly, I haven’t seen that benefit.

Having used a drum scanner for months, I knew the benefits of wet mounting on scanning negatives. I also use an Epson V700 for everyday scanning. I’ve devised a method for converting the standard dry-scan workflow on the V700 to a wet mount that is very easy and works very well, and should work for any transparency-based flat bed scanner.

The Alternative in a nutshell:

1. Replace the manufacturer negative carrier with a piece of good window glass, acrylic sheet, or optical glass (preferred, but not critical). This will become your new carrier. 

2. Shim the new carrier so the surface where you mount your negative sits within the DOF of the scanner lens. On my Epson V700, that’s approximately 3mm or 1/8″ 

3. Wet-mount the negative on that surface for scanning and scan the negative as you normally do.

Materials:

  1. A piece of optical glass (or thick acrylic, which is just as good or better) cut to fit the platen of the V700. This will become your new negative carrier. I used plain window glass for this purpose before, but have since purchased a plate of optical glass (Epson Part #1432338 housing assy., upper–you’ll need to remove the glass from the assembly, but it’s not difficult) and found minor improvements in resolution.
  2. Optical mylar sheets, 8×10 or best size to fit the platen and mounting glass. *(Mine is 8×10). Get them here: http://www.aztek.com/ (also get Kami fluid, Kami tape there.)
  3. Thick tape, like masking tape, used for setting the height (shimming) of the new carrier.
  4. Optional: Thin tape that resists the fluid used to wet mount. TESA or Kami tape work well. This tape holds the mylar sheet to the carrier while wet mounting the negative(s).
  5. Fluid specifically for wet-mounting negatives, e.g., Kami fluid (or, some recommend lighter fluid, but I’ve never tried that). Kami fluid may seem expensive, but it goes a very long way if you are frugal with its use. (A very little goes a long way).

The following schematic shows what you are building (i.e., the new carrier) to mount your negatives. The distance between the Carrier Platen and the Scanner Platen is set using shims made from heavy masking tape. Regardless if you overmount or undermount, the distance between the Scanner Platen and the Negative has to be fixed and has to be within the depth of field (DOF) of the scanner lens.

Example of overmounting (relative to Carrier Platen):

Screen Shot 2018-12-10 at 1.09.49 PM

Or undermounting..

Steps:

  1. Clean the glass (i.e., the new carrier) with Windex or any glass cleaner.
  2. Tape the edges of the new DIY carrier to protect accidental damage to scanner platen during use. Apply one width of masking tape to each long side of the glass, both top and bottom. In the image below, I’ve used 1″ blue masking tape on both surfaces of the glass.  Include extension tabs at all four corners to provide a way to lift the glass as you work with it (these tabs become safety handles.) Never apply tape to the “home” edge (the edge that goes to the top of the scanner platen) as this may interfere with the scanner calibration area.
  3. Determine the height that the upper surface (if overmounting) or lower surface (if undermounting) of the carrier must be raised above the scanner platen to achieve critical focus. See: https://jrileystewart.com/blog/2017/04/10/easily-verify-the-focus-on-your-flatbed-scanner/. Or, simply measure the height of the film plane lip on your manufacturer’s carrier, assuming that it’s optimal.
  4. Set the height of the carrier: First, decide if you are going to use the Overmount or Undermount method, as the thickness of the glass carrier will dictate how much height adjustment is needed.
  5. a. If using Overmounting method: Using thick masking tape, apply as many layers as you need to the bottom of the carrier glass plate–at each corner– until the distance determined in step 3 above is reached. All four corners get exactly the same number of layers of tape. You will mount negatives to the upper surface of the glass (so called overmounting), so this has to be in critical focus of the Epson V700 or your own scanner. Shown below is one corner after several layers of yellow masking tape have been applied. Not pretty, but it works. Another way to determine how many layers of tape you’ll need is to measure as closely as possible the height of the negative shelf on your existing negative carriers, assuming they are set to critical focus already. Then keep adding layers of tape until the same height is achieved from the bottom of the tape to the top of the carrier glass. 5.b. Alternative: If the new glass carrier doesn’t fit inside the scanner platen window, sitting directly on the platen, you’ll need to adjust the height of the new glass carrier to place the underside of the carrier at the focal point of the scanner lens, and use the Undermount design. In my hands, this required several layers of tape placed directly on the top assembly of the V700. But any way to accomplish the same thing is fine.
  6. Wet  mount a negative: Again, clean and dust the top of the carrier glass. Then, using transparent Kami tape or TESA tape, tape a piece of mylar to the new carrier at the top edge only (this is the edge of the glass that sits nearest the top edge of the scanner platen, i.e., the sensor “home.”  The sheet  of mylar becomes the top overlay of the complete sandwich of your wet-mount apparatus, specifically, from bottom to top: the taped corners that act as feet to raise the mounting glass off the platen to the focal plain, the piece of mounting glass, the negative, and the acrylic overlay. The next image shows me lifting the overlay mylar off the negative, which is resting on the mounting glass, which is resting on the scanner platen.Screen-Shot-2018-03-02-at-12.12.38-PM.png
  7. See the complete apparatus resting on the platen in the following image (this depiction uses the Overmount design as the glass carrier fit inside the window of the V700 Upper Assembly window). The two pieces of yellow masking tape are merely guides to mark the edges of the effective scanning width of the V700 when using the higher resolution lens (which is all I use).

7. Mounting the negative. The negative is held in place by applying a thin layer of wet mounting fluid onto the mounting glass while you hold the mylar sheet up and away from the glass (I do this using one hand as I hold the overlay sheet and the negative at the same time. Then carefully lay the negative into the fluid starting with the top edge first, then slowly rolling the negative into the fluid. It needn’t be perfect. Then apply a thin layer of fluid over the negative as you roll the acrylic overlay over the negative. Finally, move any bubbles over or under the negative to the edges of the film using a non-abrasive cloth (like PEC or similar).


I hope this helps you to convert your flatbed scanner to a wet-mount workflow. I’ve been using this technique for a few years and find it very useful for 35mm, 120, and 4×5 negatives. I suspect it would also work well with 8×10 negatives, but I haven’t tried that. This would let you use the higher resolution lens of the V700 on 8×10, which may be an advantage.

Send questions / comments my way and I’ll be happy to discuss them.

J. Riley Stewart