Scanning Software Matters

This is a quick comparison of how VueScan and Epson Scan produce high quality images from negative film. I’m not a scanning or film services vendor; I’m just a film user who tries to get the most from his tools, and believes this information may be helpful to others who feel the same.

Introduction

You’ve gone to all the trouble to set the right exposure and composition in your film camera. You’ve been really careful developing the film. Now it comes time to scan the negatives, and it could all fall apart unless you know the ins and outs of your scanner software.

But that’s all automatic, isn’t it??  Isn’t all scanning software the same?

I admit it’s a rhetorical question. Of course they’re not the same, in some of the most important aspects, including the ability to fully manage the scanner and make it do what you need  it to do: Get all the detail possible from the negative without clipping (or dumping) the shadows and without clipping the highlights.

Well, you say, if the exposure is perfect and the development is perfect, won’t any scanning software accomplish the same thing? And my reply is… theoretically. But anytime you deviate (intentionally or unintentionally) from the ideal situation, such as pulling or pushing film, or departing from normal development time or temperature (or developer formulation), or missing the exposure reading by a 1/2 stop or so because of an aging light meter, then all bets are off. So you need a scanning software program that can direct the scanner to ‘record’ all the grains of silver in as many situations as possible. Or, you can continue throwing useful negatives away based on imperfect scans.

If you think about all the images (and/or negatives) you’ve trashed because the shadows were dumped or the highlights clipped once scanned, it might be time to question your scanning software and how you’re using it.

But first, you’ll need to trust that most modern scanners are highly capable machines. My 10 year old Epson V700 (rated at DMax 4.0) can easily record tonal differences between film base + fog (FB+F)(0% Luminance, L) and an adjacent shadow luminance of 0.1% L. It can record differences in the highlights contained WITHIN the brightest specular highlight, recording separate tones on a negative within a specular highlight of 100% L at the center and 99.7% L from a peripheral area of the same specular highlight. The dynamic range of my V700 easily records metered values from 2EV (I’ve got a bit of flare in my Sekonic meter) and >18 EV, and it’s all captured on my negatives and, most importantly, in my scanned images.

Of course, such fine differentiation won’t matter in a print except to create smooth tonal transitions and discernible shadow and highlight textures, which are important to fine art prints of large size. If your scanner (or how you’re using it) can’t differentiate very fine differences (which are actually delicate transitions) in film densities on the negative, no amount of processing and/or printing expertise will overcome that shortfall.

Let’s compare scans from VueScan® and Epson Scan®.

I know lots of photographers who use film. I know none (except myself) who use VueScan (from https://www.hamrick.com/).  Most if not all of them use Epson Scan that came with their scanner.

Before I get into this, let me say that I’m not associated with VueScan nor Epson in any way. What I share here is only from the perspective of a user, okay?

My strong preference is for VueScan because of its much greater capability to direct the V700 (or many other scanners) to read negatives having vastly different levels of density, contrast, color, and grain structure. I’ll cover some of those capabilities below.

I have rarely used Epson Scan. I think it’s grossly simplistic and constraining to users who want to get the most from their negatives. And even though its User Manual doesn’t even cover any of its so-called advanced adjustments for levels or curves, I’ve experimented enough with them to feel okay about sharing my experiences with Epson Scan.

On the contrary, I’ve used ViewScan for years, and have scanned several hundreds of negatives, both B&W and color. Its User Manual is thorough, and it needs to be because of the comprehensive range of settings available for a great number of scanner models. I’ve already covered my basic approach to getting the most from my negatives in this article, so I won’t go into them again. Regardless, my approach is merely a starting point and you’ll want to experiment and develop your own workflow.

For this article, I’ll use a single negative having an extreme range of subject brightness (EV -5 to +6, not including specular highlight reading). I scanned the same negative using both VueScan and Epson Scan, each optimized to record as much of the density range in the negative as possible.

The scene is test scene I use routinely to quality check my workflow. I’m lucky to have a pure white van. When  I open the rear doors on a sunny day, I get a composition having a full scale of brightness ranges, from the deep shadows within the van to the bright highlights (including specular highlights) on the exterior. I exposed TMY rated at 400 by metering the passenger seat up front and placing that EV on -2 (i.e., Zone 3). The brightest reflections from the white paint, not including the linear and specular highlights fell on EV +6 (i.e., Zone XI) using my Sekonic 758. Of course, the specular highlights, if I were to try to measure them specifically, would likely fall around EV +9 or above (or Zone 14).

Below is a picture of the scene and the negative made from it. The luminance range was extreme: from fine shadows in the cargo area of the van to very high and specular highlights on the sunlit areas of white paint. The goal in exposure, development, and scanning is to retain every bit of density range above the film base + fog into useable information for processing the negative, without clipping!
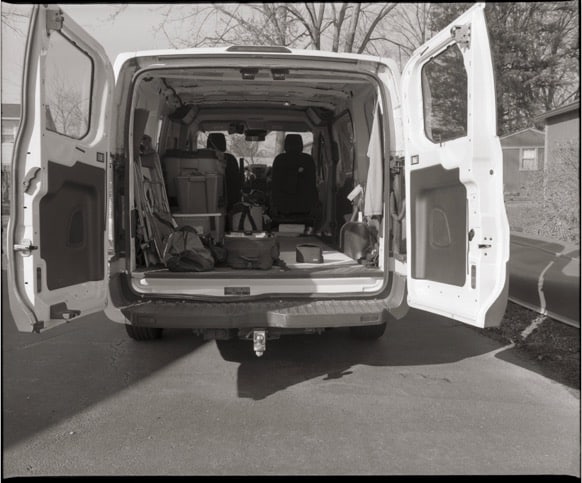
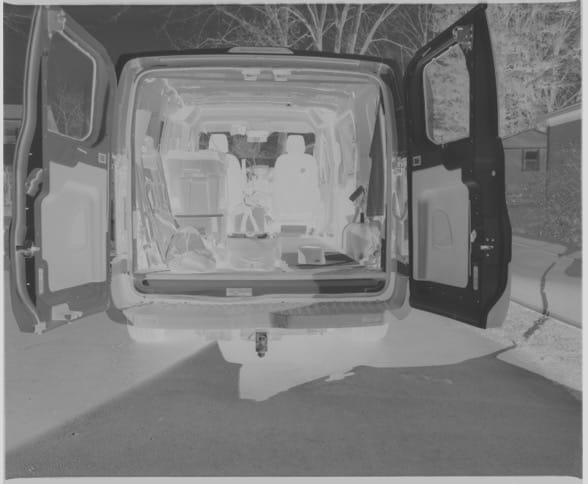
Test Image having wide range of subject brightness and dynamic range
Test Image
Test negative
Test negative (TMY rated at 400 ASA, developed in Gainer’s PC at 100%, 75 deg F, 6 min)

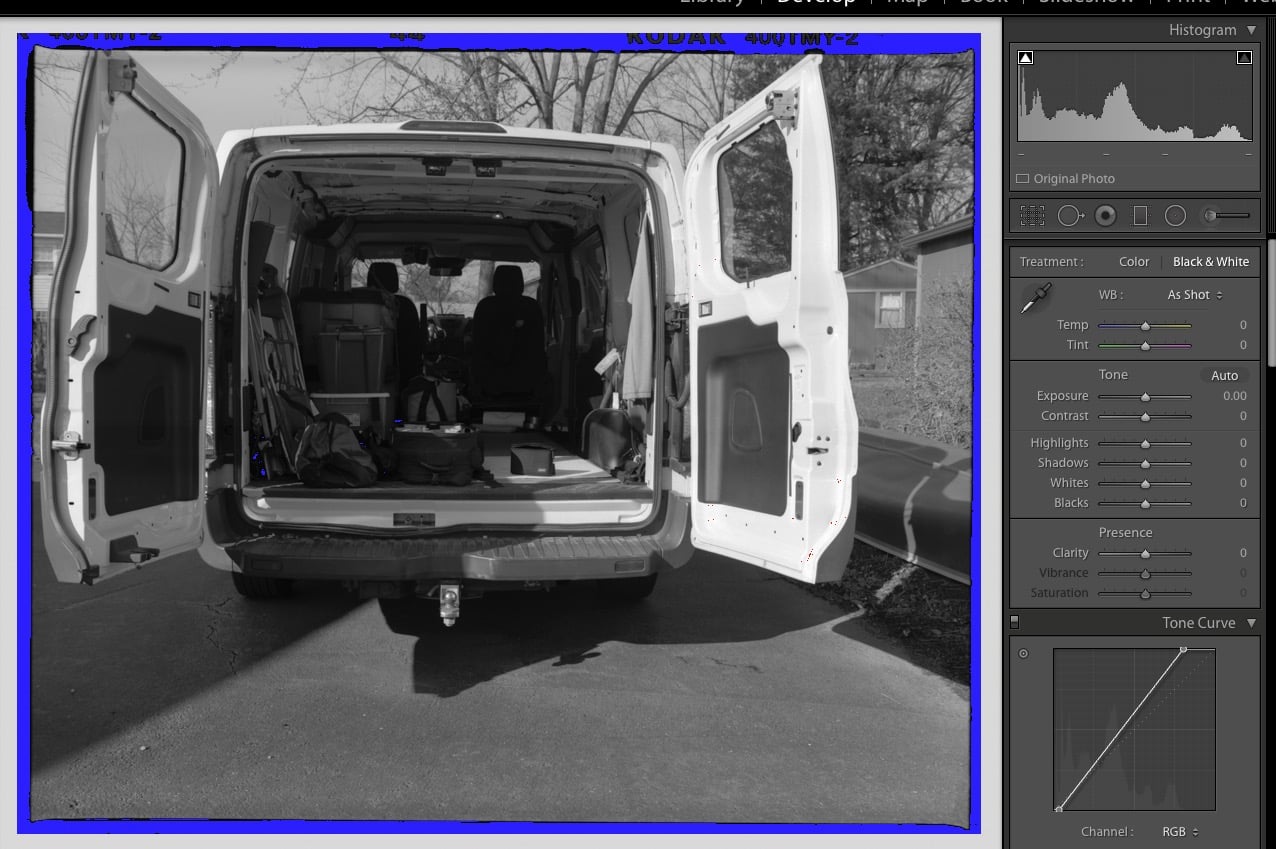
Ok, it’s a difficult negative due to the extreme density ranges, but let’s compare the optimized scans using VueScan and Epson Scan to see if there are significant differences in the image produced.


VueScan Record
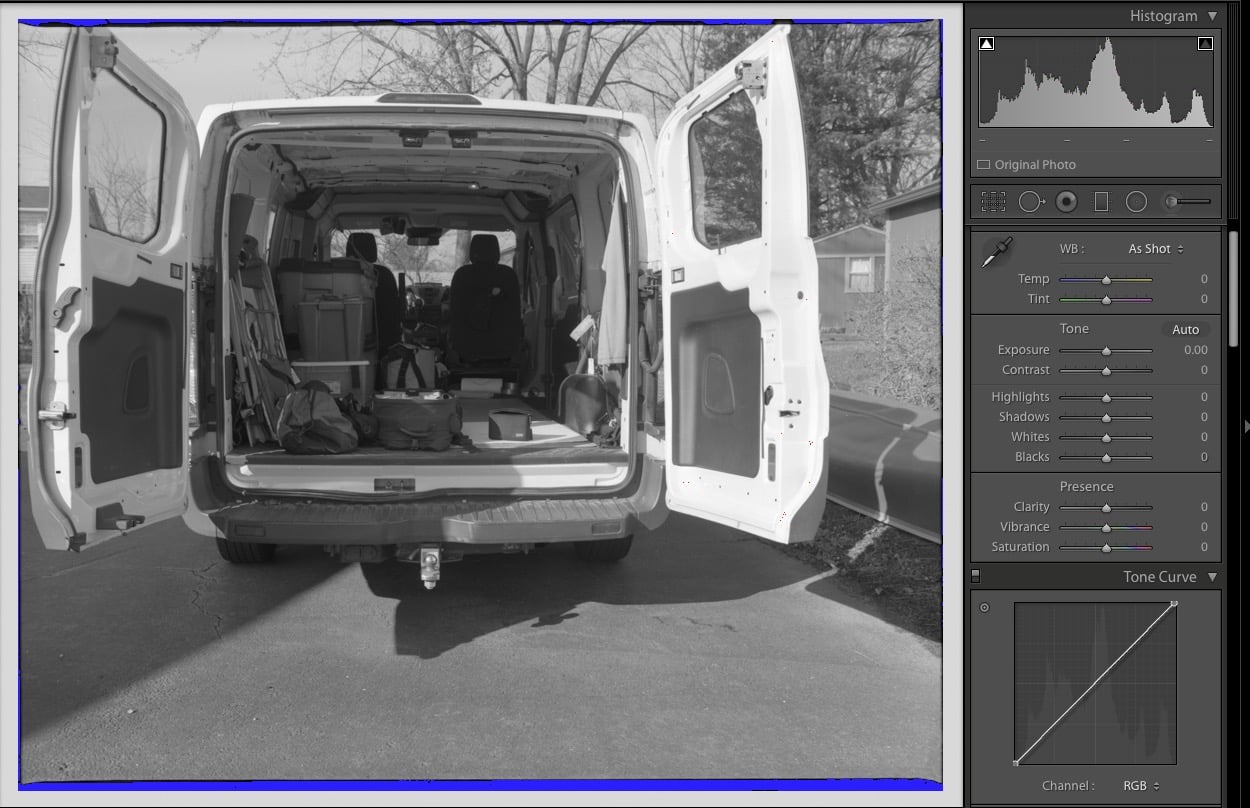
Epson Scan Record
 

Shadow Detail Results
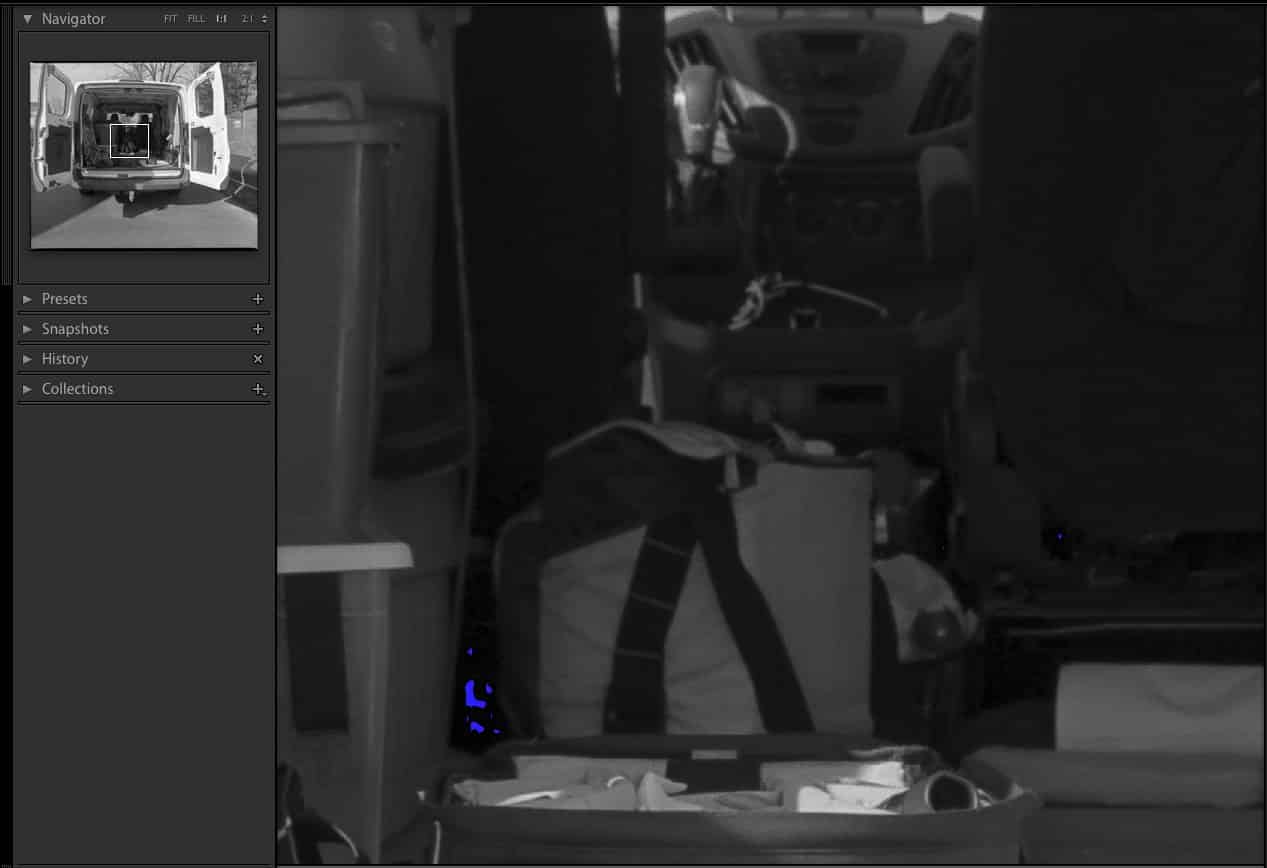
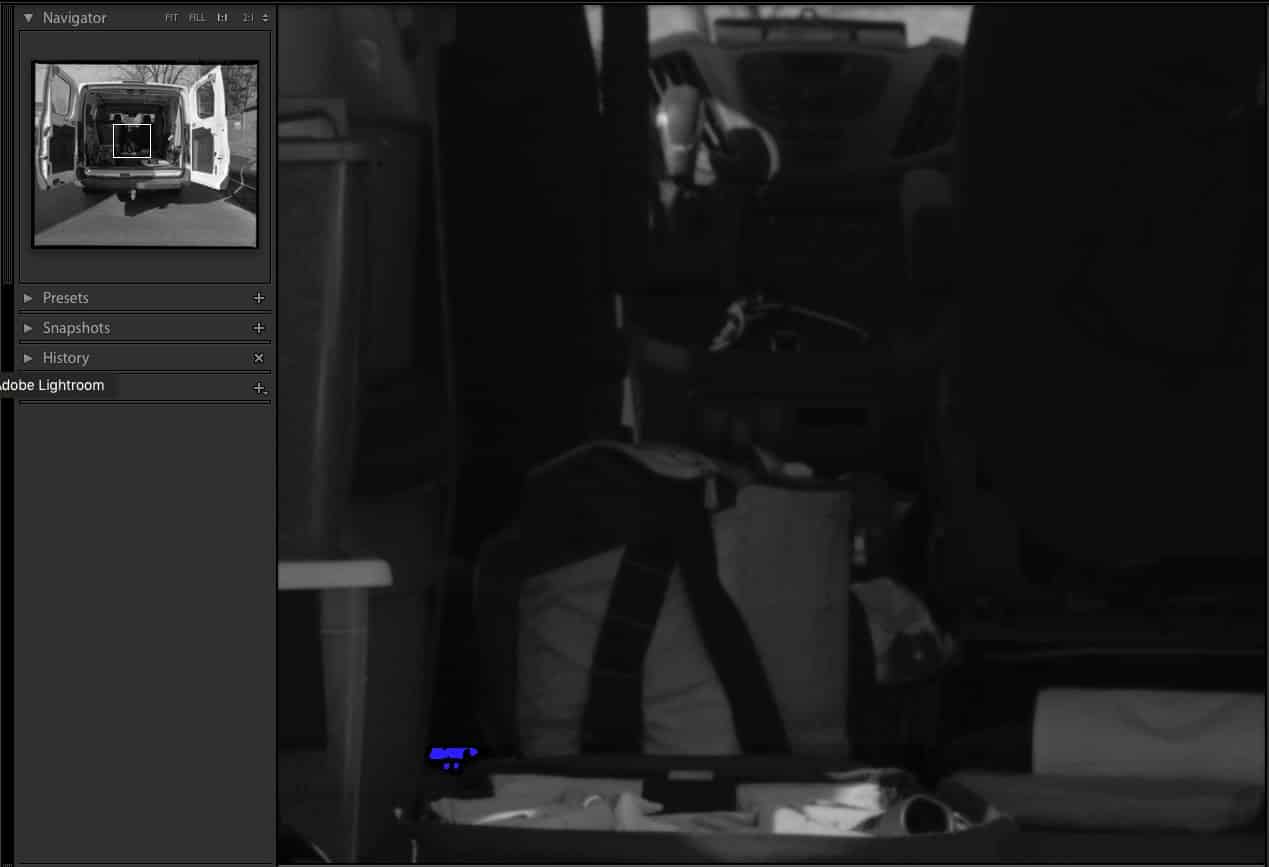
Shadow detail (1:1) from VueScan scan. Blue areas indicate clipped shadows created by selectively setting black point to allow direct comparison. Inset shows area of original image.
Shadow detail (1:1) from EpsonScan scan. Blue areas indicate clipped shadows created by selectively setting black point. Inset shows area of original image.

Comparison

Even though the levels and histogram settings for both scanning software was intentional to avoid clipping black and white points, this was much more difficult using Epson Scan due to its user interface (or perhaps my inexperience with Epson Scan). Regardless of the fact that I had to adjust levels in LR6 to make a comparison to the VueScan image, it was clear that Epson Scan compressed shadow detail, even to the point of losing details below Zone IV.  While the histogram for the VueScan image was nicely evenly spread out, the histogram for the EpsonScan image pushed nearly all shadow densities to the left.

The effect of this was particularly obvious in the 1:1 details of the same shadow area on the negative. Compared to the VueScan image, the tones of the passenger seat back and much of dashboard became completely featureless. Note these values weren’t clipped, merely compressed, by Epson Scan.

Both Epson Scan and VueScan treated highlights about the same. VueScan treated the highlights with slightly less aliasing of the grain clumps, creating more pleasing transitions across highlight tones.

Wrapping Up

If I were a photographer tied to Epson Scan as my sole tool to convert negatives into digital images, I probably would have thrown the test image described in this article in the trash after scanning it. Even after adjusting levels and curves to get the most information from the negative, Epson Scan’s inability to record shadow densities gave poor results. Where my light meter differentiated relative exposure values (rEV) between 0 (Zone V) and -3 (Zone 2), Epson Scan dumped Zone V to Zone IV and compressed Zones III, II, and I all into about Zone I (no discernible detail). This is a subjective conclusion more than objective.

Being confronted with the Epson Scan result, a smart photographer would go back to his ISO and film development workflow to try to get better separation of the shadows by shooting at less than film box speed and tweaking development time to compress highlight densities to avoid clipping. Sound familiar?

It’s possible that so many photographers recommend shooting film at 1-2 stops less than box film speed is because of scanning failures more than shooting failures. Without being able to fully control the scanner, via the right software, you’re left with settings and electronic algorithms developed by engineers, not photographers, and they develop them based on rather ideal shooting/developing scenarios that are actually quite rare in practice.

I used this extremely challenging scene to learn more about the differences in scanning between VueScan and Epson Scan scanning software. The negative was perfectly exposed and developed. The scan using VueScan was fairly straightforward and required very little adjustment to my normal scanning workflow. It gave me a image having useable information from Zone 1(L*=4.4) to Zone X (L*=100). The negative itself did not challenge the capacity of the scanner to record this wide range of densities (i.e., no clipping low or high).

This direct comparison between VueScan and Epson Scan indicated a couple things. First, the two software programs do not read or record the same negative equally, even after optimizing the levels pre-scan. Second, built-in settings are locked from the user in Epson Scan. Unlike Epson Scan, VueScan permits directing the scanner to adjust Exposure, RGB Gains, Film base colors, and Image color to tailor the scanning process to any individual negative. This flexibility is a great enabler when scanning any challenging negative.

The most obvious explanation for the difference between EpsonScan and VueScan might be their use of a different gamma correction built into the software, but I think it goes way beyond that. I’m working on a Mac and routinely rely on the native Mac gamma setting of 2.2.  Adjusting the VueScan curve in LR to represent a decreased gamma created a histogram much like the Epson Scan histogram. However, adjusting the Epson Scan curve in LR to mimic the VueScan histogram was not possible. The lost detail in the deepest shadows was still missing, and the shadow contrast too severe. It might be that an adequate correction before scanning in Epson Scan could give better results.

I’ll leave you with this:  Get to know your scanning software; scanning software matters. If your current program doesn’t let you manually adjust settings like Exposure, Levels, Curves, RGB Gains, FB+F color, and Image color, try VueScan or other program that does. Modern scanners are highly capable machines, but if you’re tied to an engineer’s guess as to what you actually need, you may not be getting everything you paid for, or that you need.

 

Wet Mount Scanning: The Undermount – Overmount Dilemma

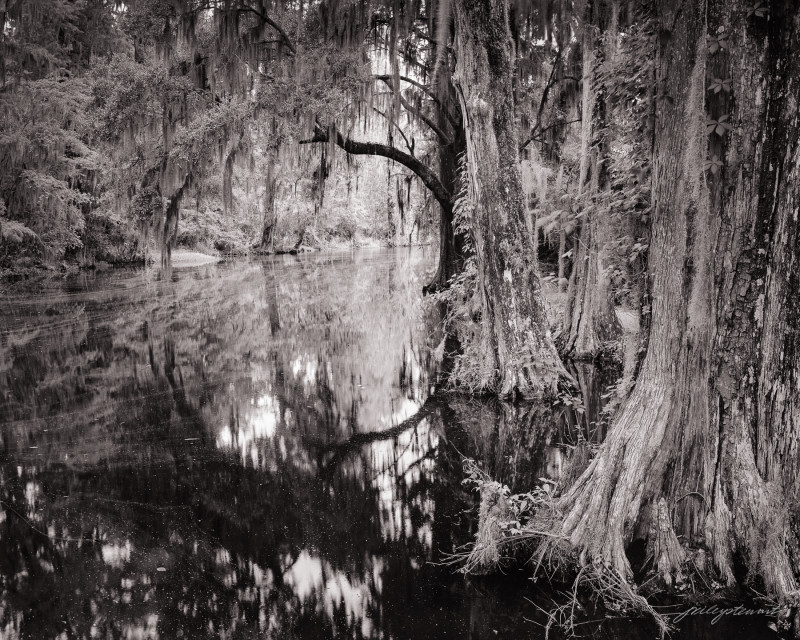
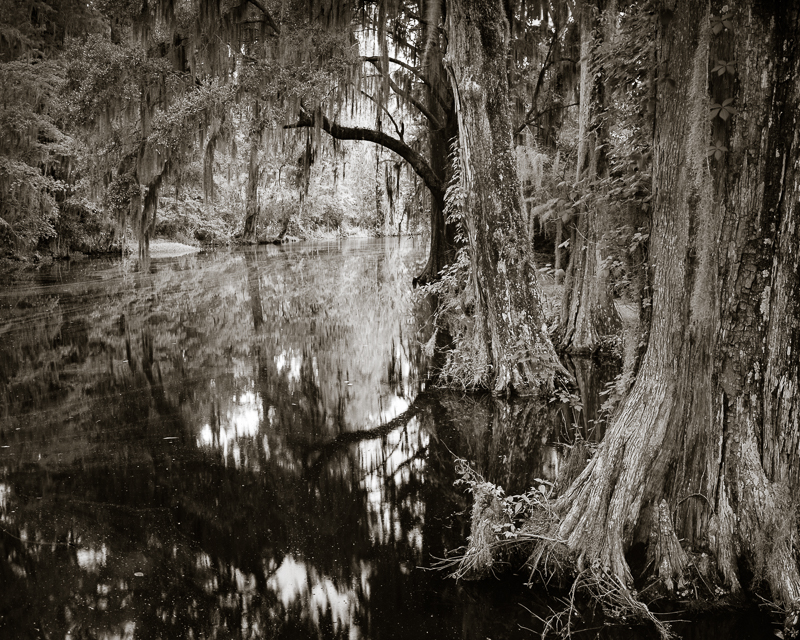
Lowcountry Cypress, J. Riley Stewart, High resolution 40×32″ fine art print.

Let’s talk about different ways to wet-mount negatives on a scanner for the best scanning results.

For years I’ve been scanning my 35mm, 120, and 4×5 negatives using a wet mount workflow, using either a drum scanner or an Epson V700. I made the move to wet mount on my V700 following testing that indicated a slight improvement in image resolution, a slight lessening of dust spots, and since I could wet mount sections of 120 size film easier than using the native MF carrier.  Plus, after a bit of practice, I realized that wet mounting was just as easy as anything else.

To wet mount on any scanner, you need a mounting base (i.e., platen), the negative, mounting fluid, and a clear cover sheet. I use Kami wet mount fluid and high grade mylar cover sheets, both from Aztek. The film lies on a rigid platen. Between the film and platen is applied a thin coat of mounting fluid. Over the film lies the cover sheet. Between the film and cover sheet is a thin coat of mounting fluid. This set up provides an optically correct path for the illumination light to pass through the negative to the sensor, with (ideally) no diffraction and reflection as it passes through the platen, mounting fluid, or mylar.

Since any disruption to the light path could affect resulting image quality, carrier system design (i.e., platen, fluid, and cover) must minimize their inherent bad effects on  image quality. Thus, it’s worth talking about undermounting vs overmounting on a flat bed scanner.

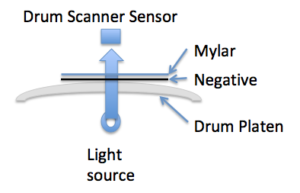
By far, the drum scanner does the best job, but that’s because drum scanners use adjustable apertures and photomultiplier tubes instead of CCD sensors to record the data from the negative. Like flatbed scanners, drum scanners use a carrier system of platen (usually made of acrylic), fluid, and mylar to hold the negative during the scan.

How you sequence the  light source->>sensor is fixed when using a drum scanner. The sequence is always source->platen->negative->mylar->sensor. 

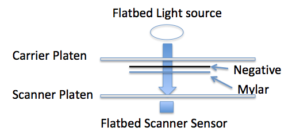
When applied to a flatbed scanner, this same sequence is referred to as undermounting, i.e., the negative is illuminated by the light source after the light has passed through 1 pane of glass (i.e., the negative carrier glass or platen) then the negative, the mylar, and finally the scanner’s platen glass before reaching the sensor. 

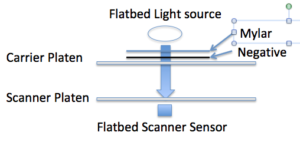
But typically, most negative carriers adapted for wet mounting employ the overmounting sequence, i.e., source->mylar (or cover glass)->negative->carrier platen> scanner platen-> sensor.

For my own work, I’ve adapted my V700 to permit wet mounting as described here and typically use the undermount method.

Betterscanning(TM) offers a new wet mounting carrier for the Epson V7xx/V8xx scanners and claims that with under mounting  “.. sharpness can be improved compared to other methods.”

I was intrigued about the undermount vs overmount dilemma and its potential difference on resolution of the resulting image.  Theoretically, either overmounting or undermounting wouldn’t seem to affect resolution. The single largest factors on a scanner’s ability to record with precision is the size of the light source (which is fixed on a flatbed scanner) and light scatter (a collective term to account for diffraction and reflection of light) between its source and the sensor.

Whether you overmount or undermount, the potential light scatter is the same (i.e., 2 layers of glass, 2 layers of fluid, the negative, air spaces, and the mylar. Resolution should (theoretically) be the same. But it’s possible that undermounting might be better if the mylar has significantly less post-negative scatter of the data then the carrier platen.

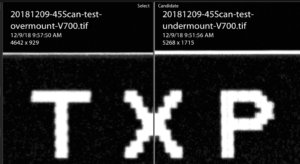
I wondered how much difference this phenomenon would make on my own V700 (wet mount with Kami fluid; neg mounted to plate glass with a  mylar overlay), and film planes equal at focal distance of my scanner. I scanned part of the film mark from a sheet of TXP 320 both ways (VueScan) at 4800 ppi. This is a screen shot from a LR comparison of the two scans; 100% view; no sharpening. On the left is the overmount scan and on the right, the undermount scan. Conclusion: No appreciable difference in resolution. 

Undermounting may have other important benefits; perhaps to reduce chromatic aberrations, but it didn’t affect resolution in my short test. I’m still intrigued, tho, and will explore further.

Other possible reasons to explain a lack of difference between overmounting and undermounting might be that other factors are limiting resolution, regardless of the configuration of the carrier system.  In my case, that could include the quality of my carrier (a piece of window glass), and internal flare.

-Carrier platen: For years I used a plain piece of window glass as my carrier platen. Because of this study, I wanted to rule out its quality being a limiting factor in image resolution. So I bought the V700 platen assembly, which includes the platen glass and holder that screws into the scanner bottom (Epson Part #1432338 housing assy., upper (includes glass), then carefully removed the glass from the assembly and set the distance to the correct focal length of the V700 lens. I re-scanned several negatives using the new glass in an undermount configuration, and then compared the results between old and new carrier platens and between overmount and undermount techniques.

Conclusion:  The benefits of the new optical glass over the old window glass were subjectively insignificant. I could not compare overmounting and undermounting using the optical glass, but that comparison was already made using the window glass, and since the optical glass and window glass were the same, I would not expect any difference between the configurations using optical glass.

-Internal flare:  Some have suggested that internal system flare caused by extraneous light (from the illuminator) around the negative might affect data quality coming from the negative. It makes sense, and Betterscanning(TM)’s new system includes a mask to apply around the negative to reduce internal system flare.  I’ve tried in the past to mask negatives using my own device, but found that it made no difference in image quality.

I recommend you test your own system of wet mounting to see if undermounting, carrier platen quality, or masking makes a difference in your scans.

See more J. Riley Stewart images here.

Unlocking Your Scanner to Get Great Scans from Film

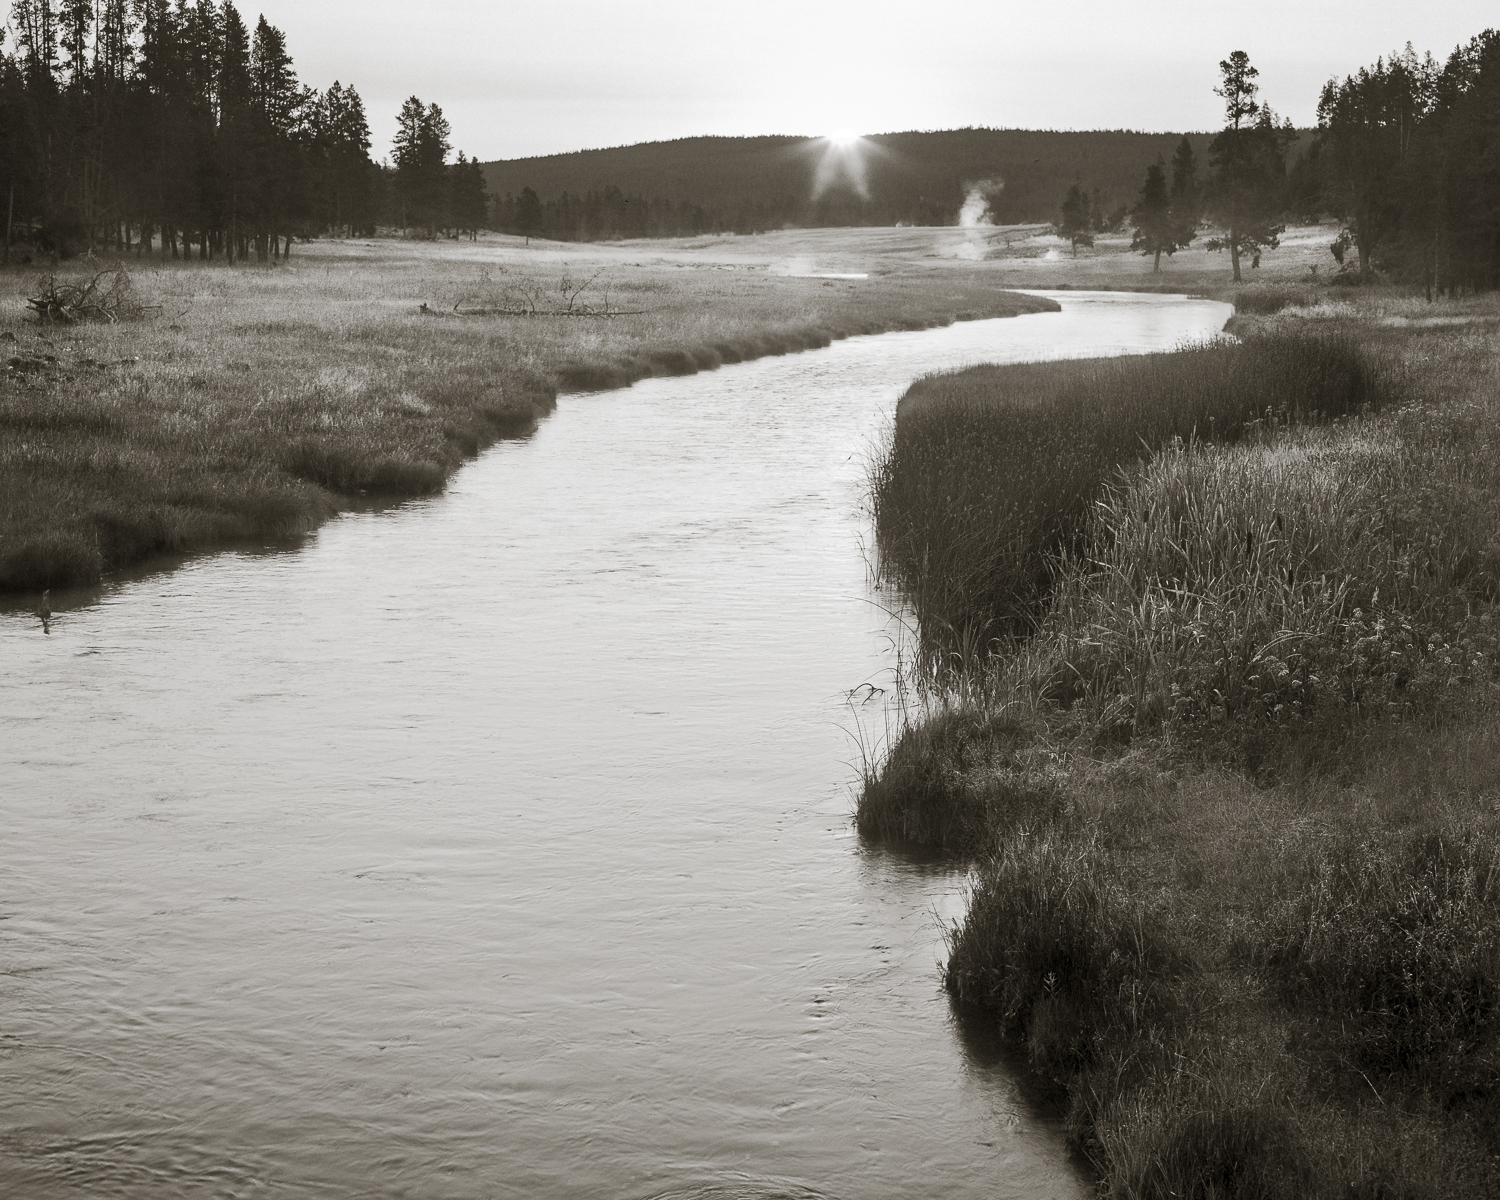
B&W fine art image of the Nez Perce River in Yellowstone NP
“A Moment on the Nez Perce” by J Riley Stewart

Why Scan Film?

This tutorial covers how I manage my film scanning to get every bit of tonal information from a negative and avoid clipped shadows and highlights, which ensures I get great scans from my film images.

Scanning film is a necessary evil if you shoot using film cameras and want to convert the film image into digital format for proofing, sharing to the web, making a digital negative for alternative processes, or for inkjet printing. Scanning film requires a special machine (a transparency scanner) that passes light through the film and to the scanner’s sensor, and records minute differences in density and color at millions of sampling points on the film, and records those differences in a digital file.

For some images on film, we can relay on automatic settings in scanning software to adequately read and convert the film image to an acceptable digital image. But there will always be those film images that fail miserably during scanning; automatic settings and presets just can’t provide a digital image that we can process into a fine image for printing or sharing. For those film images, we need to learn how to force the scanner and scanner software to do the best job possible to get all the useful information from the film. 

Software can make a big difference in user experience. I’ve tried Epson Scan®, SilverFast®, and VueScan®. By far, I’ve found VueScan is the most flexible and effective, and what I say below relates to its use. VueScan, because it includes so many controls for so many scanners, can be frustrating to use sometimes, but if you follow my workflow, and refrain from experimenting too much, you’ll be okay (I think). Try VueScan® here: (I have no association with it). I have no doubt that if all your negatives (color or B&W) are perfectly exposed and developed, you won’t need the advanced tools built into VueScan (however, it will take care of those too) and so the basic scanning software like Epson Scan will work fine. But there are those times when things don’t go as planned, and you’re left with a great composition on a crappy negative. That’s when you need the tools and the skill to get every bit of useful information from the negative before you can make a great image. I’ve compared Epson Scan to VueScan in scanning B&W film here. Take a read if interested.

Take Home Points

  • Scanning film is a craft that requires learning, but folks, it’s not rocket science. You don’t need a degree in scanning to get the job done. 
  • Scanning film is a technical task. There is little usefulness for creativity during scanning.
  • Don’t ask too much of your scanner and scanning software: it’s only good for one thing, and that’s to get every bit of useful information from the film image as is possible.
  • There is no reason a properly exposed and developed negative can’t be scanned without clipping any shadow details or any delicate highlights, even specular highlights. But to scan some film images, you must know how to control the scanner and its software.

Unleashing the power of the film scanner

The image above (“A Moment On the Nez Perce River”) is an example from a scene having extreme dynamic range that can give automatic scanner settings the fits. Automatic scanner settings will often assume a perfectly exposed negative, perfectly developed negative, a ‘common’ film or type of film, a ‘common’ type of scene, and/or it assumes you want sharpening, dust removal, color balance, resolution, and any number of other assumptions. Perfect rarely happens in real life photography.

Scanning film is a technical task. There is little room for creativity, so don’t try to make it that. But, because it’s technical, realize that you must control the machine (i.e., the scanner and its software) to get the most out of it. Luckily, controlling the machine isn’t difficult if you use the right scanning software. Like any consumer machine, its controlling software has built-in defaults and automatic settings for folks who just want something fast. If you’re serious about getting great scans, you need to know to turn off all/most of the built-in presets.

Effective Scanning Workflow (VueScan®)

Initial settings:

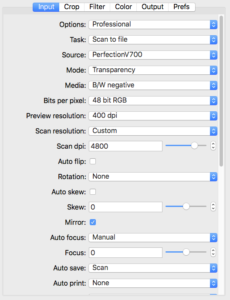
  I scan the negative as a negative, both for color and B&W films. I sometimes deviate from this with color negatives I’m having issues with, but that’s not common.  Here’s my initial settings in VueScan using my Epson V700.

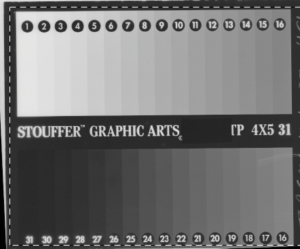
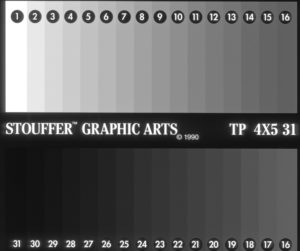
  Using these settings, click <Preview> and it will give a quick scan of the negative converted to a positive (like normal). Here’s what I’m scanning. It’s a Kodak Tri-X negative that’s been exposed through a Stouffer’s Step Wedge®. The step wedge has a minimum optical density at step 1 of 0.05 and a max density at step 31 of 3.05 in 1/3 stop increments. So it can mimic a scene having exactly 10 stops of luminance range.  Much of this is altered by negative development, which I won’t discuss here. The step wedge is merely a tool I’m using here to give you a standard ‘negative’ to talk about. Development of the negative can alter the actual densities from those 10 stops of light (i.e., by pushing or pulling exposure and development). But you’ll notice that while the darkest step (Step 31) is nearly black, the lightest step (Step 1) is far from pure white. The Epson V700 scanner has the latitude to record the 10 stops of density on film, and so does yours, probably.

Now the fun starts. We’ll set the scanner to capture every bit of information from a negative having 10 stops of density range (and more).  

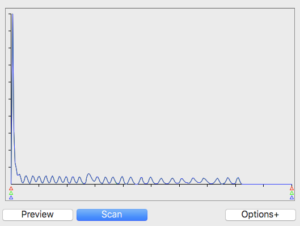
This is a histogram VueScan produces using these initial settings. You can change this histogram (and the resulting image) remarkably by adjusting certain settings. I’ll show you.

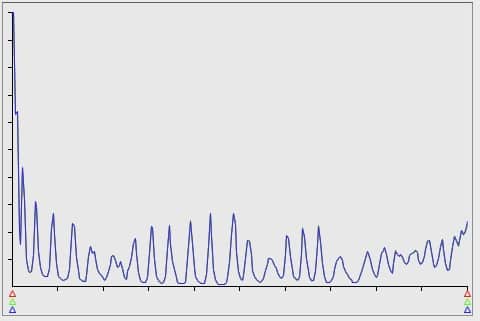
  The initial histogram produced an image from 0% Luminance (L) to Zone VIII (82% L) above film-base + fog (FB+F). Shadows are on the left; highlights are on the right, just like a normal histogram. I count 27 separate peaks, including all tones that are combined within the largest peak at the far left of the histogram. So, I’ve lost 4-5 stops in the shadow areas of the step wedge negative. If I printed this image as scanned, it would clip the darkest 6 zones or so to black. That’s not good enough for me, and it’s important to know that we can get more information from the shadows than the initial scan provided.

You probably know that film development modifies the overall contrast of densities on the film. The measure of contrast is called the Contrast Index (CI). The more development you give a specific film, the greater its CI will be, normally from 0.4 (low contrast negative) to 0.8 (very contrasty) or so. Vuescan includes  several models (target film profiles), including many that enable matching of actual negative CI to model CI for B&W films. Go into the <COLOR> tab and you’ll see you can change the target film profile to several “model” renderings. The initial histogram above shows a <Generic Color Negative> model even tho I’m scanning a B&W step wedge. 

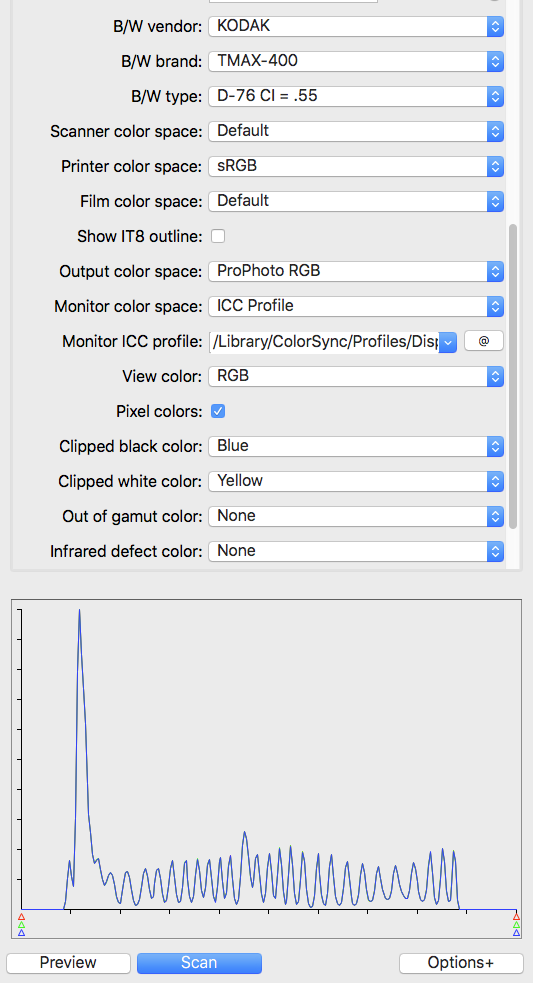
  You can experiment with varying film models under the <Color> tab. I like the Kodak TMAX 400 model as it allows me to select different contrast index (CI) levels so that I can better capture the shadows and highlights. Below is exactly the same scan, but using a different setting in the <COLOR> tab.

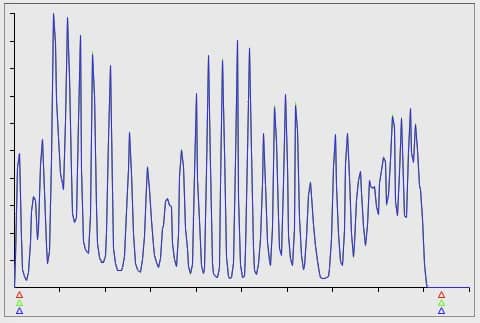
  You notice the left and right side of the range are now completely inside the extremes (levels) shown by the little red-green-blue triangles. You can stop here and be assured you’re getting every bit of data from the negative, with plenty of room to adjust levels and curves in post without clipping.

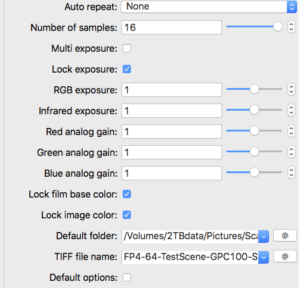
  If I do anything beyond this, it’s to set RGB Exposure (<Input> tab) to move the film FB+F peaks as far left as possible without clipping any important shadows. I want to eliminate FB+F as it has no useful information. In other words, during scanning I want to “expose to the left,” just the opposite of shooting a digital camera. Remember that when scanning a negative, digital noise (if any) will occur on the far left of the histogram, where negative densities are least. So don’t be too aggressive about this setting; don’t move your deepest important shadows too far to the left. When done right, you should still still the FB+F peak.

Setting RGB Exposure in VueScan is the one of the pre-scan settings  (i.e, machine settings) you can select on the Epson Vxx models. VueScan is the only software I’ve tried that is able to direct the scanner to slow the light emitter bar based on the RGB Exposure setting.  All other adjustments you make in software is performed on the image after scanning it, similar to PS or Lightroom does, which adjusts pixels and can cause artifacts. So there’s value in adjusting the RGB exposure to fit the negative.

The other important machine setting enabled by VueScan is the R-G-B analog gain controls that can become important when scanning color films. Film models will often presume specific R-G-B gain settings, so you need to check to see if those settings are causing your histogram to ‘dump’ tones.

Below is the exact same negative scanned using 20% more exposure so that the film base plus fog (FB+F) falls as near to the left as possible: That first little peak is FB+F.

  To recap, I’ve selected a film model that gets the shadows away from the left edge so I can clearly differentiate their peaks on the histogram, then I’ve increased RGB Exposure to ease them back to the left without clipping any important shadows (FB+F is not important).

  This is where I stop and hit <SCAN>. It’s the best I can do with this negative under any circumstances. Granted, I may need to optimize my exposure and development of TXP to get the deepest shadows away from the film base.

I’ll give another example of an Ilford FP4 negative exposed through the Step Wedge and given my standard development for FP4.

The first histogram results by scanning the film using a <GENERIC FILM> preset. Note how both the shadows (empty areas + Steps 1-3 on left of histogram) and the highlights (Steps 29-31 and blocked areas on right of histogram) are not well separated. In a final image or final print, this “automatic” scan would have clipped shadows and highlights. 

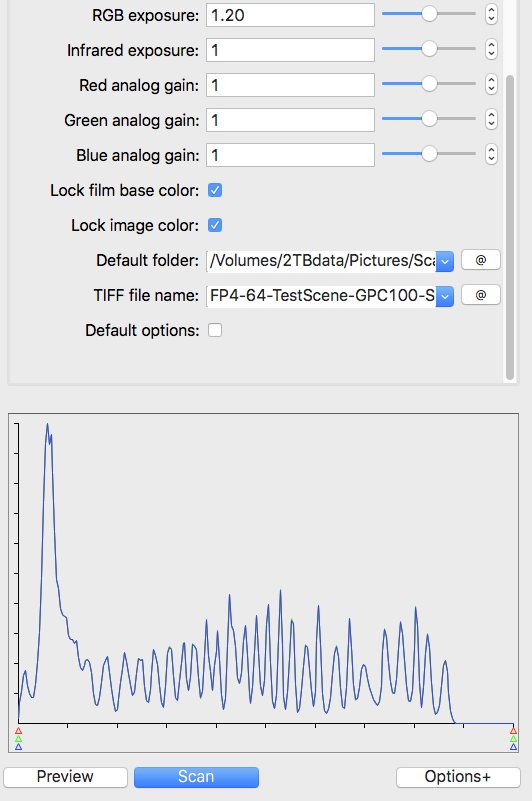
The next histogram is from the exact same negative, but the settings have been explicitly set to optimize the output image file to separate the various step wedge densities. In this scan, the RGB Exposure was set to 1.12 to move everything (all densities) to the left. Then I chose a film model having a contrast index (CI) of 0.70 to best match the actual CI of the negative. You’ll see now that every one of the 31 steps of the step wedge is discerned in the histogram, and can therefore be realized in a post-processed image or print. No important shadows nor any highlights will be clipped in the image.

I hope this was helpful, and I hope it doesn’t sound too complicated; it’s really not. It takes some time to learn the essentials of scanning negatives, but once you’ve invested in that time, you’re good to make great scans forever.

 I wrote a tutorial on how to easily convert your flatbed scanner to do wet mount scanning without buying special holders. I can perfectly wet mount 2 strips of 120 or 2 4×5 negatives using this technique in about 30 seconds. Here’s the tutorial:

https://www.jrileystewart.com/blog/2018/03/02/easily-convert-your-flatbed-scanner-to-a-wet-mount-workflow/

Happy scanning!

Subscribe to my newsletter “Under the Darkcloth” here.


5 Helpful Gadgets for a Photography Darkroom

Darkroom:  a place where where analog photographers go to play. 

If you take pictures using film, you need at a minimum some dark place (or some apparatus) where the film can be safely transferred from its box into the camera (for sheet film) and some dark place where you can transfer the film from its carrier to the developing tank, or even to develop film and paper.

Anyone who has had a darkroom knows there are hundreds of tools required to produce one print. The obvious among them being developing equipment (beakers, bottles, chemicals, a scale, etc), a good sink, an enlarger, light stand, working tables, trays, tongs, thermometers, timers, etc, etc. Even novice film photographers know these essentials.

But there are a number of ‘tools’ that are very useful that nobody talks much about. Here’s my list of the top 5 hacks for getting things done as an analog photographer.

1. Stouffer Step Wedge 

Have you ever shot a roll of film and then after scanning, noticed that the shadows were all dumped or the highlights blocked up? Were the images more grainy than you expected?  The cause of such surprises may be because the film responded exactly as expected for the developer used to render the latent image, but you just didn’t realize it.
Shooting with film requires an understanding how your film(s) of choice behave upon exposure and then upon development. The choice of B&W film can not be divorced from the developer used to render the latent image. While it may be enticing to choose a film and then just pick a developer for that film based on someone else’s recommendation and then live with the results, is not something I’d ever recommend. We need to understand the tools of our craft.

The choices in B&W developers are great, especially if you make your own brew, which opens up a vast number of specific formulas, each having it’s own way of acting on that film. Some will provide full box speed while others will require 1/2 box speed (as an example). Some will produce fine grain while others more grain. Some will selectively restrain development in the highlights (compensating effect) while others will respond to exposure more linearly.  

The only way to understand how your film will behave in a specific developer is to test. You need to determine the speed of the film in your developer, the range of density over a 10+ stops of exposure (i.e., Zones 1-10), and you may want to explore pushing and pulling development to achieve certain effects under low or extreme lighting.

By far, the most useful tool I’ve found for doing these experiments is the Stouffer Step Wedge available from Stouffer Graphics.  And no, you don’t need a spectrophotomer to do this test, even if it gives you more precise data and calculations. I simply use Photoshop sampler tool to determine Luminance values from 0 – 100% for each wedge of the step exposed onto my film and developed in my developer. Percent luminance relates directly to Zone values from Zone 0 – Zone 10.

The benefits of using the step wedge to expose film for testing is consistency, because you’re going to expose several sheets / frames and you don’t want to rely on variations of  sun/clouds/shutter/aperture to confound things. The way you use it is to overlay the film with the step wedge, I use the 4×5 step wedge because I use 4×5 film, but it also comes in strips for testing roll film. Then cover the sandwich with a sheet of glass to keep them flat. Then I flash the sandwich with my speedlight to expose the film through the step wedge, then develop the exposed sheets/rolls of film at 3-4 different durations. You’ll need to experiment with how much power to set the speedlight, and you may need neutral masks to reduce it further (I use plain bond paper at the speedlight source).

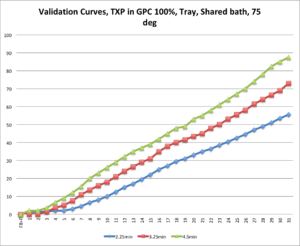
The goal with exposing the sandwich is to get a density in the developed negative at section 31 on the step wedge very close to film base + fog (FB+F). A couple tries and you should be able to nail it. Once you have that reference set, simply measure luminance (L) for each step on an image using the Photoshop Info brush or Digital Color Meter (for example) and plot each reading. Here’s an example of the results from TXP developed in my developer of choice for various times, as an example.

To learn more about such characteristic curves using spectrophotometric equipment, see https://www.filmshooterscollective.com/analog-film-photography-blog/a-practical-guide-to-using-film-characteristic-curves-12-25.

Since I like open shadows and full scale negatives, this data tells me I should plan on developing TXP in this soup for 4.5 min for Normal development, and that if I need to pull development to N-1, then about 4 min should be close (i.e., a normal Zone 9 density will render as Zone 8). To determine an N+1 development, I would need to define the curve at 5.25 min or maybe even 6.4 min.

The point is, the Stouffer step wedge is a great tool if you want to know how your film(s) behave in certain developers, at certain times and temperatures, or certain processes. There are hundreds of conditions you might want to compare to really nail down the best way to get your film to behave under various taking conditions, or if you just want to know how consistent your own process is.

2. pH meter

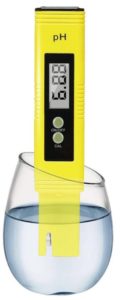
If you mix chemicals, even if the chemicals are commercially packaged, a pH meter is an essential tool for your darkroom. I think I paid $15 for mine years ago, and I use it all the time without problems. The ATC brand shown comes with calibration buffers.

One of the earliest indicators of developer failures can be a fall of pH (i.e., becoming less alkaline). Oxidation of buffers or active agents often change the pH of the solution, and a small change can completely change the way the active ingredients behave with your film. I check pH of my home brew developer for every batch, and know that it should be 10.05 before use. Add to this a measurement of Total Dissolved Solids (TDS), which indicates you’ve added the prescribed ingredients in the right amounts, and you should be good to go. In my standard brew, I know the stock solution should have 4335-4355 ppm TDS. The TDS meter came with my purchase of a Zero Water pitcher (see below).

3. Sodium Carbonate, Washing Soda

Once a mainstay in any darkroom, washing soda (100% Na Carbonate) is great not only for

regulating the pH of developers, but it also makes a great cleaner for trays, glassware, and even negatives. I keep an open container sitting on my darkroom sink and use it instead of dishwashing soap. It makes my glassware squeaky clean (that’s how I know it works.)

Washing soda used to be on every grocery story shelf, but today that’s not the case. You may need to order it from Walmart, or just about any store that sells cleaning supplies. Just google Arm & Hammer Washing Soda to see where you can get it.

4. Water filtration system with TDS meter

Chlorine- and metal-free water is a must have when preparing chemicals for developing film. For years I’ve bought gallon bottles of distilled water for this purpose, at about $1 per gallon. Too often I found myself wanting to develop film and not having enough distilled water on hand.

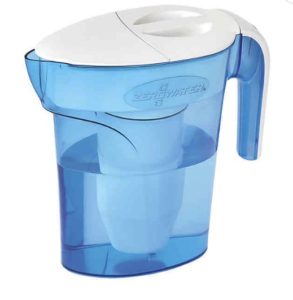
I recently bought a Zero Water® filtration system to keep me from having to run to the store when I needed distilled water. I estimated at $1 per gallon of distilled water, I could pay for this thing with the original filter, which in my area I estimate will filter up to 50 gallons of water. It comes with a Total Dissolved Solids meter, which I also use to monitor my developer solutions (see above). Three full filtrations will fill a gallon jug with 0 TDS water, so I won’t need it everyday.
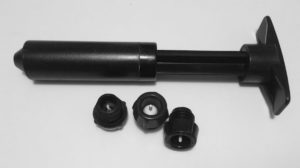
5. Air Evacuator

Probably the most important tip of the list is a way to ensure the life span of oxygen-sensitive chemicals in the darkroom.

I bought this “wine bottle air evacuator’ at a kitchen store over 15 years ago for just a few dollars, and it’s seen a lot of use.

Anyone who works in a darkroom knows that oxygen in your chemicals is the enemy. It shortens the shelf life to sometimes a few days when oxygen is given the opportunity to dissolve into the chemical solutions; and it eagerly takes every opportunity to do just that.

“How to protect photographic chemistry from oxidation?” is a common question on photo threads among the analog community, and there are lots of ways to stabilize the activity of stored chemicals. I tried many of them: marbles, collapsible jugs, aliiqouting into smaller bottles which are kept full, etc, etc.  The wine bottle air evacuator is by far the easiest, cheapest, and most effective method I’ve ever used.

The only limitation, if you can call it that, is that the bottles used to store chemistry must fit the rubber caps intended for use with the evacuator (shown in picture). Luckily, brown and green bottles that wine comes in are perfect for the task. Yea, you have to buy wine to use this tool!  It happens in my house that we always have empty wine bottles, so that ain’t a problem.

So, how well does it work?  I went through a time when I was trying every film and paper developer known to man. I’d mix them up and use just a fraction of the supply, then store the bottles for months, then retry them again. Specifically, I’ve kept D76 stock solution for over a year in a sealed bottle using this evacuator; without any loss of activity. The vacuum stayed intact and the solution protected from oxidation. That’s a pretty good testament.

I’m a cheapskate typically, and have always balked at paying so much for the products offered to the photographic community. My darkroom and my field pack are full of things I’ve made myself using reengineered ideas and workarounds.

Hopefully, some of you finding this article will get some ideas about what might be helpful in your own craft.

Comments or questions welcomed.

Easily verify the focus on your flatbed scanner

Wet Mounting on the Epson V700 V750 V800 V850

This article describes a way to make sure the placement of negatives above your scanner’s platen is within the depth of field of your scanner’s lens for best sharpness.

If your film holders don’t place the film where the scanner focuses its lens, then you’re going to get fuzzy images. And that may be causing you to pull your hair out. Neither are good situations to find yourself in.


Now, let’s talk about checking the focus of your scanner.

Many flatbed scanners have a fixed focal distance set by the manufacturer, and they provide holders that place the negative “precisely” at that distance.  Most of the time, this works well.

But there are times when you might suspect that the fixed focus (or even auto focus) isn’t behaving right. If you are getting consistently blurry scans or scans that you believe should be sharp and aren’t, you may have a scanner that isn’t focusing precisely, or a holder that isn’t placing the negative where the lens is focusing.

In this short article, I’ll show you an easy way to verify the depth of field on your flatbed scanner’s lens.  Then, you can take steps to make sure your negative carrier places negatives precisely at the optimum distance above the scanner platen for maximum sharpness and resolution.

To verify the focusing capability of your flatbed scanner, all you’ll need is a transparent ruler and a second ruler to measure with.

I’ll be using the Epson V700/V800 for this instruction, but the procedures should work for any flatbed scanner.

Concept

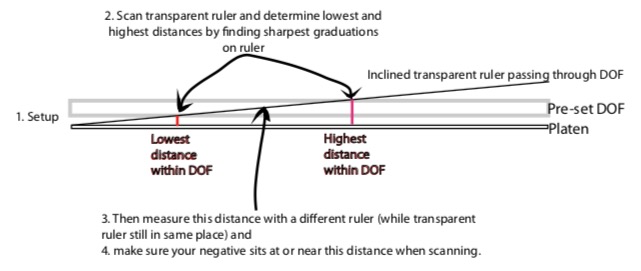
Like any lens, your scanner’s lens has a range of acceptable focus, or depth of field (DOF) where it performs best.  You can determine DOF by scanning a transparent ruler that has been placed on an incline, with one end well below the minimum DOF height and the other end placed well above the maximum DOF height. The graduations on the scanned image of the transparent ruler will be sharp within the scanner’s DOF.

Procedure

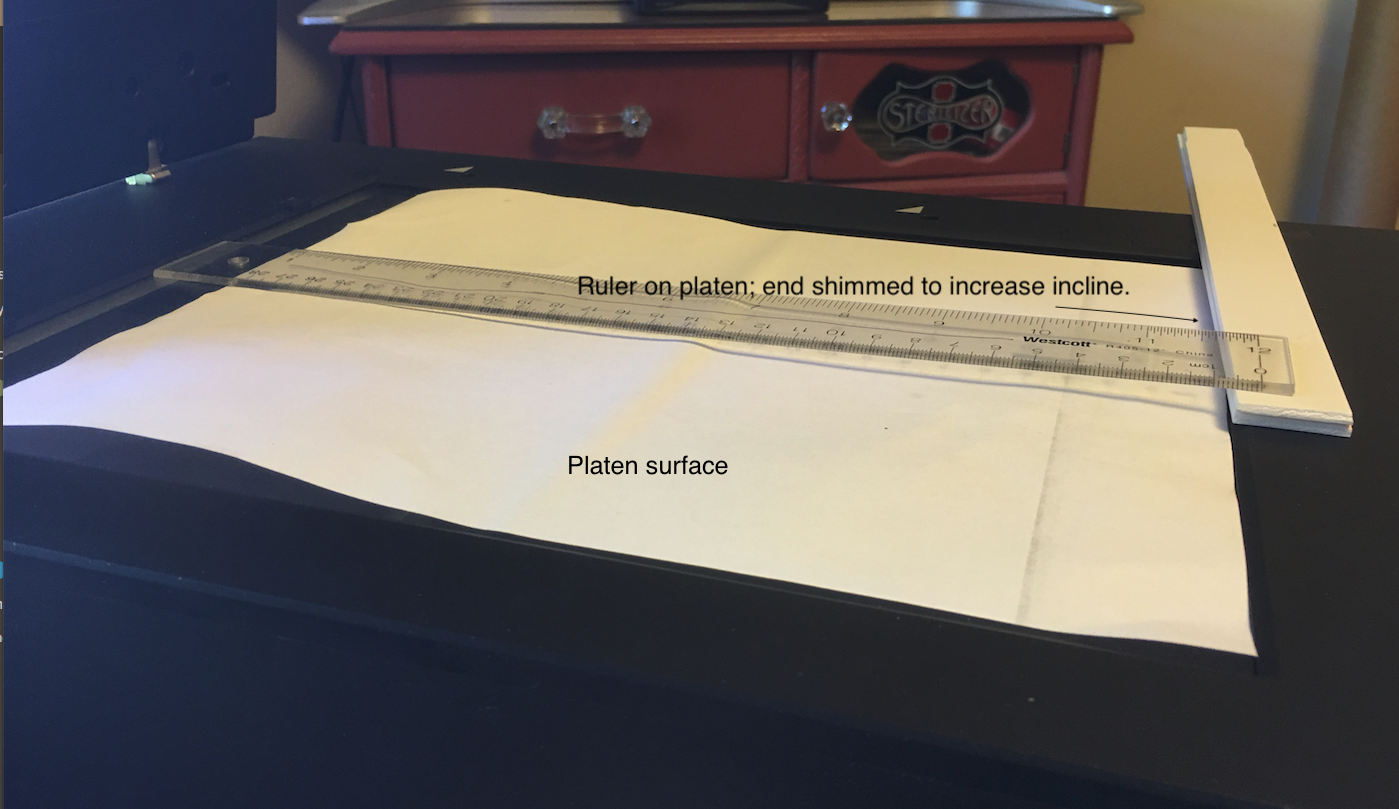
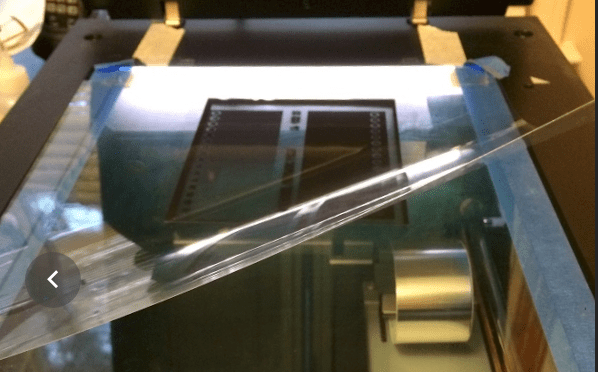
  1. The first step is to place the transparent ruler on an incline relative to the scanner platen. In the following picture, I placed one end of the ruler on the platen and placed the other end of the ruler to rest on the top of the scanner bed, shimmed by approximately 1/4″.   Shimming the elevated end of the ruler will steepen the incline and help differentiate the sharpness along the entire length of the ruler.  It’s important to check that when you lower the lid on the scanner that you don’t move or warp the ruler. You don’t need to lower the lid all the way; just close it enough to avoid touching the end of the ruler.  Now, open the lid and tape each end of the ruler down to avoid movement during scanning.

    Shows the inclined placement of the transparent ruler on the V700 platen. The upper end is shimmed to increase the steepness of the incline. The white sheet of paper is only for illustration purposes so you can ‘see’ the scanner’s glass platen in this illustration (it’s not used during the actual scan).
  1. Scan the ruler using your normal scanning settings (i.e., high resolution, 2400 ppi) without sharpening, and open the file in your photo viewing software, like Preview, Photoshop, or Lightroom. Do not move the transparent ruler yet; you’ll need it in exactly the same location in Step 4.
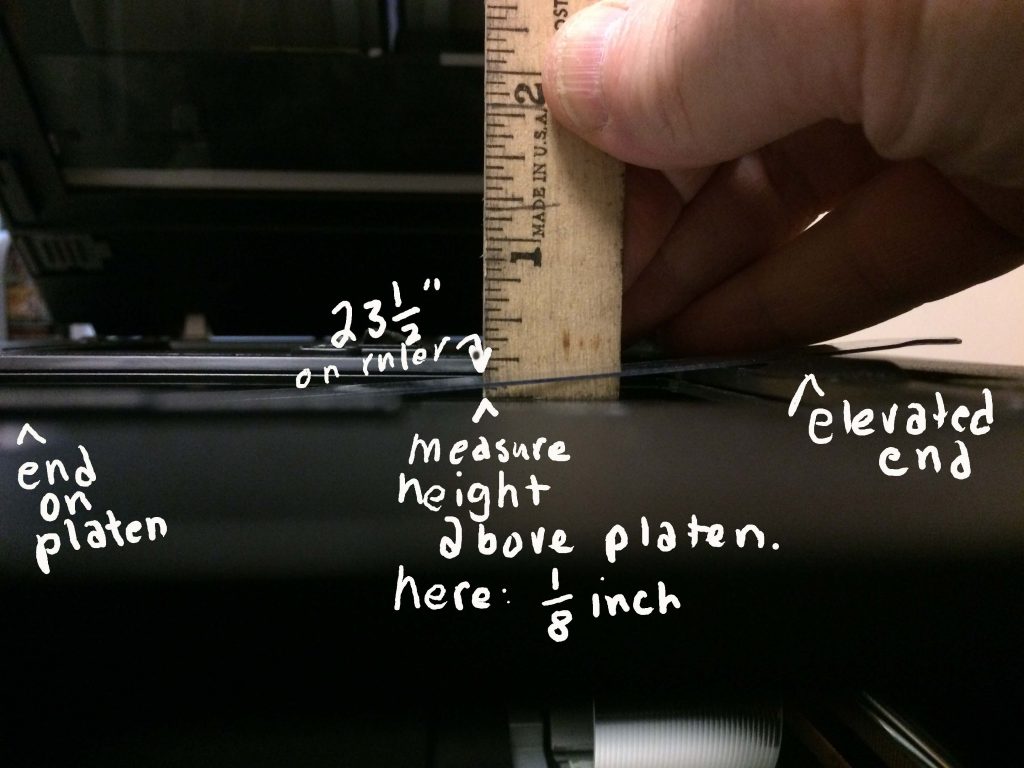
  2. On the scanned image, examine the ruler along its entire length, looking for the sharpest delineation of the numbers on the ruler. There should be a range of numbers/graduations that will be sharper than anywhere else along the ruler. If your scanner’s depth of field is very wide, you may not see any difference in sharpness along the ruler. This is good, because it means you shouldn’t be experiencing out of focus situation no matter where the negative is placed above the platen. But you need to examine closely to rule out minor differences in sharpness as you examine along the length of the ruler.  In my example below, maximum sharpness was seen about 23-24 cm on the ruler, call it 23.5 cm. The differences in sharpness between 0 and 4 inches on this image is difficult to show, but careful inspection at 50% in Preview clearly shows the difference.  You should see a clear difference. V700FocusTest003
  3. Now you need to determine the distance above the platen where you found the sharpest graduations on the ruler. Use a different ruler for this step. A micrometer may also be used if you have one, but you don’t need that much precision. I used a simple wooden ruler that  began graduations at the very end of the ruler. So, at the point on the transparent ruler (still resting on the scanner) where I found maximum resolution, I measured the distance above the platen surface and found it to be 1/8″. Your results may vary.  This measurement told me that my scanner’s best performance was 1/8″ above the platen. IMG_2946
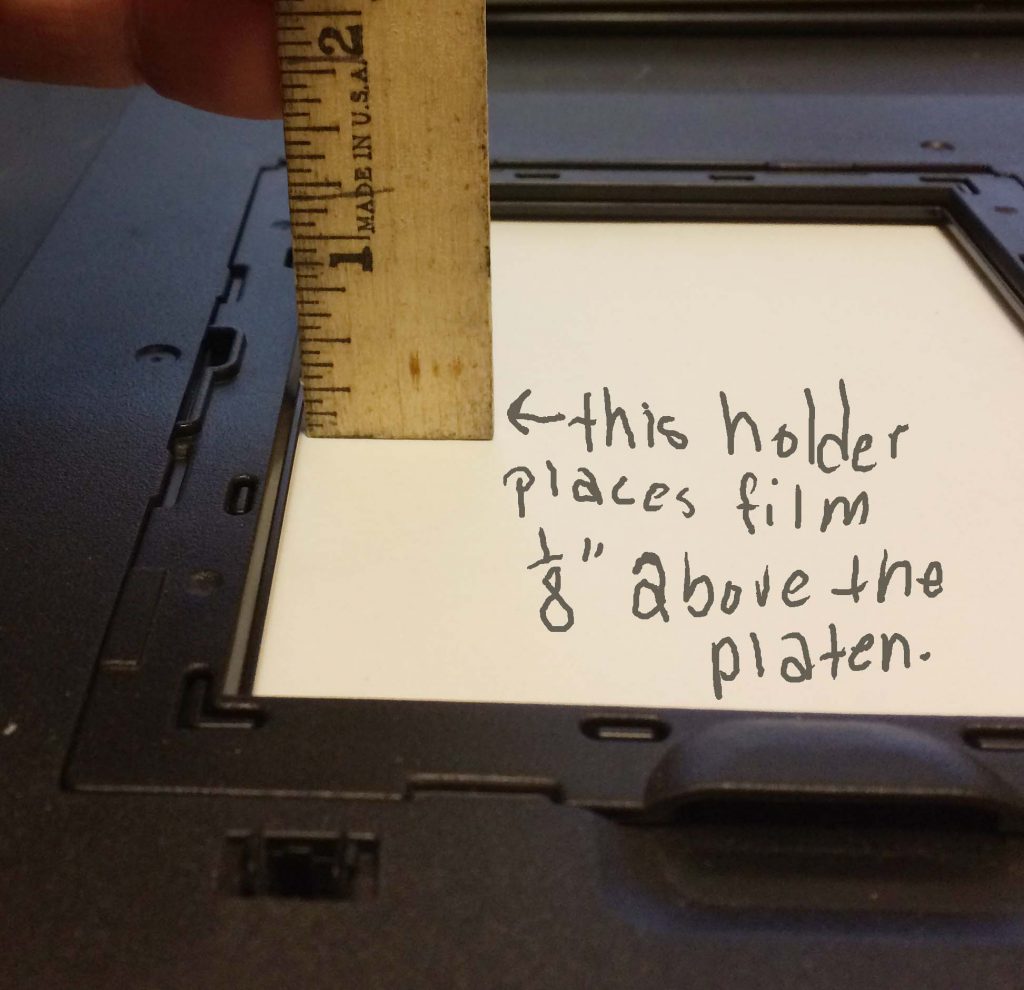
  4.  Now compare this distance to the height of the negative plane on your negative holder to see if your holder is placing the negative where the scanner has its maximum resolution. First place your negative holder on a flat hard surface (e.g. a table top) and find the lip on the holder that holds the negative during scanning. Measure the distance from the table top to the top of the lip. This tells you exactly where your holder is placing the negative during scanning. IMG_2978 copy
  5. Interpretation

    If you’re lucky, the height measured in Step 5 is exactly the same as the height measured in Step 4. It means your holder is placing the negative exactly where the scanner lens is focusing.

    If the holder doesn’t place the negative within an acceptable distance for the scanner’s lens, you’ll need to modify your holder or change to a holder that does. The Epson holder comes with adjusting feet; merely changing the setting on the feet may fix the problem.

    For the vast majority of scanners, the distance you find is sharpest will be very close to the distance measured on the negative carrier. But this quick test of focus on your scanner should at least confirm that scanner focusing is or is not optimal, and you can take actions to fix it.

    It’s possible that after doing this test, you find that there is no region of perfect sharpness along the entire length of the transparent ruler. There are two possible reasons: 1. the ruler moved or deflected during the scan when the lid is closed (re-read Step 1 in Procedures above), or the scanner’s lens is faulty and you may need to replace or repair the scanner.

Bonus utility: I used this test to determine where my custom negative carrier had to sit for maximum sharpness. I modified my scanner to accommodate a wet-mount under-mount design, and knowing my scanner’s specific DOF told me how much shimming I had to do for correct placement of the negative in this custom carrier. We’re not constrained to using the manufacturer’s film carriers once we know the scanner’s true DOF.

What does it mean when the negative is placed optimally, but the scans still appear ‘fuzzy?’

First, make sure your shooting technique is perfect.  Barring the case where the scanner is not functioning properly, finding that your images still appear unsharp most likely suggests a fault in technique. BY FAR, this will be the cause of unsharp images (i.e., not the scanner). It’s been the same since the the advent of modern cameras and lenses; it’s not the tools but the technique that causes most situations of unsharp images. You already know this, right?  Do you use a tripod when sharpness is important to the image? Do you practice appropriate aperture/shutter speed relative to subject motion? Technique remains one of the most important factors in acquiring an image on the negative that is sharp or not sharp. It’s always been that way.

Second, make sure to minimize your subjective bias toward those hyper-acute images shot with modern digital cameras. I suspect this bias is a leading cause for people new to film   thinking their scans are ‘blurry.’ This topic is probably worth a separate article; because it took me a couple years after returning to film scanning after a year shooting with digital to realize that comparing the two technologies is an apples and oranges comparison. In short, never compare a 1:1 depiction of a digital image to a 1:1 depiction of a scanned image unless the two images are exactly the same resolution (i.e., 20 MP to 20 MP), and even that is a stretch.  The best evaluation of sharpness for a film scan is by looking at an appropriately sized print, not a file on your computer monitor.  Don’t toss your scanner or give up on shooting film before making a print comparison!

I hope this article helps you determine whether your scanner is functioning properly, and how to determine where the optimum focal point of your scanner’s lens is.  Feel free to ask questions.


Let me hear your questions or comments below.

A Short Trip to Amish Country

Distinctive crop patterns in Amish Country, Pennsylvania
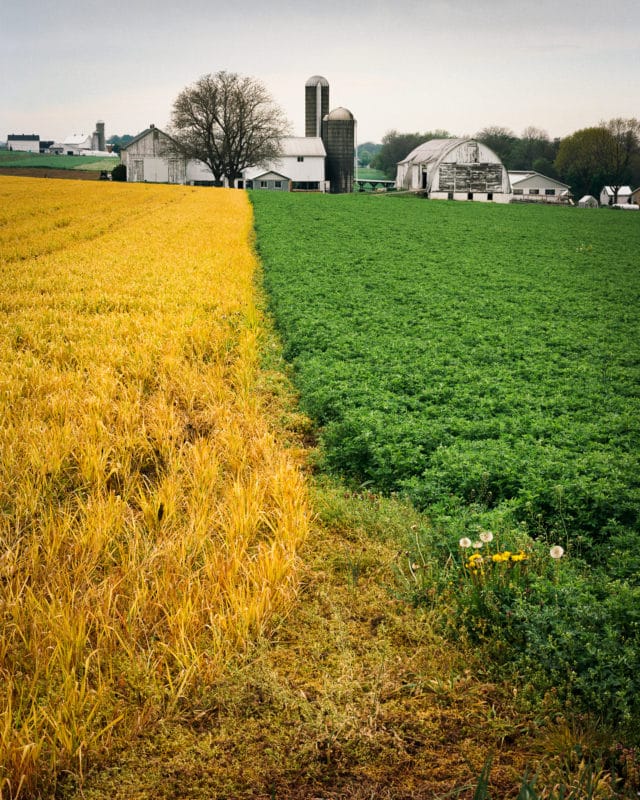
“Clear Boundary” – Crops share a mighty thin line on this farm in Amish Country, Pennsylvania.

From northern Virginia, we needn’t go far to see a very different culture than we have in most of the United States. I found udder peace (whoops, my bad)  in Amish Country.

I recently spent 3 days in the Pennsylvania Amish Country. It was a strange experience. I was deep in rural agricultural land, but it almost felt like urban. Finding pull offs along roads, finding compositions to photograph, and the ever-present sense of “unwanted attention” were constants.

My trip to Lancaster County, Pennsylvania was just what I needed. Visiting the “Pennsylvania Dutch” is like stepping back into the early 20th Century, driving the backroads at speeds no faster than horse-drawn carriages, stopping for long periods of time just to watch the Amish work their fields with mules (who actually did most of the work, I admit), and taking in the unique smell of natural fertilizer spewing from the their “honey” wagons.

Lancaster County is only a couple hours from my home, and I’ve been thinking all winter that I needed to go up there and experience it again after many years. Having grown up on a farm myself, pastoral settings have always been a favorite of mine. We have a saying in Oklahoma “you can take the boy off the farm, but you can’t take the farm out of the boy.” That’s so true, I think.

In fact, I avoid cities when I can. Even in Lancaster County, I accidentally drove too close to the town of Lancaster on my first day, got caught up in city traffic and strip malls for an hour, and considered for a moment just heading home. “If this is what Amish Country has become, I’m done!”

Luckily, I quickly escaped modern humanity and spent the next 3 days traveling every back road I could find to the north, east, and south from Lancaster. This is where the rich Amish culture lives today, and I was surprised how strong it remains after all these years of American ‘progress.’ The Amish in their horse drawn carriages, farm teams, and foot-powered scooters were common sightings among the beautiful farm lands and buildings of rural Lancaster County. I’ve included a few travel photos below to give you an idea of what I found.

Photographically speaking, I met with several challenges to how I normally work in the field, to the point of giving that up for something else. I normally just pull off and park on the road easement when I find something to photograph, and then take my time setting up and composing the scene. I can be on site like this for half an hour or more.

But road easements in Lancaster County are essentially non-existent except where the rare power line happens to follow the road. Without utility easements, the Amish plant their crops to within a few feet of the road bed, making pulling off the road to photograph impossible. I would never drive onto their crops just to get a picture.

I was able to find and capture “Clear Boundary” (my opening picture) along a road where the easement was wide enough for my van to park safely while I composed the shot. And I didn’t have a lot of time to do that because I had to share the easement with farm machinery pulling over to allow car traffic to pass. Oh, the life of a landscape photographer! :)

The second challenge was that most of what I found that really interested me were scenes that included moving subjects. Things that move have to be photographed quickly, and in many cases repeatedly. That’s not so easy with the large bellows camera that I typically enjoy using.

So after the first full day of empty searching for “normal” situations, I decided to pull out my faster 35mm film camera with a zoom lens attached and just have fun shooting from the van window with butt in seat. These will never become large exhibition prints, but not everything we photograph has to be “serious,” I guess. I thought you might enjoy seeing what I saw.

I’ve added two images from the trip to my gallery, and they are now available. The first is “Clear Boundary.” Just click the picture to see it in the gallery. The other scene is “Bifurcations,” a quiet B&W composition of a lone tree reflecting itself in the Pequea River in southern Lancaster County. See it here: “Bifurcations

Image of the delicate bifurcations of a bare tree reflected in a river
“Bifurcations” – The elegance of a lone tree is only made greater when reflected.

More images from Amish Country.


Update on Dignan’s 2 Bath C41 Development


I’ve been using Kodak’s Flexcolor chemistry for 4 years with acceptable results, but have found the variability from day to day and batch to batch to be irritating. I thought it worthwhile to test a simpler formula published many years ago called the “Dignan’s 2 Bath C41 process.” (see http://www.apug.org/forums/forum223/34413-dignan-ncf-41-divided-color-negative-developer-2.html).

Using Kodak chemistry essentially requires mixing a fresh stock solution that must be used within a week’s period, even if developing far less than the the published capacity claims. In low volume operations, this can mean higher cost per roll/sheet, since you are forced to throw away “unused” developer. The modern C41 chemistry workflow requires very careful measurement of 4 solutions,  and tight temperature and time controls to make it work reliably in small volume manual operations such as small tank or tray development. If you have an autoprocessor like a Jobo, this may not be important to you. But I still develop my 4×5 negatives in open trays sitting in a tempering bath, and tightly controlling temperatures over several hours is challenging.

As a test, I purchased the chemicals required to mix Dignan’s C41 developer, which requires two stock solutions (A and B). The workflow is far simpler with this formula. First the negatives are bathed in Solution A for a time, then transferred to Solution B for a time. Bleaching, fixing, and stabilizing then occurs as with the Kodak workflow. The 2 batch workflow is claimed to be temperature tolerant: somewhere around 25 degree C and it need not be precise. The instructions prescribe at least 3 min in Solution A and at least 6 min in Solution B, with no wash between solutions. Sol A never exhausts because it doesn’t oxidize nor does it dilute over time. You just keep using it until you deplete the volume, and mix up another batch. Sol B is one-shot because the carryover Sol A on the negatives will consume the buffering power of Sol B quickly.

Most of the discussion on the boards about Dignan’s chemistry are quite old, perhaps dealing with older films, and were not very encouraging. My main concerns, based on the discussions, were 1) low saturation negatives and 2) grainy negatives.

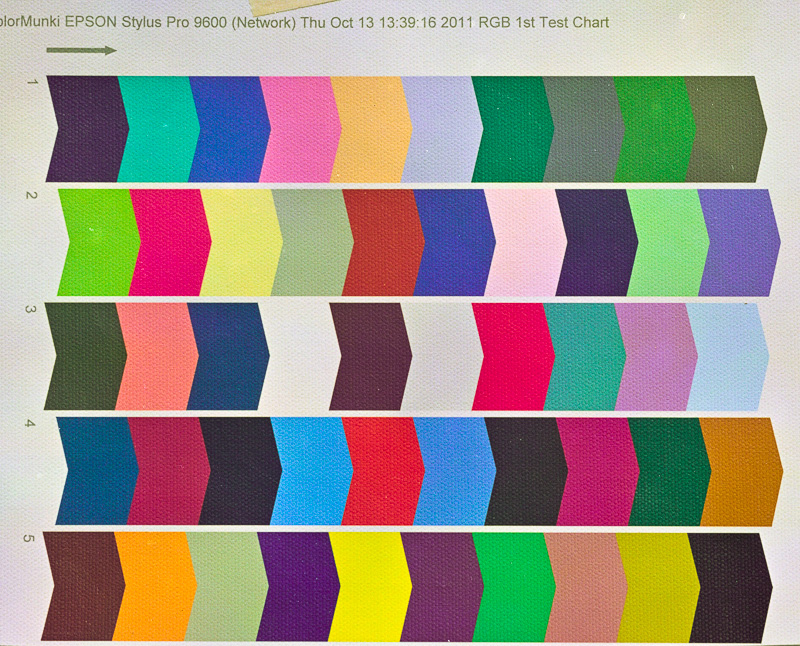
I found both concerns eliminated after a simple test. I shot a full-scale color print (Colormunki print test onto canvas) placed in full sun using a 4×5 camera loaded with Ektar 100 film. I developed one sheet in Dignan’s formula for twice the rated times (i.e., 6 minutes in Solution A and 12 minutes in Solution B) at 30 deg C.  The next day, I developed the second sheet closer to the prescribed time and temperature: 25 deg C, 3 min Solution A and 6 min Solution B. Solution B must be fresh, but I used the same solution from the previous day’s work. In both cases (Day 1 and Day 2), the pH of my Solution B was 11.88 at 25 deg C.

Here’s a jpg of the scanned and converted negative from Day 1 (i.e., higher temp and time periods). The colors are fully saturated and the amount of grain was very typical to what I see with Flexicolor chemistry on Ektar (i.e., very fine).  There were minor color shifts I had to correct in software, but again, they were pretty typical of what I see using Flexicolor chemistry on Ektar film.

Dignan2BathTest-9_4Kat6m-editcolorcorrection-hipass3px

Even with the higher temperature and extended times that I used on Day 1, I still noticed some color mottling across the film frame that indicates uneven development. I saw this especially at the edges of the negative, and this was very obvious with the Day 2 negative, for which I used the published time and temperature specifications (75 deg F, 3 min Sol A, 6 min Sol B).  This tells me that I need to further extend either both time or temperature in both Sol A and Sol B. I don’t believe exhaustion of Sol B on Day 2 was the culprit because the pH had not changed. Instead, I  suspect that these modern films are engineered to maximize penetration of chemistry into all emulsion layers at high temperatures and short times, since the normal development of C41 is 100-103 deg F for 3:15 minutes.  I plan to adopt 100 deg F for 5min (Sol A) and 10 min (Sol B) as an arbitrary start point for further testing. I know this defeats one of the benefits of the 2 Bath workflow (i.e., room temperature processing), but it believe it will be necessary.

If you are searching for alternative C41 developers, you might try this old fashioned formula. It’s very simple, cheap, and should be robust.

Update 10/28/15:   I’ve been testing further. My thoughts above haven’t changed, but now I’ve developed a number of real negatives and I’m even more impressed with the NFC-41 workflow.  Scans well, minimal grain (Ektar and Portra films).  Some of the problems I’m seeing with uneven development have to be worked out. I typically use tray development, and I suspect that even though I’m getting good saturation in Bath A, it’s more important to agitate in Bath B to get even development. A couple of my negatives seem “undeveloped” in the centers of the negatives, where they have the most tendency to stagnate the flow of Bath B while in the tray. Tray development may not work here: either a carrier that can be taken from Bath A to Bath B without the need to manually shuffle the negatives, or perhaps using BTZ-like development tubes. I’ve used BTZ tubes before and they work great, but you have to constantly roll the tubes and that’s a pain.

Warning:  There is no real “buffering” power of Bath B. It’s only potassium carbonate and potassium bromide; no buffers. So be sure to use fresh Bath B for every set of negatives. I tried to test the capacity of Bath B by running several negatives before changing to fresh. The pH went from 11.9 (fresh) to 11.2 (used), and the last negatives were extremely thin. The bath volume was about 500 mls, and probably 5 drained negatives went through it. So, don’t trust that Bath B has much more capacity than a couple negatives..test it in your own workflow. One idea for stabilizing Bath B capacity would be to adopt a suitable buffer, e.g. Sodium bicarbonate: Sodium Hydroxide. The range of pH for this pair is 9.8-11, adjustable by the amount of NaOH added. Kodak Flexicolor pH is 10.03, and that should be the target pH of the bicarbonate buffer used in a putative “improved” Bath B.  I might try this. it would be extremely cheap and convenient since the ingredients are available as baking soda (sodium bicarb) and Red Devil ® Lye.

Update 11/5/2015:  After several more negatives, tray developed at 100 deg F for 6 minutes in both Bath A and Bath B, I haven’t stabilized the process. The image on the negatives has consistently been thin using this approach. That can be a good thing if you’re scanning your negatives like I do, but what’s happening with my technique is that I’m getting “too thin” negatives.  I’m giving up on this for the time being…may return for further experimentation later.


I’m not that interested in stepping into the 21st Century

Magnolia Plantation along the Ashley River, SC
“Lowcountry Cypress” (Copyright 2015, J. Riley Stewart), 40×32″ Limited Edition photographic print.

See more at J. Riley Stewart’s galleries

If you still shoot film, what would you do if, for some reason, its supply suddenly dried up? What if film was no longer available at any price?

I know it’s a small possibility, at least in the mid-term, but…. what if?

To most photographers–amateur or professional–this is a moot point. They’ve already turned to digital capture, and most likely don’t care about the availability of film. It’s that very phenomenon that has drastically reduced the supply of film over the past 20 years. Sure, we can still buy film in almost all formats, but the number of brands and types of film is nothing like it was in the past, and those films still available costs us a lot more. But I should add, the modern films available today are exquisite and well-worth the cost.

I still shoot film, mostly large format 4×5 and 120 in both B&W and color. The biggest reason I use film is that it gives me “a look” that isn’t yet possible with digital capture, especially when my goal is to make larger scale photographic prints, i.e., anything larger than 16×20 inches. Film capture enables large prints that are alive with delicate details and textures and tones; prints that make you want to step into them and explore.

So what’s a guy to do if a precious resource behind his passion dries up? I plan to be making pictures for the next 20-30 years, and there’s no guarantee that film will be accessible during that span of time given the direction analog photography is going. Will I have to step into the 21st Century “digital” age?

I think I’ll do just the opposite. Before the digital revolution, and even before Kodak’s release of the first “Brownie” camera in 1900, people were making exquisite photographic prints from wet plates, dry plates, tin-types, and paper negatives printed on albumen-, silver gelatin-, and platinum-coated papers. The earliest photographic processes didn’t require manufactured film to produce beautiful photographs.

All these old processes excite me much more than bits and bytes. Sure, some of my excitement relates to the craft involved with these processes (the “magic” once associated with photography), but most of it relates to the aesthetics of the resulting prints, which we can still see in many of our finest art museums 150 years after they were made.

In fact, I may not wait for the disappearance of film, even if it never comes. If Mathew Brady could do it, so can I.


Subscribe to our mailing list

* indicates required

Location

Email Format

View previous campaigns.


The downside to the digital photography revolution

Update Oct 2019: I wrote the article below in 2012, and much has changed in the digital photography realm since then. Unfortunately, much has stayed the same.  First, hi-end digital camera resolution has improved greatly, and has surpassed 35mm film captures. But that has very little to do with art photography. Second, processing software now enables anyone with a digital image to ‘stitch’ captures and make huge digital files capable of huge prints. But that also has very little to do with art photography. Third, we now have very good graduated filters that help manage the luminance range of landscape scenes to accommodate the (still) limited dynamic range (DR) of digital cameras. I have nothing critical to say about DR management filters; I never use them; never need them with my analog workflow.

But the biggest change in digital photography has been, in my opinion, that many digital photographers have learned how to create magnificent images from digital cameras. There are more photographic artists who have converted from analog to digital and forced themselves to learn how to use the digital tool, and they’ve done it very very well.


Article from 2012..

I was recently talking with a friend about digital photography. As we discussed the differences between digital capture and film capture, I blurted “..I think digital photography is the worse thing that could have happened to photography as art.”

The conversation went on, “blah, blah, blah…” and we finally went on about our business. Later, however, I thought “why did I say that? Did I really mean it?”

Those of you who follow my blog know I consider myself to be among the shrinking class of photographers who still use film primarily. I use my Nikon D200 digital camera for some things, but if I’m taking a picture of something I think is important, I’ll use my Nikon F5, my Mamiya RB67 medium format (film) camera, or my Cambo 4×5.

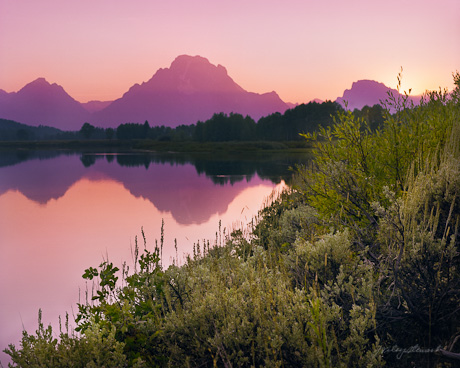
“Purple Mountains Majesty”  Captured using a Mamiya RB67 Pro S camera onto Kodak Portra 120 size film and scanned using an Epson V700 film scanner.

But back to my topic: why did I say such a terrible thing about digital photography? Here’s a list of serious consequences that I think represent the downside to the digital revolution; you be the judge how important they are to the art of photography as you practice it.

First a caviat: I consider photography to be the technique of creating an image that depends on light reflecting off a physical entity(ies), striking a light sensitive surface, and thus creating a 2-dimensional representation of that physical entity. Significant manipulation of the 2D representation  after capture can cause a departure from photography and into digital art (each artist defines his/her own limits in this regard.)  While digital art may use a camera as a tool to create such art, I do not consider digital art and photography to be synonymous.

My other bias is that I also have a personal dislike for what we used to call “chalk and soot” in fine art images.  These are large spaces in a photograph that are devoid of any detail in the shadows (soot) or in the highlights (chalk). In either case, such artifacts become distractions because our brain sees them as “unbelievable.” If you’re creating landscape photographs that have distractions, and there are many types, it will discourage many viewers from further engaging in the image. In digital terms, “chalk and soot” is the same thing at “clipping” at the extremes of the light spectrum.

So, here’s my list of reasons why I think digital technology, as applied to photography, has destroyed the art of photography:

1.Tiny, low resolution pictures are the norm. There was a time when most pictures we saw were at least 4×6 inch prints; and commonly 8×10 (the size of a magazine cover) and larger, and printed at 300 dots per inch or greater. The norm today is 3×3 (or less) shown on an excessively contrasty monitor showing us  much lower resolutions of 76 dpi.

I believe one of the great human values that photography provides is the opportunity to see and explore real, factual subjects with much greater depth than is possible in the ‘blink of an eye.’  Studying a low-resolution 3×3 inch thumbnail on our display monitors is just, well, impossible. It’s a superficial study at best, and therefore misses the whole point of the value of photography in our lives. While many photographers who post images to the internet exceed 3×3 inch (thankfully), resolution is still largely limited by the display technology. To really see an image for what it is, you need to see it in print, big, and in Hi-Def.

2. It’s not about getting good pictures now, it’s about getting fast pictures. There was a time when most people who took pictures truly wanted the picture to be “good.” Sadly, the norm today is to snap the damn thing, get it up on Facebook to share, and don’t worry about fuzziness, poor lighting, distracting objects, etc. It’s fun to share, but the ease of taking pictures today that don’t cost a dime has certainly reduced incentives to ‘make a good photograph.’ If you want to see an example of my point, just scan a few Facebook galleries of your friends. I’ll bet you’ll agree with me that the vast majority are really bad photographs (but we’ll never say that in public; nor should we I guess.)

3. With a digital camera, “this is the best I can do”. There was a time when skilled photographers took great care to avoid distracting artifacts in their imagery. Proper exposure, proper placement of the camera, and proper selection of camera and lens were fundamental considerations any serious photographer made for every click of the shutter.  Today it’s common to see artifacts such as distracting, featureless blacks and pure blown-out whites, fuzziness, photographic noise, and others that are typical with digital capture,  even from experienced, well-known photographers. This is, perhaps, my biggest gripe: that serious photographers seem to have compromised photographic quality for ease in ‘picture taking.’ Some say digital is the form that today’s photographic art has taken. And based on the popularity of digital cameras over film cameras, perhaps they’re right…. but I hope not.

4. Digital is a plastic technology. Digital photography is very “digital.”  Our eyes don’t see things in digital format, they see things in analog format. So does film, by the way, it responds to light in analog form.  WIth digital image capture we get super crisp lines and sharp transitions between colors. Perhaps the best way of characterizing this effect is “plastic.” Yet our eyes see and interpret lines and colors  having smooth transitions.  If you want to produce images that most closely mimic what our eyes and brains see, you must capture the subject using an analog technology, not a digital one.

This list is a start. While digital technology has given us the ability to take and share pictures so much more easily than before (and this is a good thing, much like the Kodak Brownie introduction in 1888), digital’s popular adoption for fine art photography, and especially for landscape photography, has so far been overwhelmingly bad. As the technology develops further it may overcome its present limitations for capturing subjects having wide latitude, with minimal noise, and excessive “plastic” character.

But that day isn’t here….. yet.

Subscribe to our mailing list

* indicates required

Email Format

View previous campaigns.