What makes a photograph “original,” and why does it matter?

Example of provenance COA stamp on reverse of a J Riley Stewart limited edition print
Authentication establishes provenance to an original photograph.

Establishing provenance for fine art photography is just as important as provenance for paintings and other hand-crafted visual artworks. Let me tell you why and how to determine if a photographic print is original.

I recently read a story about a gallery customer who bought an Ansel Adams photograph on the cheap ($6). He was elated, believing it to be an original. But, when he later discovered it was merely a cheap reproduction from a calendar, he felt cheated. You can read about it here:  http://petapixel.com/2014/10/07/print-scam-meets-eye-ansel-adams-gallery/   

This buyer isn’t the first–and he won’t be the last–to be confused about the definition of “original photograph.”  With a little bit of knowledge, and understanding the terms used to describe art originality, you will be a smarter collector.

It’s fairly easy to identify an original oil painting. You can actually see the paint on the canvas.  It’s not so easy to tell original watercolors or illustrations from their reproductions. Printing materials today are so good that, without advanced inspection, a reproduction of a watercolor or illustration can look very much like an original. 

Fortunately, when painters and illustrators sell printed copies of their artwork, they usually mark them as “reproduction.” Reproductions are made using a variety of mass printing processes, such as digital inkjet or lithographic printing.  Anytime you see contemporary wall art marked as a reproduction, you’re looking at a mechanically printed digital picture of the original handcrafted artwork, and there may have been thousands of copies made. Because of this, reproduction prints are much less expensive than the original artwork. 

Well, if digital prints of paintings are considered reproductions, why aren’t all prints considered reproductions? Aren’t modern inkjet photographic prints just copies of a digital image?   

It’s true that today the vast majority of photographic prints are created using mechanical printers. And the number of copies is virtually limitless with today’s printing capabilities. This situation makes defining “original photograph” much more useful today compared to the times when photographers made “copies” in very small numbers and when each print was hand made from an original piece of film. 

Uniqueness has never been a strict criterion for describing art as original. A painter or illustrator can create the same scene again and again, a songwriter can record the same song again and again, and a photographer can print her photograph again and again. Art need not be “one-of-a-kind” to be original.

There is, however, one attribute that all artwork must have to be universally recognized as original:  provenance. This includes all visual artistic media, even art photographs.

Provenance is a set of facts that inextricably link the physical object of art to its creator. Provenance describes the artwork explicitly, disclosing its title, the name of the artist, the date of creation, its medium, and its dimensions, at the very least.  The medium will indicate whether the artwork is an oil painting, a bronze statue, or a photograph. When you see provenance on a label or caption, you can be fairly confident that the physical object is authentic to the named artist. When you don’t see provenance, it either means the artist neglected to document his/her creation or that it’s a reproduction or a forgery, none of which is good for you as a collector.

Original photographs, i.e., those with provenance, carry another descriptor that isn’t as commonly used in handcrafted art: the copyright status at the time of creation. The creator of any artwork is always the first owner of the copyright. Copyright ownership is especially important to the provenance of original art produced through a printing process like photography, digital art, printmaking, stories, and songs, where copyright status is almost always cited in the provenance. 

Like paintings, the opposite of an original photograph is a forged photograph. Today it’s fairly easy to download someone else’s photograph from the web, run it though editing software, print, sign it, and then frame it for personal or commercial use. Clearly, when someone claims someone else’s photograph as their own, that photograph is not an original. It’s a forgery.  Of course, this violates the law, but it can and does happen. Should a buyer of a forgery expect to pay the same price as an original? Of course not. Do they?  Sometimes, but only when deceived or uninformed.

Here’s some of the most common ways to determine originality of an photographic print:

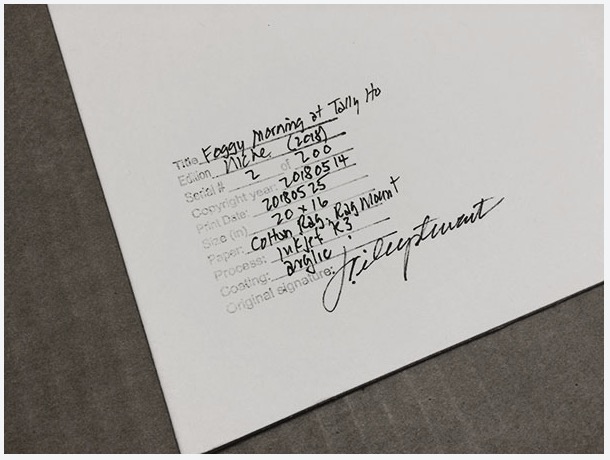
  • Original photographic prints will have provenance, including copyright information, typically documented on a Certificate of Authenticity (COA). The COA will be either attached to the photograph itself or in the hands of the gallerist selling the photograph. It should always convey with the photograph upon sale.
  • Know the photographer. Research his/her website, visit their gallery, and communicate with them. They will be happy to discuss a particular piece with you and substantiate it as their own, and tell you when it’s not. A part of being a professional art photographer is documenting provenance for each original work.
  • Read the label. If you see a photographic print labeled as a “reproduction,”  it typically means that the authoring photographer had very little to do with the printing, distribution, and selling of that photograph (either legally or illegally). Ansel Adams himself had nothing to do with the printing and sale of the 2013 calendar print mentioned in my lead paragraph, and the label correctly identified it as a “reproduction.”
  • Finally, give yourself permission to accept that if the photograph looks like it came from low quality printing like a book, poster, or calendar or is priced at $6.99, it is very likely a reproduction.

I take a rather rigid approach to provenance for my own work. My original prints all have a common description: I took the picture and own the copyright, I personally interpreted the scene/subject, I personally printed the photograph using techniques I deliberately chose, and then finished the photograph and documented its serial number in a limited edition. Each of my originals comes with a signed COA, either as an attachment or permanently stamped on the reverse of the print, that should follow the photograph forever.

More about how I manage my limited editions of fine art photographs.

If you collect artwork and care about potential resale value or collectible status, it’s smart to know when you’re collecting originals versus reproductions. You don’t want to pay original prices for reproductions, and if you ever choose to resell your collection, don’t expect someone else to have great interest in your reproductions.

Happy collecting!


See more J. Riley Stewart images.

Wet Mount Scanning: The Undermount – Overmount Dilemma

Lowcountry Cypress, J. Riley Stewart, High resolution 40×32″ fine art print.

Let’s talk about different ways to wet-mount negatives on a scanner for the best scanning results.

For years I’ve been scanning my 35mm, 120, and 4×5 negatives using a wet mount workflow, using either a drum scanner or an Epson V700. I made the move to wet mount on my V700 following testing that indicated a slight improvement in image resolution, a slight lessening of dust spots, and since I could wet mount sections of 120 size film easier than using the native MF carrier.  Plus, after a bit of practice, I realized that wet mounting was just as easy as anything else.

To wet mount on any scanner, you need a mounting base (i.e., platen), the negative, mounting fluid, and a clear cover sheet. I use Kami wet mount fluid and high grade mylar cover sheets, both from Aztek. The film lies on a rigid platen. Between the film and platen is applied a thin coat of mounting fluid. Over the film lies the cover sheet. Between the film and cover sheet is a thin coat of mounting fluid. This set up provides an optically correct path for the illumination light to pass through the negative to the sensor, with (ideally) no diffraction and reflection as it passes through the platen, mounting fluid, or mylar.

Since any disruption to the light path could affect resulting image quality, carrier system design (i.e., platen, fluid, and cover) must minimize their inherent bad effects on  image quality. Thus, it’s worth talking about undermounting vs overmounting on a flat bed scanner.

By far, the drum scanner does the best job, but that’s because drum scanners use adjustable apertures and photomultiplier tubes instead of CCD sensors to record the data from the negative. Like flatbed scanners, drum scanners use a carrier system of platen (usually made of acrylic), fluid, and mylar to hold the negative during the scan.

How you sequence the  light source->>sensor is fixed when using a drum scanner. The sequence is always source->platen->negative->mylar->sensor. 

When applied to a flatbed scanner, this same sequence is referred to as undermounting, i.e., the negative is illuminated by the light source after the light has passed through 1 pane of glass (i.e., the negative carrier glass or platen) then the negative, the mylar, and finally the scanner’s platen glass before reaching the sensor. 

But typically, most negative carriers adapted for wet mounting employ the overmounting sequence, i.e., source->mylar (or cover glass)->negative->carrier platen> scanner platen-> sensor.

For my own work, I’ve adapted my V700 to permit wet mounting as described here and typically use the undermount method.

Betterscanning(TM) offers a new wet mounting carrier for the Epson V7xx/V8xx scanners and claims that with under mounting  “.. sharpness can be improved compared to other methods.”

I was intrigued about the undermount vs overmount dilemma and its potential difference on resolution of the resulting image.  Theoretically, either overmounting or undermounting wouldn’t seem to affect resolution. The single largest factors on a scanner’s ability to record with precision is the size of the light source (which is fixed on a flatbed scanner) and light scatter (a collective term to account for diffraction and reflection of light) between its source and the sensor.

Whether you overmount or undermount, the potential light scatter is the same (i.e., 2 layers of glass, 2 layers of fluid, the negative, air spaces, and the mylar. Resolution should (theoretically) be the same. But it’s possible that undermounting might be better if the mylar has significantly less post-negative scatter of the data then the carrier platen.

I wondered how much difference this phenomenon would make on my own V700 (wet mount with Kami fluid; neg mounted to plate glass with a  mylar overlay), and film planes equal at focal distance of my scanner. I scanned part of the film mark from a sheet of TXP 320 both ways (VueScan) at 4800 ppi. This is a screen shot from a LR comparison of the two scans; 100% view; no sharpening. On the left is the overmount scan and on the right, the undermount scan. Conclusion: No appreciable difference in resolution. 

Undermounting may have other important benefits; perhaps to reduce chromatic aberrations, but it didn’t affect resolution in my short test. I’m still intrigued, tho, and will explore further.

Other possible reasons to explain a lack of difference between overmounting and undermounting might be that other factors are limiting resolution, regardless of the configuration of the carrier system.  In my case, that could include the quality of my carrier (a piece of window glass), and internal flare.

-Carrier platen: For years I used a plain piece of window glass as my carrier platen. Because of this study, I wanted to rule out its quality being a limiting factor in image resolution. So I bought the V700 platen assembly, which includes the platen glass and holder that screws into the scanner bottom (Epson Part #1432338 housing assy., upper (includes glass), then carefully removed the glass from the assembly and set the distance to the correct focal length of the V700 lens. I re-scanned several negatives using the new glass in an undermount configuration, and then compared the results between old and new carrier platens and between overmount and undermount techniques.

Conclusion:  The benefits of the new optical glass over the old window glass were subjectively insignificant. I could not compare overmounting and undermounting using the optical glass, but that comparison was already made using the window glass, and since the optical glass and window glass were the same, I would not expect any difference between the configurations using optical glass.

-Internal flare:  Some have suggested that internal system flare caused by extraneous light (from the illuminator) around the negative might affect data quality coming from the negative. It makes sense, and Betterscanning(TM)’s new system includes a mask to apply around the negative to reduce internal system flare.  I’ve tried in the past to mask negatives using my own device, but found that it made no difference in image quality.

I recommend you test your own system of wet mounting to see if undermounting, carrier platen quality, or masking makes a difference in your scans.

See more J. Riley Stewart images here.

Varnishing photographic prints as a way to present them distinctively

Varnishing photographic prints on paper is an alternative to showing them matted and placed under glass. There are many benefits to varnishing prints. Let’s go through them.

But first, if you want to get an idea of what we’re talking about, watch this video. There are many ways to varnish prints; this is the technique I use.


Whether printed in a wet darkroom or printed by inkjet, photographic prints require some form of protection to keep them clean and protected. In early days of albumen and platinum paper prints, the old timers would wax the surface and place the prints under a mat, which was then placed under glass.  Waxing prints is an art form in its own way: if you’ve ever tried it you know what I mean.

Today, matting and glazing remains the standard technique to protect and display photographic prints. But there’s a significant aesthetic and physical cost to this presentation.  First, there’s the reflection off the glass that you have to fight before you can actually enjoy the artwork beneath. Second, glass is heavy and adds a lot of weight to the framed artwork. Third, glass is breakable; it needs its own protection for safety sake. Fourth, glazing requires matting; both adds complexity and cost to framing artwork in the traditional way.

Varnishing prints is an excellent alternative to matting and glazing.  A varnished print can be mounted into an open frame without additional protection. The varnish is washable and sufficiently durable to environmental grime or other hazards like sneezes, dirty fingers, or accidental rubs and scrapes.  Compared to traditional presentations, a framed varnished print is much lighter in weight, has no breakable glass to worry about, and requires no matting. Framing a varnished print is much easier and less expensive than framing traditionally.

But these physical benefits of a varnished print are of less importance than the aesthetic benefits, in my opinion. Modern varnishes (which are actually acrylics) gives the surface a subtle semi-gloss sheen but it also deepens the blacks and enhances global contrast and color vibrancy.  I prefer the semi-gloss surface, but know that you can choose any degree of glossiness you prefer, from full matte to very shiny gloss depending on the actual varnish applied. Regardless, from an aesthetic perspective, varnishing enhances a sense of visual depth in the image and gives it a very distinctive and  ‘painterly’ luminism-like appearance. Viewing these prints is a very different experience than viewing traditional matted/glazed prints.


Example of a hand-varnished print surface

Print varnishes are available from several suppliers, but they all are acrylic-based, which are applied in liquid form but which dry to a hard, durable coating after minutes to hours. I use Breathing Color Glamour II Glossy diluted with distilled water (2:1 or so) and only on rag papers. I use BC’s 9″ foam roller approach, but have tried other rollers with a lot of success. (I gave up on ‘any ole roller’ approach after spending 6 months reworking my technique because my hardware store changed their supplier of the rollers I was using, to disastrous effect).

Varnishing is fairly simple to master, but like any other print treatment it may require experimentation and practice. I’ve worked out a method that’s fairly reliable that I’m sharing below.

If you want to try hand-varnishing your photographic prints, here are a few tips from my technique:

1. Use multiple thin coatings of diluted varnish. It helps extend tack time until you get the coating even. It helps sneak up on the degree of glossiness of Glossy varnish, as the amount of gloss is directly related to the amount of varnish applied. Multiple coatings help avoid little air bubbles that can ruin the surface. These bubbles will form regardless, but thicker coatings may trap them and never let them go. Three thin coats are much better than one thick one.

2.  I varnish under a dust tent (homemade) and varnish on a vertical surface. Most people varnish flat on a horizontal table. My table is stood up (it’s actually a 4×8′ sheet of plywood), and I tape the upper corners of the print to the table.  I do this to avoid room dust falling on the print during drying time. I vacuum the tent before each session.

3.  I use the hose from a HVLP spray painter and as soon as the varnish on the print starts to ‘settle’– I keep a steady stream of warm air circulating over it to speed drying time, which speeds the application of 3 coats significantly.  You can get by without the rapid drying, but you’ll need to wait until each coat dries before applying the next. The longer it stays “tacky,” the more risk there is that dust will settle on the surface (not good, as even minuscule dust particles that get embedded in the varnish will show up like tiny stars.)

4. Be sure to varnish all the way to the edge of the paper, even the white borders. If you don’t, the paper will dry unevenly and cause serious warps and wrinkles that extend into the image that are very difficult to flatten. Just saying….

There are alternatives to varnishing techniques, and I’ve tried most of them. Some recommend using a sprayer. Some roll varnishing with the print flat on a table. Others have elaborate spraying rooms that minimize dust and blow back. I settled on the techniques above because of the final surface appearance and minimal problems with dust and wasted varnish.

Like anything we do in making photographs, varnishing is as much an art as it is a science. A change to any one part of the workflow (size of print, supplier of the varnish, a change in application method, etc) requires a re-work of the technique until you get used to the change. Be prepared to waste some prints, especially if you get into large prints.

Hope this helps. Let me know how it goes.

J.

See more J. Riley Stewart images here.

Unlocking Your Scanner to Get Great Scans from Film

B&W fine art image of the Nez Perce River in Yellowstone NP
“A Moment on the Nez Perce” by J Riley Stewart

Why Scan Film?

This tutorial covers how I manage my film scanning to get every bit of tonal information from a negative and avoid clipped shadows and highlights, which ensures I get great scans from my film images.

Scanning film is a necessary evil if you shoot using film cameras and want to convert the film image into digital format for proofing, sharing to the web, making a digital negative for alternative processes, or for inkjet printing. Scanning film requires a special machine (a transparency scanner) that passes light through the film and to the scanner’s sensor, and records minute differences in density and color at millions of sampling points on the film, and records those differences in a digital file.

For some images on film, we can relay on automatic settings in scanning software to adequately read and convert the film image to an acceptable digital image. But there will always be those film images that fail miserably during scanning; automatic settings and presets just can’t provide a digital image that we can process into a fine image for printing or sharing. For those film images, we need to learn how to force the scanner and scanner software to do the best job possible to get all the useful information from the film. 

Software can make a big difference in user experience. I’ve tried Epson Scan®, SilverFast®, and VueScan®. By far, I’ve found VueScan is the most flexible and effective, and what I say below relates to its use. VueScan, because it includes so many controls for so many scanners, can be frustrating to use sometimes, but if you follow my workflow, and refrain from experimenting too much, you’ll be okay (I think). Try VueScan® here: (I have no association with it). I have no doubt that if all your negatives (color or B&W) are perfectly exposed and developed, you won’t need the advanced tools built into VueScan (however, it will take care of those too) and so the basic scanning software like Epson Scan will work fine. But there are those times when things don’t go as planned, and you’re left with a great composition on a crappy negative. That’s when you need the tools and the skill to get every bit of useful information from the negative before you can make a great image. I’ve compared Epson Scan to VueScan in scanning B&W film here. Take a read if interested.

Take Home Points

  • Scanning film is a craft that requires learning, but folks, it’s not rocket science. You don’t need a degree in scanning to get the job done. 
  • Scanning film is a technical task. There is little usefulness for creativity during scanning.
  • Don’t ask too much of your scanner and scanning software: it’s only good for one thing, and that’s to get every bit of useful information from the film image as is possible.
  • There is no reason a properly exposed and developed negative can’t be scanned without clipping any shadow details or any delicate highlights, even specular highlights. But to scan some film images, you must know how to control the scanner and its software.

Unleashing the power of the film scanner

The image above (“A Moment On the Nez Perce River”) is an example from a scene having extreme dynamic range that can give automatic scanner settings the fits. Automatic scanner settings will often assume a perfectly exposed negative, perfectly developed negative, a ‘common’ film or type of film, a ‘common’ type of scene, and/or it assumes you want sharpening, dust removal, color balance, resolution, and any number of other assumptions. Perfect rarely happens in real life photography.

Scanning film is a technical task. There is little room for creativity, so don’t try to make it that. But, because it’s technical, realize that you must control the machine (i.e., the scanner and its software) to get the most out of it. Luckily, controlling the machine isn’t difficult if you use the right scanning software. Like any consumer machine, its controlling software has built-in defaults and automatic settings for folks who just want something fast. If you’re serious about getting great scans, you need to know to turn off all/most of the built-in presets.

Effective Scanning Workflow (VueScan®)

Initial settings:

  I scan the negative as a negative, both for color and B&W films. I sometimes deviate from this with color negatives I’m having issues with, but that’s not common.  Here’s my initial settings in VueScan using my Epson V700.

  Using these settings, click <Preview> and it will give a quick scan of the negative converted to a positive (like normal). Here’s what I’m scanning. It’s a Kodak Tri-X negative that’s been exposed through a Stouffer’s Step Wedge®. The step wedge has a minimum optical density at step 1 of 0.05 and a max density at step 31 of 3.05 in 1/3 stop increments. So it can mimic a scene having exactly 10 stops of luminance range.  Much of this is altered by negative development, which I won’t discuss here. The step wedge is merely a tool I’m using here to give you a standard ‘negative’ to talk about. Development of the negative can alter the actual densities from those 10 stops of light (i.e., by pushing or pulling exposure and development). But you’ll notice that while the darkest step (Step 31) is nearly black, the lightest step (Step 1) is far from pure white. The Epson V700 scanner has the latitude to record the 10 stops of density on film, and so does yours, probably.

Now the fun starts. We’ll set the scanner to capture every bit of information from a negative having 10 stops of density range (and more).  

This is a histogram VueScan produces using these initial settings. You can change this histogram (and the resulting image) remarkably by adjusting certain settings. I’ll show you.

  The initial histogram produced an image from 0% Luminance (L) to Zone VIII (82% L) above film-base + fog (FB+F). Shadows are on the left; highlights are on the right, just like a normal histogram. I count 27 separate peaks, including all tones that are combined within the largest peak at the far left of the histogram. So, I’ve lost 4-5 stops in the shadow areas of the step wedge negative. If I printed this image as scanned, it would clip the darkest 6 zones or so to black. That’s not good enough for me, and it’s important to know that we can get more information from the shadows than the initial scan provided.

You probably know that film development modifies the overall contrast of densities on the film. The measure of contrast is called the Contrast Index (CI). The more development you give a specific film, the greater its CI will be, normally from 0.4 (low contrast negative) to 0.8 (very contrasty) or so. Vuescan includes  several models (target film profiles), including many that enable matching of actual negative CI to model CI for B&W films. Go into the <COLOR> tab and you’ll see you can change the target film profile to several “model” renderings. The initial histogram above shows a <Generic Color Negative> model even tho I’m scanning a B&W step wedge. 

  You can experiment with varying film models under the <Color> tab. I like the Kodak TMAX 400 model as it allows me to select different contrast index (CI) levels so that I can better capture the shadows and highlights. Below is exactly the same scan, but using a different setting in the <COLOR> tab.

  You notice the left and right side of the range are now completely inside the extremes (levels) shown by the little red-green-blue triangles. You can stop here and be assured you’re getting every bit of data from the negative, with plenty of room to adjust levels and curves in post without clipping.

  If I do anything beyond this, it’s to set RGB Exposure (<Input> tab) to move the film FB+F peaks as far left as possible without clipping any important shadows. I want to eliminate FB+F as it has no useful information. In other words, during scanning I want to “expose to the left,” just the opposite of shooting a digital camera. Remember that when scanning a negative, digital noise (if any) will occur on the far left of the histogram, where negative densities are least. So don’t be too aggressive about this setting; don’t move your deepest important shadows too far to the left. When done right, you should still still the FB+F peak.

Setting RGB Exposure in VueScan is the one of the pre-scan settings  (i.e, machine settings) you can select on the Epson Vxx models. VueScan is the only software I’ve tried that is able to direct the scanner to slow the light emitter bar based on the RGB Exposure setting.  All other adjustments you make in software is performed on the image after scanning it, similar to PS or Lightroom does, which adjusts pixels and can cause artifacts. So there’s value in adjusting the RGB exposure to fit the negative.

The other important machine setting enabled by VueScan is the R-G-B analog gain controls that can become important when scanning color films. Film models will often presume specific R-G-B gain settings, so you need to check to see if those settings are causing your histogram to ‘dump’ tones.

Below is the exact same negative scanned using 20% more exposure so that the film base plus fog (FB+F) falls as near to the left as possible: That first little peak is FB+F.

  To recap, I’ve selected a film model that gets the shadows away from the left edge so I can clearly differentiate their peaks on the histogram, then I’ve increased RGB Exposure to ease them back to the left without clipping any important shadows (FB+F is not important).

  This is where I stop and hit <SCAN>. It’s the best I can do with this negative under any circumstances. Granted, I may need to optimize my exposure and development of TXP to get the deepest shadows away from the film base.

I’ll give another example of an Ilford FP4 negative exposed through the Step Wedge and given my standard development for FP4.

The first histogram results by scanning the film using a <GENERIC FILM> preset. Note how both the shadows (empty areas + Steps 1-3 on left of histogram) and the highlights (Steps 29-31 and blocked areas on right of histogram) are not well separated. In a final image or final print, this “automatic” scan would have clipped shadows and highlights. 

The next histogram is from the exact same negative, but the settings have been explicitly set to optimize the output image file to separate the various step wedge densities. In this scan, the RGB Exposure was set to 1.12 to move everything (all densities) to the left. Then I chose a film model having a contrast index (CI) of 0.70 to best match the actual CI of the negative. You’ll see now that every one of the 31 steps of the step wedge is discerned in the histogram, and can therefore be realized in a post-processed image or print. No important shadows nor any highlights will be clipped in the image.

I hope this was helpful, and I hope it doesn’t sound too complicated; it’s really not. It takes some time to learn the essentials of scanning negatives, but once you’ve invested in that time, you’re good to make great scans forever.

 I wrote a tutorial on how to easily convert your flatbed scanner to do wet mount scanning without buying special holders. I can perfectly wet mount 2 strips of 120 or 2 4×5 negatives using this technique in about 30 seconds. Here’s the tutorial:

https://www.jrileystewart.com/blog/2018/03/02/easily-convert-your-flatbed-scanner-to-a-wet-mount-workflow/

Happy scanning!

Subscribe to my newsletter “Under the Darkcloth” here.


I’m not that interested in stepping into the 21st Century

Magnolia Plantation along the Ashley River, SC
“Lowcountry Cypress” (Copyright 2015, J. Riley Stewart), 40×32″ Limited Edition photographic print.

See more at J. Riley Stewart’s galleries

If you still shoot film, what would you do if, for some reason, its supply suddenly dried up? What if film was no longer available at any price?

I know it’s a small possibility, at least in the mid-term, but…. what if?

To most photographers–amateur or professional–this is a moot point. They’ve already turned to digital capture, and most likely don’t care about the availability of film. It’s that very phenomenon that has drastically reduced the supply of film over the past 20 years. Sure, we can still buy film in almost all formats, but the number of brands and types of film is nothing like it was in the past, and those films still available costs us a lot more. But I should add, the modern films available today are exquisite and well-worth the cost.

I still shoot film, mostly large format 4×5 and 120 in both B&W and color. The biggest reason I use film is that it gives me “a look” that isn’t yet possible with digital capture, especially when my goal is to make larger scale photographic prints, i.e., anything larger than 16×20 inches. Film capture enables large prints that are alive with delicate details and textures and tones; prints that make you want to step into them and explore.

So what’s a guy to do if a precious resource behind his passion dries up? I plan to be making pictures for the next 20-30 years, and there’s no guarantee that film will be accessible during that span of time given the direction analog photography is going. Will I have to step into the 21st Century “digital” age?

I think I’ll do just the opposite. Before the digital revolution, and even before Kodak’s release of the first “Brownie” camera in 1900, people were making exquisite photographic prints from wet plates, dry plates, tin-types, and paper negatives printed on albumen-, silver gelatin-, and platinum-coated papers. The earliest photographic processes didn’t require manufactured film to produce beautiful photographs.

All these old processes excite me much more than bits and bytes. Sure, some of my excitement relates to the craft involved with these processes (the “magic” once associated with photography), but most of it relates to the aesthetics of the resulting prints, which we can still see in many of our finest art museums 150 years after they were made.

In fact, I may not wait for the disappearance of film, even if it never comes. If Mathew Brady could do it, so can I.


Subscribe to our mailing list

* indicates required

Location

Email Format

View previous campaigns.