Darkroom: a place where where analog photographers go to play.
If you take pictures using film, you need at a minimum some dark place (or some apparatus) where the film can be safely transferred from its box into the camera (for sheet film) and some dark place where you can transfer the film from its carrier to the developing tank, or even to develop film and paper.
Anyone who has had a darkroom knows there are hundreds of tools required to produce one print. The obvious among them being developing equipment (beakers, bottles, chemicals, a scale, etc), a good sink, an enlarger, light stand, working tables, trays, tongs, thermometers, timers, etc, etc. Even novice film photographers know these essentials.
But there are a number of ‘tools’ that are very useful that nobody talks much about. Here’s my list of the top 5 hacks for getting things done as an analog photographer.
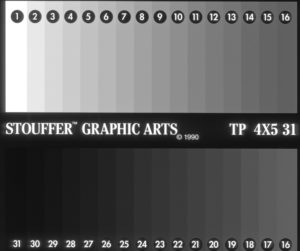
1. Stouffer Step Wedge
 Have you ever shot a roll of film and then after scanning, noticed that the shadows were all dumped or the highlights blocked up? Were the images more grainy than you expected? The cause of such surprises may be because the film responded exactly as expected for the developer used to render the latent image, but you just didn’t realize it.
Shooting with film requires an understanding how your film(s) of choice behave upon exposure and then upon development. The choice of B&W film can not be divorced from the developer used to render the latent image. While it may be enticing to choose a film and then just pick a developer for that film based on someone else’s recommendation and then live with the results, is not something I’d ever recommend. We need to understand the tools of our craft.
The choices in B&W developers are great, especially if you make your own brew, which opens up a vast number of specific formulas, each having it’s own way of acting on that film. Some will provide full box speed while others will require 1/2 box speed (as an example). Some will produce fine grain while others more grain. Some will selectively restrain development in the highlights (compensating effect) while others will respond to exposure more linearly.
The only way to understand how your film will behave in a specific developer is to test. You need to determine the speed of the film in your developer, the range of density over a 10+ stops of exposure (i.e., Zones 1-10), and you may want to explore pushing and pulling development to achieve certain effects under low or extreme lighting.
By far, the most useful tool I’ve found for doing these experiments is the Stouffer Step Wedge available from Stouffer Graphics. And no, you don’t need a spectrophotomer to do this test, even if it gives you more precise data and calculations. I simply use Photoshop sampler tool to determine Luminance values from 0 – 100% for each wedge of the step exposed onto my film and developed in my developer. Percent luminance relates directly to Zone values from Zone 0 – Zone 10.
The benefits of using the step wedge to expose film for testing is consistency, because you’re going to expose several sheets / frames and you don’t want to rely on variations of sun/clouds/shutter/aperture to confound things. The way you use it is to overlay the film with the step wedge, I use the 4×5 step wedge because I use 4×5 film, but it also comes in strips for testing roll film. Then cover the sandwich with a sheet of glass to keep them flat. Then I flash the sandwich with my speedlight to expose the film through the step wedge, then develop the exposed sheets/rolls of film at 3-4 different durations. You’ll need to experiment with how much power to set the speedlight, and you may need neutral masks to reduce it further (I use plain bond paper at the speedlight source).
The goal with exposing the sandwich is to get a density in the developed negative at section 31 on the step wedge very close to film base + fog (FB+F). A couple tries and you should be able to nail it. Once you have that reference set, simply measure luminance (L) for each step on an image using the Photoshop Info brush or Digital Color Meter (for example) and plot each reading. Here’s an example of the results from TXP developed in my developer of choice for various times, as an example.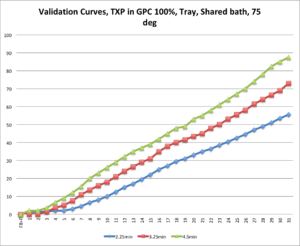
To learn more about such characteristic curves using spectrophotometric equipment, see https://www.filmshooterscollective.com/analog-film-photography-blog/a-practical-guide-to-using-film-characteristic-curves-12-25.
Since I like open shadows and full scale negatives, this data tells me I should plan on developing TXP in this soup for 4.5 min for Normal development, and that if I need to pull development to N-1, then about 4 min should be close (i.e., a normal Zone 9 density will render as Zone 8). To determine an N+1 development, I would need to define the curve at 5.25 min or maybe even 6.4 min.
The point is, the Stouffer step wedge is a great tool if you want to know how your film(s) behave in certain developers, at certain times and temperatures, or certain processes. There are hundreds of conditions you might want to compare to really nail down the best way to get your film to behave under various taking conditions, or if you just want to know how consistent your own process is.
2. pH meter
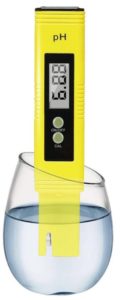 If you mix chemicals, even if the chemicals are commercially packaged, a pH meter is an essential tool for your darkroom. I think I paid $15 for mine years ago, and I use it all the time without problems. The ATC brand shown comes with calibration buffers.
One of the earliest indicators of developer failures can be a fall of pH (i.e., becoming less alkaline). Oxidation of buffers or active agents often change the pH of the solution, and a small change can completely change the way the active ingredients behave with your film. I check pH of my home brew developer for every batch, and know that it should be 10.05 before use. Add to this a measurement of Total Dissolved Solids (TDS), which indicates you’ve added the prescribed ingredients in the right amounts, and you should be good to go. In my standard brew, I know the stock solution should have 4335-4355 ppm TDS. The TDS meter came with my purchase of a Zero Water pitcher (see below).
3. Sodium Carbonate, Washing Soda
Once a mainstay in any darkroom, washing soda (100% Na Carbonate) is great not only for
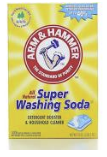
regulating the pH of developers, but it also makes a great cleaner for trays, glassware, and even negatives. I keep an open container sitting on my darkroom sink and use it instead of dishwashing soap. It makes my glassware squeaky clean (that’s how I know it works.)
Washing soda used to be on every grocery story shelf, but today that’s not the case. You may need to order it from Walmart, or just about any store that sells cleaning supplies. Just google Arm & Hammer Washing Soda to see where you can get it.
4. Water filtration system with TDS meter
Chlorine- and metal-free water is a must have when preparing chemicals for developing film. For years I’ve bought gallon bottles of distilled water for this purpose, at about $1 per gallon. Too often I found myself wanting to develop film and not having enough distilled water on hand.
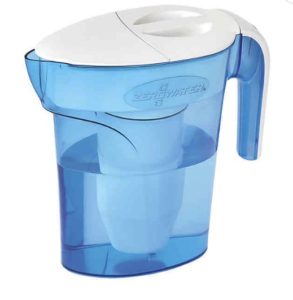 I recently bought a Zero Water® filtration system to keep me from having to run to the store when I needed distilled water. I estimated at $1 per gallon of distilled water, I could pay for this thing with the original filter, which in my area I estimate will filter up to 50 gallons of water. It comes with a Total Dissolved Solids meter, which I also use to monitor my developer solutions (see above). Three full filtrations will fill a gallon jug with 0 TDS water, so I won’t need it everyday.
5. Air Evacuator
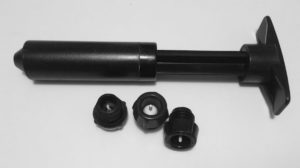
Probably the most important tip of the list is a way to ensure the life span of oxygen-sensitive chemicals in the darkroom.
I bought this “wine bottle air evacuator’ at a kitchen store over 15 years ago for just a few dollars, and it’s seen a lot of use.
Anyone who works in a darkroom knows that oxygen in your chemicals is the enemy. It shortens the shelf life to sometimes a few days when oxygen is given the opportunity to dissolve into the chemical solutions; and it eagerly takes every opportunity to do just that.
“How to protect photographic chemistry from oxidation?” is a common question on photo threads among the analog community, and there are lots of ways to stabilize the activity of stored chemicals. I tried many of them: marbles, collapsible jugs, aliiqouting into smaller bottles which are kept full, etc, etc. The wine bottle air evacuator is by far the easiest, cheapest, and most effective method I’ve ever used.
The only limitation, if you can call it that, is that the bottles used to store chemistry must fit the rubber caps intended for use with the evacuator (shown in picture). Luckily, brown and green bottles that wine comes in are perfect for the task. Yea, you have to buy wine to use this tool! It happens in my house that we always have empty wine bottles, so that ain’t a problem.
So, how well does it work? I went through a time when I was trying every film and paper developer known to man. I’d mix them up and use just a fraction of the supply, then store the bottles for months, then retry them again. Specifically, I’ve kept D76 stock solution for over a year in a sealed bottle using this evacuator; without any loss of activity. The vacuum stayed intact and the solution protected from oxidation. That’s a pretty good testament.
I’m a cheapskate typically, and have always balked at paying so much for the products offered to the photographic community. My darkroom and my field pack are full of things I’ve made myself using reengineered ideas and workarounds.
Hopefully, some of you finding this article will get some ideas about what might be helpful in your own craft.
Comments or questions welcomed.