I’ve been using Kodak’s Flexcolor chemistry for 4 years with acceptable results, but have found the variability from day to day and batch to batch to be irritating. I thought it worthwhile to test a simpler formula published many years ago called the “Dignan’s 2 Bath C41 process.” (see http://www.apug.org/forums/forum223/34413-dignan-ncf-41-divided-color-negative-developer-2.html).
Using Kodak chemistry essentially requires mixing a fresh stock solution that must be used within a week’s period, even if developing far less than the the published capacity claims. In low volume operations, this can mean higher cost per roll/sheet, since you are forced to throw away “unused” developer. The modern C41 chemistry workflow requires very careful measurement of 4 solutions, and tight temperature and time controls to make it work reliably in small volume manual operations such as small tank or tray development. If you have an autoprocessor like a Jobo, this may not be important to you. But I still develop my 4×5 negatives in open trays sitting in a tempering bath, and tightly controlling temperatures over several hours is challenging.
As a test, I purchased the chemicals required to mix Dignan’s C41 developer, which requires two stock solutions (A and B). The workflow is far simpler with this formula. First the negatives are bathed in Solution A for a time, then transferred to Solution B for a time. Bleaching, fixing, and stabilizing then occurs as with the Kodak workflow. The 2 batch workflow is claimed to be temperature tolerant: somewhere around 25 degree C and it need not be precise. The instructions prescribe at least 3 min in Solution A and at least 6 min in Solution B, with no wash between solutions. Sol A never exhausts because it doesn’t oxidize nor does it dilute over time. You just keep using it until you deplete the volume, and mix up another batch. Sol B is one-shot because the carryover Sol A on the negatives will consume the buffering power of Sol B quickly.
Most of the discussion on the boards about Dignan’s chemistry are quite old, perhaps dealing with older films, and were not very encouraging. My main concerns, based on the discussions, were 1) low saturation negatives and 2) grainy negatives.
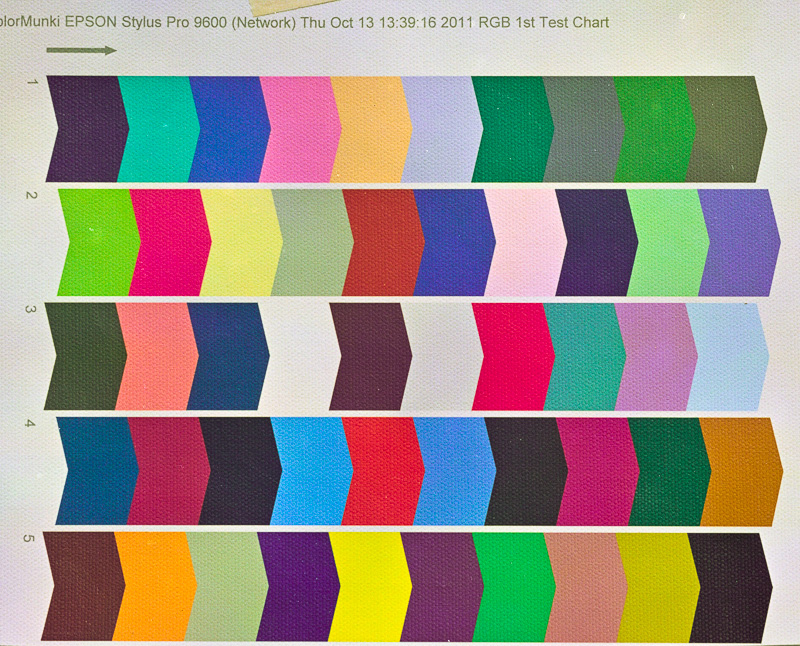
I found both concerns eliminated after a simple test. I shot a full-scale color print (Colormunki print test onto canvas) placed in full sun using a 4×5 camera loaded with Ektar 100 film. I developed one sheet in Dignan’s formula for twice the rated times (i.e., 6 minutes in Solution A and 12 minutes in Solution B) at 30 deg C. The next day, I developed the second sheet closer to the prescribed time and temperature: 25 deg C, 3 min Solution A and 6 min Solution B. Solution B must be fresh, but I used the same solution from the previous day’s work. In both cases (Day 1 and Day 2), the pH of my Solution B was 11.88 at 25 deg C.
Here’s a jpg of the scanned and converted negative from Day 1 (i.e., higher temp and time periods). The colors are fully saturated and the amount of grain was very typical to what I see with Flexicolor chemistry on Ektar (i.e., very fine). There were minor color shifts I had to correct in software, but again, they were pretty typical of what I see using Flexicolor chemistry on Ektar film.
Even with the higher temperature and extended times that I used on Day 1, I still noticed some color mottling across the film frame that indicates uneven development. I saw this especially at the edges of the negative, and this was very obvious with the Day 2 negative, for which I used the published time and temperature specifications (75 deg F, 3 min Sol A, 6 min Sol B). This tells me that I need to further extend either both time or temperature in both Sol A and Sol B. I don’t believe exhaustion of Sol B on Day 2 was the culprit because the pH had not changed. Instead, I suspect that these modern films are engineered to maximize penetration of chemistry into all emulsion layers at high temperatures and short times, since the normal development of C41 is 100-103 deg F for 3:15 minutes. I plan to adopt 100 deg F for 5min (Sol A) and 10 min (Sol B) as an arbitrary start point for further testing. I know this defeats one of the benefits of the 2 Bath workflow (i.e., room temperature processing), but it believe it will be necessary.
If you are searching for alternative C41 developers, you might try this old fashioned formula. It’s very simple, cheap, and should be robust.
Update 10/28/15: I’ve been testing further. My thoughts above haven’t changed, but now I’ve developed a number of real negatives and I’m even more impressed with the NFC-41 workflow. Scans well, minimal grain (Ektar and Portra films). Some of the problems I’m seeing with uneven development have to be worked out. I typically use tray development, and I suspect that even though I’m getting good saturation in Bath A, it’s more important to agitate in Bath B to get even development. A couple of my negatives seem “undeveloped” in the centers of the negatives, where they have the most tendency to stagnate the flow of Bath B while in the tray. Tray development may not work here: either a carrier that can be taken from Bath A to Bath B without the need to manually shuffle the negatives, or perhaps using BTZ-like development tubes. I’ve used BTZ tubes before and they work great, but you have to constantly roll the tubes and that’s a pain.
Warning: There is no real “buffering” power of Bath B. It’s only potassium carbonate and potassium bromide; no buffers. So be sure to use fresh Bath B for every set of negatives. I tried to test the capacity of Bath B by running several negatives before changing to fresh. The pH went from 11.9 (fresh) to 11.2 (used), and the last negatives were extremely thin. The bath volume was about 500 mls, and probably 5 drained negatives went through it. So, don’t trust that Bath B has much more capacity than a couple negatives..test it in your own workflow. One idea for stabilizing Bath B capacity would be to adopt a suitable buffer, e.g. Sodium bicarbonate: Sodium Hydroxide. The range of pH for this pair is 9.8-11, adjustable by the amount of NaOH added. Kodak Flexicolor pH is 10.03, and that should be the target pH of the bicarbonate buffer used in a putative “improved” Bath B. I might try this. it would be extremely cheap and convenient since the ingredients are available as baking soda (sodium bicarb) and Red Devil ® Lye.
Update 11/5/2015: After several more negatives, tray developed at 100 deg F for 6 minutes in both Bath A and Bath B, I haven’t stabilized the process. The image on the negatives has consistently been thin using this approach. That can be a good thing if you’re scanning your negatives like I do, but what’s happening with my technique is that I’m getting “too thin” negatives. I’m giving up on this for the time being…may return for further experimentation later.

Varnishing prints is an excellent alternative to matting and glazing. A varnished print can be mounted into an open frame without additional protection. The varnish is washable and sufficiently durable to environmental grime or other hazards like sneezes, dirty fingers, or accidental rubs and scrapes. Compared to traditional presentations, a framed varnished print is much lighter in weight, has no breakable glass to worry about, and requires no matting. Framing a varnished print is much easier and less expensive than framing traditionally.
But these physical benefits of a varnished print are of less importance than the aesthetic benefits, in my opinion. Modern varnishes (which are actually acrylics) gives the surface a subtle semi-gloss sheen but it also deepens the blacks and enhances global contrast and color vibrancy. I prefer the semi-gloss surface, but know that you can choose any degree of glossiness you prefer, from full matte to very shiny gloss depending on the actual varnish applied. Regardless, from an aesthetic perspective, varnishing enhances a sense of visual depth in the image and gives it a very distinctive and ‘painterly’ luminism-like appearance. Viewing these prints is a very different experience than viewing traditional matted/glazed prints.
Print varnishes are available from several suppliers, but they all are acrylic-based, which are applied in liquid form but which dry to a hard, durable coating after minutes to hours. I use Breathing Color Glamour II Glossy diluted with distilled water (2:1 or so) and only on rag papers. I use BC’s 9″ foam roller approach, but have tried other rollers with a lot of success. (I gave up on ‘any ole roller’ approach after spending 6 months reworking my technique because my hardware store changed their supplier of the rollers I was using, to disastrous effect).
Varnishing is fairly simple to master, but like any other print treatment it may require experimentation and practice. I’ve worked out a method that’s fairly reliable that I’m sharing below.
If you want to try hand-varnishing your photographic prints, here are a few tips from my technique:
1. Use multiple thin coatings of diluted varnish. It helps extend tack time until you get the coating even. It helps sneak up on the degree of glossiness of Glossy varnish, as the amount of gloss is directly related to the amount of varnish applied. Multiple coatings help avoid little air bubbles that can ruin the surface. These bubbles will form regardless, but thicker coatings may trap them and never let them go. Three thin coats are much better than one thick one.
2. I varnish under a dust tent (homemade) and varnish on a vertical surface. Most people varnish flat on a horizontal table. My table is stood up (it’s actually a 4×8′ sheet of plywood), and I tape the upper corners of the print to the table. I do this to avoid room dust falling on the print during drying time. I vacuum the tent before each session.
3. I use the hose from a HVLP spray painter and as soon as the varnish on the print starts to ‘settle’– I keep a steady stream of warm air circulating over it to speed drying time, which speeds the application of 3 coats significantly. You can get by without the rapid drying, but you’ll need to wait until each coat dries before applying the next. The longer it stays “tacky,” the more risk there is that dust will settle on the surface (not good, as even minuscule dust particles that get embedded in the varnish will show up like tiny stars.)
4. Be sure to varnish all the way to the edge of the paper, even the white borders. If you don’t, the paper will dry unevenly and cause serious warps and wrinkles that extend into the image that are very difficult to flatten. Just saying….
There are alternatives to varnishing techniques, and I’ve tried most of them. Some recommend using a sprayer. Some roll varnishing with the print flat on a table. Others have elaborate spraying rooms that minimize dust and blow back. I settled on the techniques above because of the final surface appearance and minimal problems with dust and wasted varnish.
Like anything we do in making photographs, varnishing is as much an art as it is a science. A change to any one part of the workflow (size of print, supplier of the varnish, a change in application method, etc) requires a re-work of the technique until you get used to the change. Be prepared to waste some prints, especially if you get into large prints.
Hope this helps. Let me know how it goes.
J.