Photographers who scan film will eventually ask themselves whether it’s worth the cost to get a drum scan of their negatives. Let’s discuss how drum scanning compares to flatbed scanning to learn when you might need the extra quality provided by that mystical drum scanner.
I’ve used film as my image recording tool since the early 1980s. I once printed the images in a wet darkroom on sensitized paper, but have since moved to scanning the negatives and using the resulting digital images to modify and make prints using inkjet printers. This is called the hybrid workflow, and most film users use it today, partially or totally.
Resolution and acuity are two very common ways to assess technical quality of photographic images. Resolution refers to how much subject detail is retained in the image or print. Acuity refers to the sharpness of fine edges and lines.
I own and use both the Epson V700 flatbed scanner and the Howtek 4500 drum scanner. I’ve made thousands of scans from each, so I think I’m qualified to help you answer “Do I need a drum scan?”
My needs for scanning will likely differ from yours. I like to make large high resolution prints. I’ve sold hundreds of such prints, and many up to 32×40 inches in size from medium- and large-format negatives. My experience with 35mm negatives isn’t vast, but I’ve scanned perhaps hundreds of them for evaluation or printing.
Large size prints demand the highest level of scanning resolution. Any lapse in quality will utterly destroy the feeling of a print needing a high sense of texture or subject clarity. But how much resolution is enough? Can you get by with a more affordable, small flatbed scanner or do you need to drum scan your negatives?
I’m going to show you a real life test that will illustrate the difference in resolving power of a drum scanner and a modern Epson V700 flatbed scanner. I’m using a 4×5 negative, but you can reasonably extrapolate my findings to any size negative.
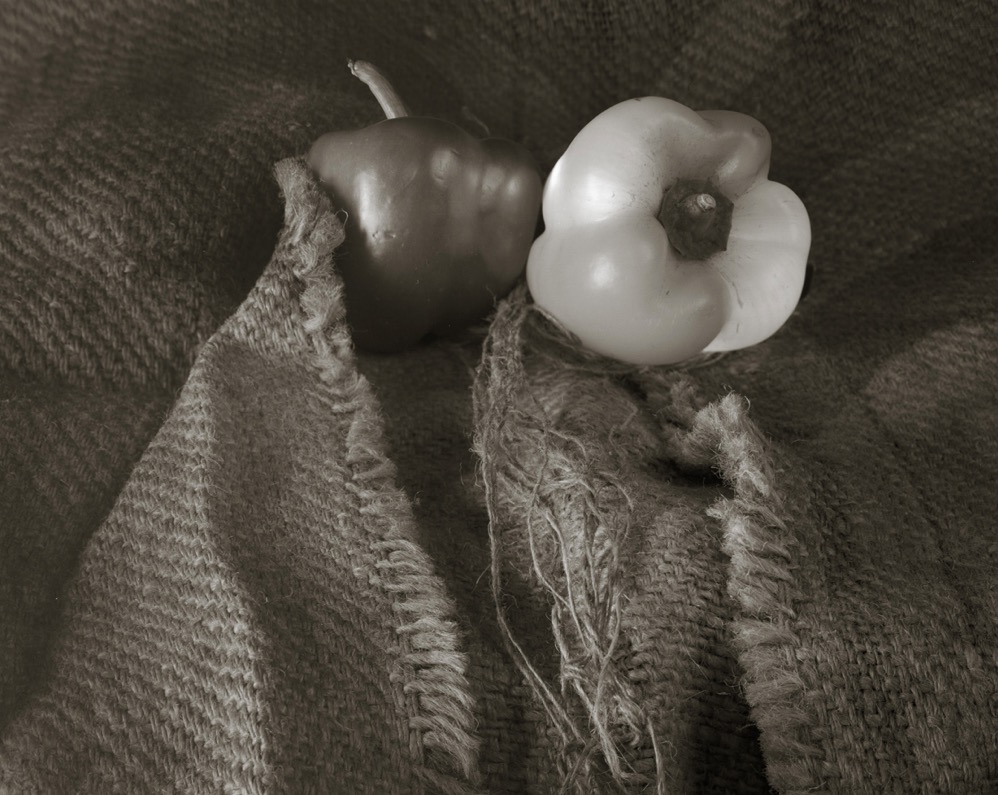
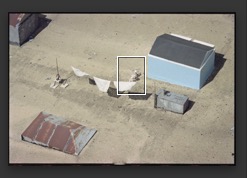
The image below “Out of the Sack” is from my “Afterglow” project. The same 4×5 negative was scanned two ways: (1) Epson V700, undermount, wet mount technique, 4000 dpi using VueScan™ and (2) Howtek™ 4500 drum scanner at 4000 ppi and a 6 micron aperture using DPL™ software. Both resulting scans produced negatives in the 320 MP range, which means printing them at 300 dpi makes a print around 60 x 48 inches.
The small white rectangle represents an approximate 2″ wide section of the large 60 x 48″ print. We’re going to look at this section in detail to compare the V700 to the Howtek scan.

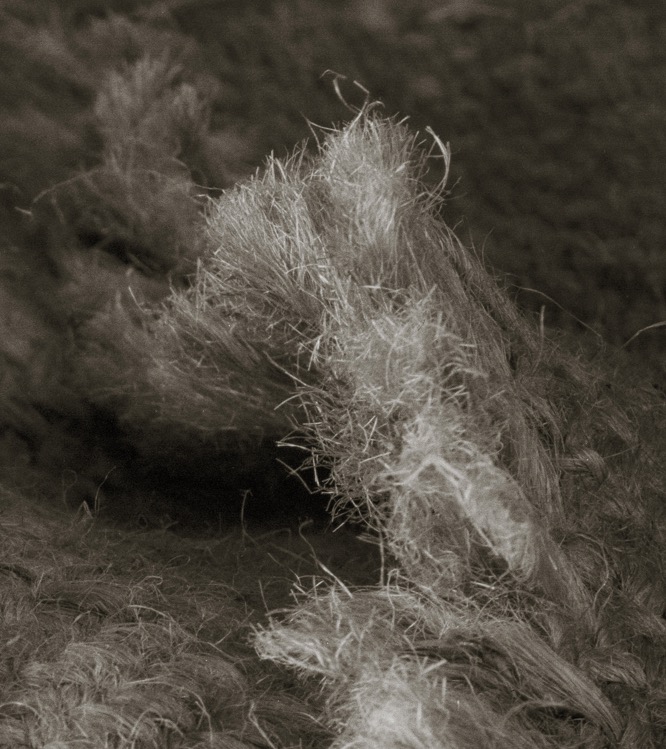
Remember the 2″ wide area of interest is a very small section of the 60×48″ print, but is still large enough to elicit a sense of fine texture and detail in someone viewing the photograph on a wall.. But in a 30×24 ” print, the area of interest would be 1″ wide, and in a 15 x 12 ” print, 0.5″ wide. And at some smaller print size, you’d need a loupe to see those same details and texture.
This is important, because any difference in quality between the two scans will be diminished merely because of the size of the print, regardless of viewing distance. As the print gets smaller, the relative significance of any small section of the print also diminishes. So if you routinely print no larger than say, 16×20 inches, the conclusions I draw from this experiment will have far less importance than I draw from the large reference photograph.
Let’s see how the V700 and Howtek compare in a real-world scenario.
The images below are 1:1 depictions of the small rectangle in the image above (i.e., the area of interest). On the left is the drum scan (Howtek 4500) and on the right is the flatbed (Epson V700). Neither image has been sharpened. Which is “better?”
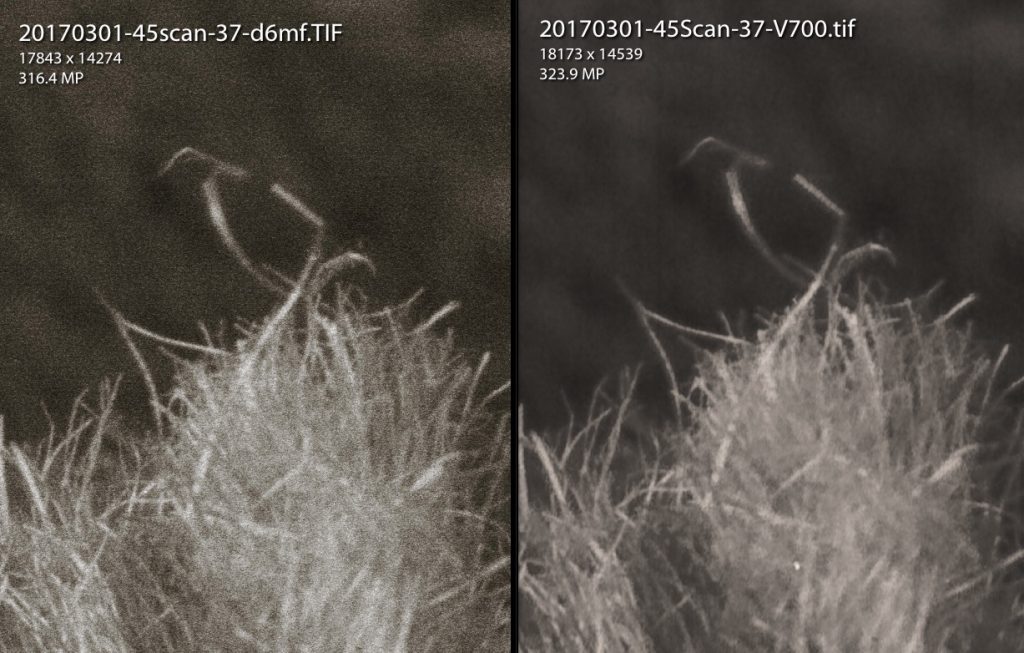
First, there are differences between the drum scan and the unsharpened flatbed scan. Resolving power of the Epson V700 is very, very close to that of the Howtek 4500. Almost every element (lines, shapes, tones) in the image can be found in both scans. To assess resolution I like to look at lines that create a “V” pattern (or intersectional angles) and at parallel lines that create a line of shadow between them. You can see that almost 95% of such patterns appear in both, in both highlight tones and shadow tones. There are only a small number of very insignificant angles and inter-line shadows that can’t be found in the V700 scan. This indicates that resolving power in the V700 is very close to the Howtek drum scanner.
Second, the main difference between the drum scan and the flatbed scan appears to be due to the higher acuity possible in the drum scanner. All edges are just a bit sharper on the drum scan, giving the appearance of higher resolution, but in fact it is not. Acuity can be best enhanced by sharpening the image (but remember, excessive sharpening can also degrade resolution).
The next image permits side-by-side comparison between the unsharpened drum scan (Howtek 4500) and the V700 scanned image slightly sharpened in Lightroom. Which is “better?”
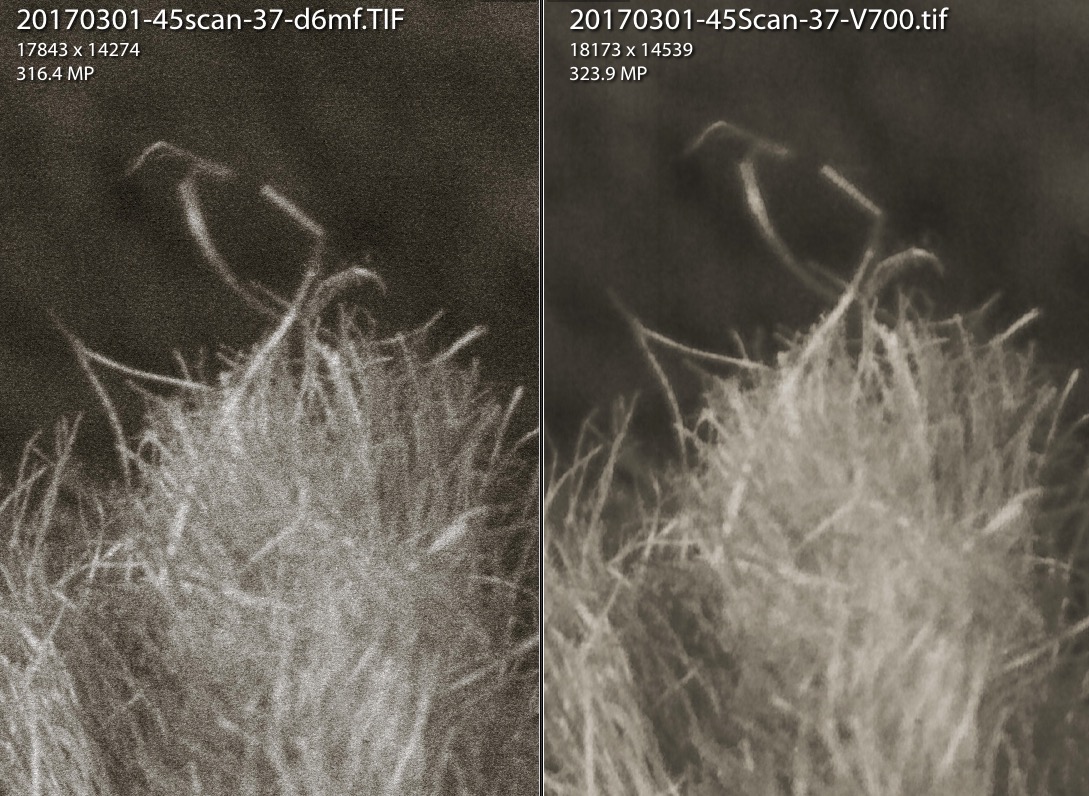
Indeed, a slight degree of sharpening to the V700 scan improves, but does not equal, the acuity of the drum scan. But it comes really, really close. The settings I used to sharpen the V700 image in Lightroom were Amt 91, Radius 2.0, Detail 33, and Masking 94. This is a small degree of sharpening on a 320 MP image.
What do these comparisons tell us?
My results are not inconsistent with those reported by others. They did the same thing (perhaps not as definitively as I have) showing the differences in image quality between a highly magnified portion of a image when scanned with a flatbed scanner and with a drum scanner. The drum scanner always looks ‘better’ than the flatbed scanner.
I’ve gone one step beyond and showed that the V700 appears to resolve details almost as well as the Howtek 4500 drum scanner, but the V700 suffers a bit in obtaining the same level of acuity. Luckily, minor lapses in acuity can be nearly corrected by careful sharpening.
So, let’s put all this in context again. We began with a scan of a 4×5 ” negative that would produce a 60 x 48 ” print when printed at 300 dpi. 300 dpi is above the 240 dpi below which most healthy human eyes begin to detect a loss of resolution. I showed that the V700 (using my undermount wetmount workflow using Vuescan can resolve nearly all the detail resolved by the Howtek, but that minor sharpening of the V700 image is required to produce nearly all the acuity provided in the unsharpened Howtek scan. This is actually pretty remarkable.
Is the difference between the Howtek and V700 acuity important enough to warrant the extra cost of a drum scan? To answer that, you’d need to ask:
- Could your eyes detect the difference I’ve shown if you were to closely inspect a 2″ wide section of a 60 x 48 ” print and say “..that’s not as good as it could be.” You’d not have the benefit of having a drum scanned print as a comparator as we’ve done here. So I’d hazard a guess that most would not be able to detect that small difference.
- Do you routinely produce prints that are over 12x linear enlargements of your negatives, as used in this example? If so, you may need to eake out every bit of resolution and acuity that only a drum scanner can provide. Having said that, I’ve created many exquisite, fine prints to 40 x 32 ” from 120 size negatives, a linear enlargement factor of around 15x.
- Do you produce high-quality negatives having sharp subjects? If sharpness (i.e., resolution + acuity) isn’t a consideration in your final prints, then it won’t matter during scanning either.
- Do you know how to get the most out of your flatbed scanner? I’ve written several articles about scanning with the Epson V700 to maximize image quality as well as several other articles about the Craft of Photography. You may enjoy reading them.
So, do you need to drum scan your negatives?
The short answer is “it depends on the size of the negative and the size of the prints to be made from that negative.” For most of us shooting 35mm film and printing to not larger than 16×20 inches, a high quality, 4000 ppi scan from a modern flatbed scanner could make an exceptional print. But you’ll need every bit of scanning power to make a quality print larger than 16 x 20 inches, and that may mean investing in a drum scan. This also assumes a perfectly sharp, full crop negative from which you take the scan, of course. Still, you will be limited in print size: even drum scanning will not likely get much beyond 18×24 inch fine print from perfect 35mm negative. If you want large fine prints, you need to start with large negatives.
Update 6/23/20:
Some of you have asked for a 35mm comparison as I’ve done above for a 4×5 negative. I don’t have many as I rarely shoot 35mm, but I can offer one example. The first image is the complete 35mm frame showing an inset box, from which I then show a 1:1 view of a small pink bicycle on a roof top, first from a V700 Scan and then from a drum scan. Both were sized to 4000 dpi (~24mp) and under a wet mount protocol. Both images were sharpened optimally (and modestly).
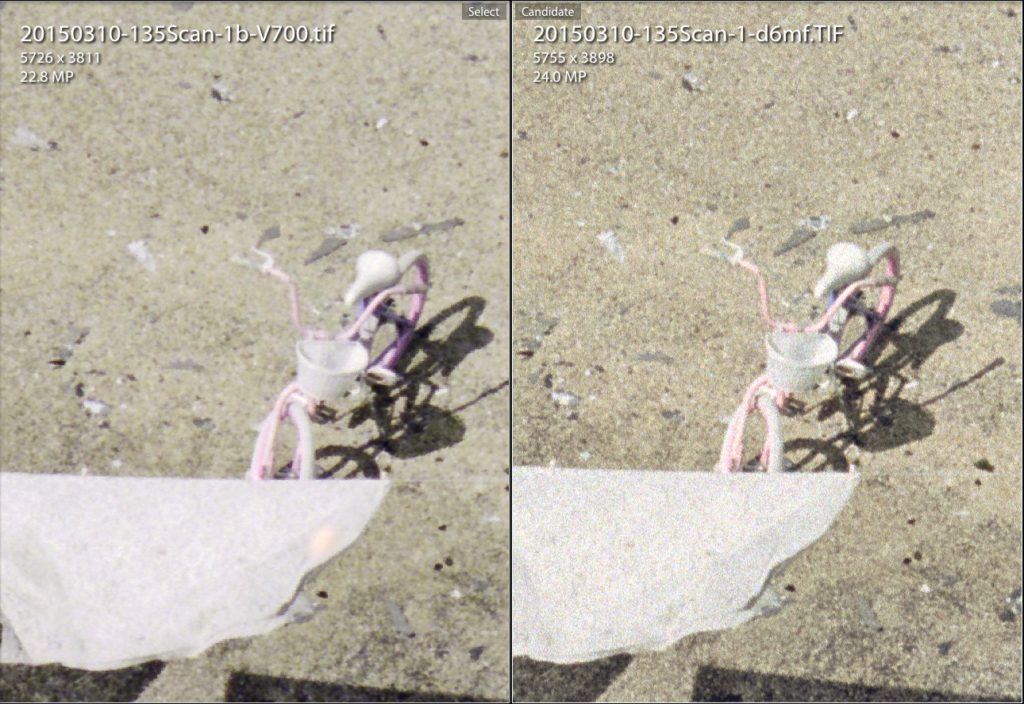
You’ll probably agree that there are noticeable differences in both acuity and resolution comparing the flatbed with the drum scans in the 35mm format. Keep in mind this is approximately what you would see in an 18.5 x 13 inch full-frame print (printed at 300 dpi). The differences would be less detectable in smaller prints, to a point where you’d need a magnifying loupe to see them.
End of Update
Since I have both my own drum scanner and a good flatbed scanner, which do I use for my final scans of my larger format negatives? Well, I tend to be a perfectionist and I know the drum scanner can get me closer to perfection, so I use my drum scanner for final production, especially for my larger prints for exhibition. But I have no qualms about relying on my Epson V700 for all pre-production proofs, book images, or anytime the expected print sizes are less than 40×32″ or so, depending on negative size..
Today’s modern flatbed scanners are really quite good once you’ve mastered their capabilities. The linear CCD sensors used in these printers will likely never compare exactly to the PMT sensors of the drum scanners of yesterday, but who knows? As the PMT machines become more rare, they may become completely obsolete. While we have them, they definitely have their place in creating the highest quality of images in large prints. For small prints, especially from larger negatives, the cost of getting a drum scan is probably not worth it.
All comments and questions welcomed.
J. Riley Stewart, copyright 2020.

See more J. Riley Stewart images
Varnishing prints is an excellent alternative to matting and glazing. A varnished print can be mounted into an open frame without additional protection. The varnish is washable and sufficiently durable to environmental grime or other hazards like sneezes, dirty fingers, or accidental rubs and scrapes. Compared to traditional presentations, a framed varnished print is much lighter in weight, has no breakable glass to worry about, and requires no matting. Framing a varnished print is much easier and less expensive than framing traditionally.
But these physical benefits of a varnished print are of less importance than the aesthetic benefits, in my opinion. Modern varnishes (which are actually acrylics) gives the surface a subtle semi-gloss sheen but it also deepens the blacks and enhances global contrast and color vibrancy. I prefer the semi-gloss surface, but know that you can choose any degree of glossiness you prefer, from full matte to very shiny gloss depending on the actual varnish applied. Regardless, from an aesthetic perspective, varnishing enhances a sense of visual depth in the image and gives it a very distinctive and ‘painterly’ luminism-like appearance. Viewing these prints is a very different experience than viewing traditional matted/glazed prints.
Print varnishes are available from several suppliers, but they all are acrylic-based, which are applied in liquid form but which dry to a hard, durable coating after minutes to hours. I use Breathing Color Glamour II Glossy diluted with distilled water (2:1 or so) and only on rag papers. I use BC’s 9″ foam roller approach, but have tried other rollers with a lot of success. (I gave up on ‘any ole roller’ approach after spending 6 months reworking my technique because my hardware store changed their supplier of the rollers I was using, to disastrous effect).
Varnishing is fairly simple to master, but like any other print treatment it may require experimentation and practice. I’ve worked out a method that’s fairly reliable that I’m sharing below.
If you want to try hand-varnishing your photographic prints, here are a few tips from my technique:
1. Use multiple thin coatings of diluted varnish. It helps extend tack time until you get the coating even. It helps sneak up on the degree of glossiness of Glossy varnish, as the amount of gloss is directly related to the amount of varnish applied. Multiple coatings help avoid little air bubbles that can ruin the surface. These bubbles will form regardless, but thicker coatings may trap them and never let them go. Three thin coats are much better than one thick one.
2. I varnish under a dust tent (homemade) and varnish on a vertical surface. Most people varnish flat on a horizontal table. My table is stood up (it’s actually a 4×8′ sheet of plywood), and I tape the upper corners of the print to the table. I do this to avoid room dust falling on the print during drying time. I vacuum the tent before each session.
3. I use the hose from a HVLP spray painter and as soon as the varnish on the print starts to ‘settle’– I keep a steady stream of warm air circulating over it to speed drying time, which speeds the application of 3 coats significantly. You can get by without the rapid drying, but you’ll need to wait until each coat dries before applying the next. The longer it stays “tacky,” the more risk there is that dust will settle on the surface (not good, as even minuscule dust particles that get embedded in the varnish will show up like tiny stars.)
4. Be sure to varnish all the way to the edge of the paper, even the white borders. If you don’t, the paper will dry unevenly and cause serious warps and wrinkles that extend into the image that are very difficult to flatten. Just saying….
There are alternatives to varnishing techniques, and I’ve tried most of them. Some recommend using a sprayer. Some roll varnishing with the print flat on a table. Others have elaborate spraying rooms that minimize dust and blow back. I settled on the techniques above because of the final surface appearance and minimal problems with dust and wasted varnish.
Like anything we do in making photographs, varnishing is as much an art as it is a science. A change to any one part of the workflow (size of print, supplier of the varnish, a change in application method, etc) requires a re-work of the technique until you get used to the change. Be prepared to waste some prints, especially if you get into large prints.
Hope this helps. Let me know how it goes.
J.