The Psychology and Aesthetics of a Toned Monochrome Print

Color affects our emotions. Whole volumes have been written describing these effects, and how artists and advertisers use color to best induce specific emotions. Color also has profound effects on the perceived depth of any two-dimensional representation of our three-dimensional world.

To make the point, look at the three squares below. Which color, blue or red, seems ‘closer’ to you? This example is a good way to show how our eyes play tricks on us when it comes to color alone. If you see the red square appear to be in front of the blue squares, that is the typical response.  There is a biological explanation for this effect, but the result is that “warm (e.g., red) colors project” and “cool (e.g., blue) colors recede.”

ColorContrast

How does this relate to the psychology of B&W (so called, “monochrome”) prints?

I’ve been creating B&W prints for years, but the truth is, I don’t really care for “black and white” prints. I much prefer “purple and white” or “eggplant and white,” and for some subjects, “brown and white.”

The 20th Century masters of landscape photography touted the physical and emotional effects of toning their B&W prints. There were dozens of techniques and materials used to impart colors selectively to silver gelatin prints. Among the most widely used was a selenium chloride solution. Depending on the paper and developer used to print the image, bathing the print in a weak solution of selenium chloride for a few minutes materially changed the color of the print to what Ansel Adams called an “eggplant” color, most noticeable in the darker shadow areas.

I loved the aesthetic effect selenium toning had on my prints, so it became a standard part of my darkroom workflow, and now continues in my hybrid workflow.

What was that effect?

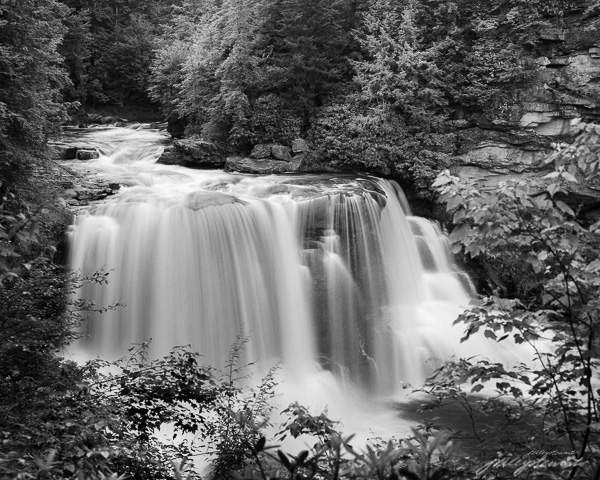
Take a look at the two images below. The first is a straight “monochrome” depiction of Blackwater Falls in West Virginia. It’s a beautiful image, full of light and excitement and depth. These characteristics are imparted solely by the subjects, which are entirely shades of neutral gray (you may see color, but it’s because your monitor is not neutral–most are not). This depiction represents what comes out of the standard B&W developer or when you convert an image to B&W in a digital workflow.

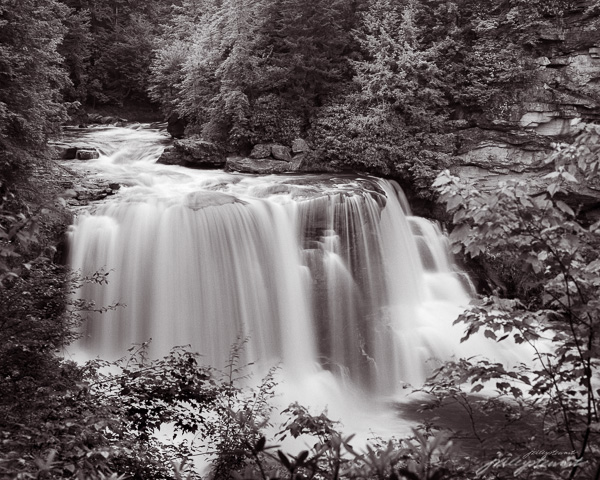
Now look at the second image. It was given a treatment that selectively toned the shadow areas as if the print was toned in my darkroom method for selenium toning. The mid tones and shadow areas now have this deep purple (so called “eggplant”) tone.

Blackwater Falls at Full Force

Blackwater Falls at Full Force
“Blackwater Falls at Full Force” – Limited edition archival pigment print, up to 40×32 inches


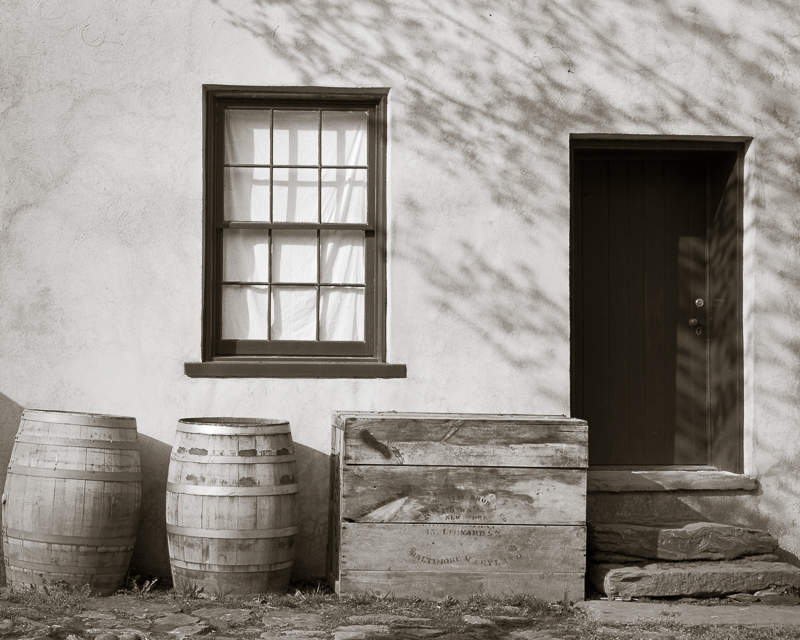
There are many other tones besides the ‘eggplant’ of selenium toner that artists can choose to use. For some images, I like a warmer tone that mimics Kodak Brown Toner I used to use on wet prints made in the darkroom. Brown toner is very effective in giving a more nostalgic aesthetic to some subjects, such as those in my Virginia Grist Project and other old architectural subjects, like “Dappled Shadows” below.

example of a warm-toned print
“Dappled Shadows on a Store Front” – warmer brown tones gives a nostalgic aesthetic to old architectural subjects.

How do you feel about the two different presentations? If the second image appears to have more depth in the shadows, it’s because the cooler purple color appears to recede behind the screen surface; the comparatively warmer whites appear to be in front of the shadows. This therefore tends to push the highlights in the water forward and causes the trees and other shadows to fall back into the image, much like the red and blue squares above, creating a greater sense of depth in the image.  Depth in a two-dimensional picture encourages the viewer to want to engage in the picture, something all visual artists want from our audience.

There is also an emotional aspect to the image I think is important. Hues in the purple range are known to induce a sense of calm and creativity, of wonder and exploration. Purple is a very emotional color to most humans.  The toned image of this enormous waterfall therefore creates an internal conflict that is very subtle, but still there. First, you stand before this potentially dangerous, powerful, noisy waterfall that most of us react to with a bit of anxiety, red flags goes up in your consciousness: beware!  But surrounding the waterfall on all aspects is this calming tone that encourages exploration of the shoreline, the trees, the flowers and rocks along the river’s banks. This is a conceptual contrast, and one I think adds drama and excitement in the toned print that isn’t so apparent in the untoned print.

I always tone my B&W prints, varying between a cooler (more bluish) to a warmer (more reddish) selenium tone, depending on the subject of the photograph. It’s always a very subtle tone, not even as much as I’ve shown you in the second image above, which I exaggerated for purposes of this article.

If you make B&W prints (or even web images), experiment with toning to emphasize the feelings you want to compel in viewers. There is a infinite number of possibilities.  In Lightroom, use the Split Toning feature to do this. For the toned image above, I set the Highlight toning saturation to 0 and the Shadow saturation to 9, hue 354. I set Balance to +50, favoring toning to the shadows.

To my heart, monochrome images should be way more than black and white!

Do you already tone your B&W images? What are your experiences? Let me hear your thoughts.

Cheers!


In image-making, you need to know the story before you can tell it.

Every picture tells a story. Sometimes it’s a story well-told, and sometimes not.

Just as a writer carefully maps out the setting, the plot, and cast of characters long before he/she begins typing a novel, visual story-tellers–those who make images instead of books–also will previsualize the story they want an image to tell.  Previsualization begins when we find or stage a subject that we believe has inherent artistic potential–i.e., has a story to tell–and leads to a point in time when we actually act on that belief by taking its picture or beginning to sketch on canvas.

In photography, previsualization is no less important than it is to any method of image-making. Often our eye will catch something we think has promise, but then we must exercise thoughtful previsualization to make the most of the story in front of us. In fact, previsualization must start with the story we want to tell, and all other compositional decisions we make should support that story.

One of the most important compositional decisions a photographer makes during previsualization is whether the final image will be in color or in B&W.

One good reason to decide on B&W film capture is the creative flexibility that B&W film lends to the photographer. If I can exploit this flexibility, I want to do that. Use of color subtraction filters and the ability to adjust film development to increase or decrease the contrast of the captured image are both good reasons to select B&W film over color film. Color film offers far fewer, if any, creative controls.

But first and foremost, the choice to use either color or B&W film should be based on the scene in front of the camera and what the photographer wants to say about that scene. In other words, does the presence of color support, or does it detract, from the story you want this scene to communicate? This is a question that is just as applicable to digital capture as it is to film capture, and it should be asked during previsualization.

It is so easy to defer the question of “color or B&W?” when shooting in color only, such as when shooting with a digital camera. Since the digital camera always captures the full color spectrum, the tendency is to just capture the scene and worry about converting to B&W later and see which, color or B&W, “looks best.”

This could be a mistake, regardless of whether you’re capturing to a digital sensor or onto film. The reason it’s a mistake is because you’ve also deferred the critical question: “Does my concept for this scene–i.e., the story I want to tell– require color? Does the color in the scene support or does it detract from that story?”  When shooting film specifically, deferring this question until later also means that by choosing to use color film, you have removed any opportunity to exploit the creative advantages that B&W film offers.

I follow the advice of the greats who came before me and try to nail down the story for every photograph I take long before I load the film into my camera and click the shutter. Nailing down the story is the first, and perhaps the most important, part of previsualization. The story not only affects the choice of color vs B&W, but also where to point the camera, choice of lens, and every other aspect of composition. I repeat, being in color or being in B&W is one of the strongest compositional decisions to make: it should be made during previsualization. You should know before you take the picture whether it should be B&W or color.

Deciding on color or B&W is an intuitive decision, and I admit that sometimes, I don’t trust my intuition and will capture the same scene onto both color film and B&W film. Most of the time, I learn that I should trust my intuition more.

Here’s a case in point:

Being Obvious (color)
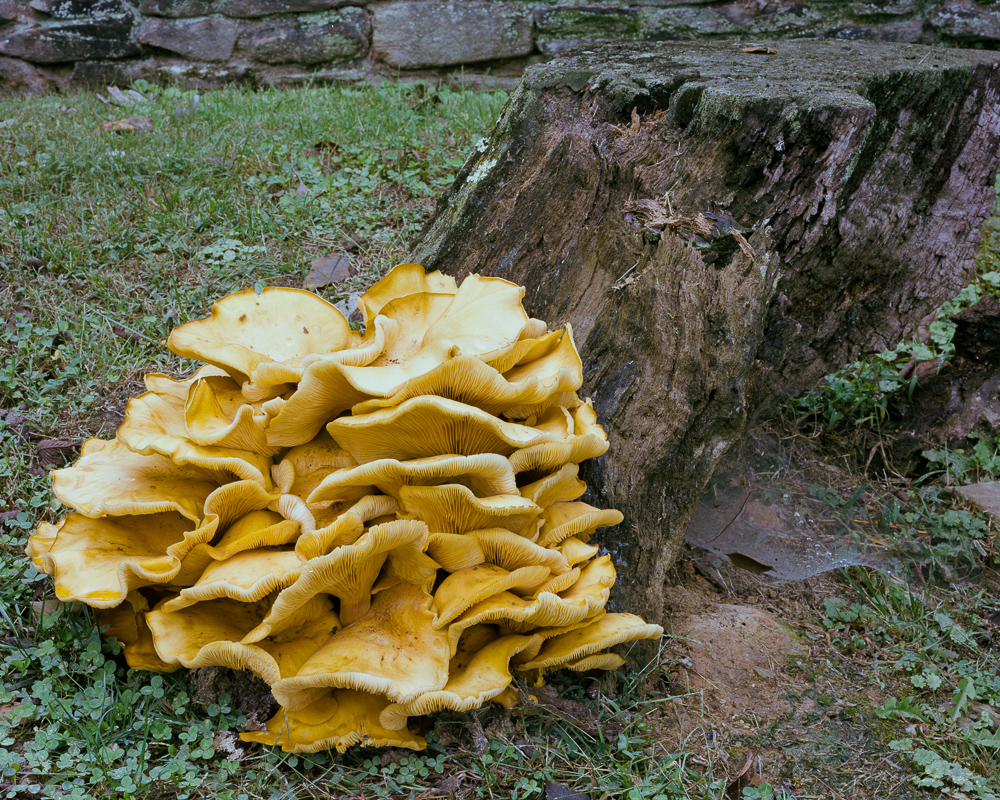
I came upon this massive mushroom this week while out walking on a local farm. It was more than 2 feet in diameter and rested in a bed of clover just at the base of an old dead tree stump.
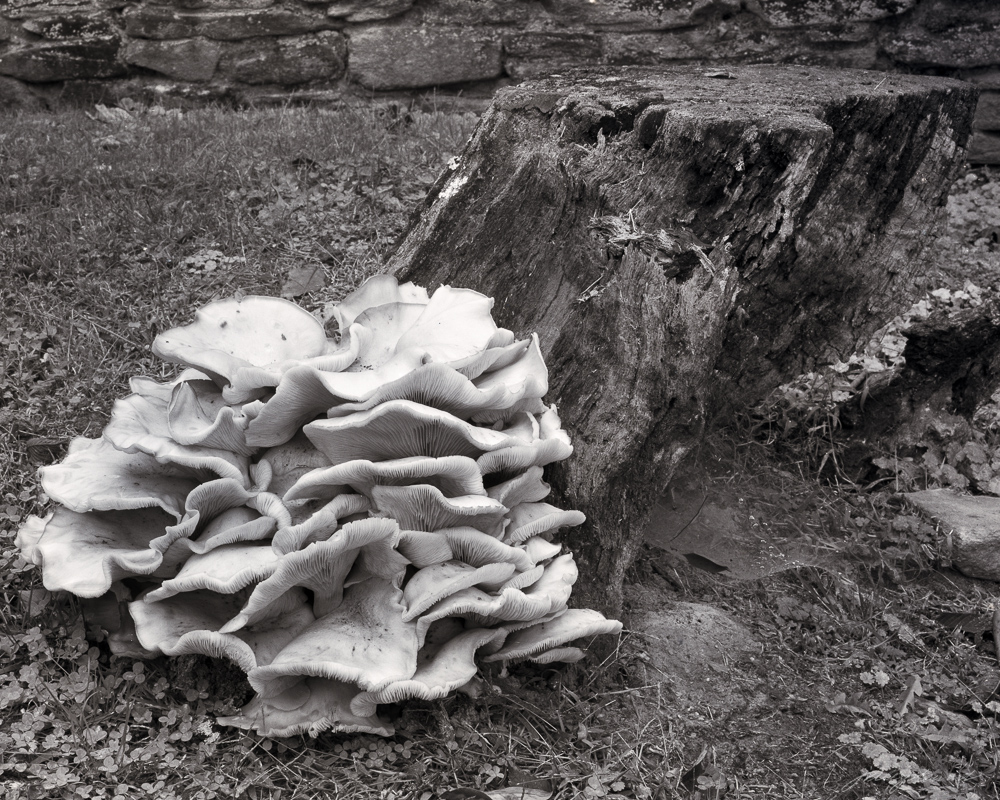
What was immediately obvious was just how obvious this old mushroom was. It’s size and texture of course made it stand out from everything around it, but it’s color was intense as well. The yellow and orange hues really made it ‘different’ from the cooler greens of the surrounding grass and ivy, and from the old monochromatic stump.  The impression I had, and this became my concept for this scene, was “Being Obvious.”

From that point on, my single goal in taking its portrait was to support the concept of ‘being obvious.’ My intuition told me that it should be a B&W portrait, and by using a pale yellow filter I could enhance separation of the main subject from its surrounding cooler tones quite well. But its mushroom’s color was so intense that I began an inner argument with myself (i.e., with my intuition) that then caused me to take the portrait in both color and in B&W. Both portraits were taken in similar, flat overcast light.

The color portrait is interesting because of the subject, but I think it lacks balance, and the colors present in the scene seem to detract from the story of the mushroom “being obvious. The intense yellow/orange of the mushroom tends to share the space almost equally with the other two major colors: the blue green ivy and the brown stump.  In other words, the natural colors didn’t support my concept very well, even though intense.

I was glad I followed my first inclination and also took the mushroom’s portrait using B&W film. I chose to use a light yellow filter to deepen the tones of the cool green clover and lighten the tones of the fungus, thus exploiting the creative controls possible with B&W film.

Being Obvious
“Being Obvious” copyright 2015, J. Riley Stewart

The B&W portrait better segregates the mushroom from all other elements in the image; the ivy and stump are no longer competing for attention with the mushroom, and this change better supports my ‘being obvious’ story.  The B&W image also is better balanced than the color portrait, as I was easily able to lighten the tones on the far right of the frame to create that balance.  Brightening the same green ivy in the color photograph would not have accomplished the same result.

Had I not previsualized this scene and just took the pretty picture of the mushroom without thinking, I might not have  even thought to “see” this in monochromatic B&W, and would have failed to tell the best story for this fantastic, and worthy, subject.

Which do you prefer? Does this picture say something different to you? Would you have captured this portrait in color or B&W?

Leave a comment below! 

Summer is the Season for Photographing in B&W

When nature loses her colors, I focus on scenes full of shapes, shadows, and light.

Summertime can be a challenging time for taking pictures in nature. Nature’s summer colors are largely limited to yellow green vegetation and blue sky, and not much else. So at this time of year, I tend to load my film packs with Black and White (B&W) film. Let me tell you why.

Great oaks witness a veil of summer fog.

I love B&W photographs. Nearly all of the landscape photographers who truly inspire me create in B&W.  In my opinion, it’s the absence of natural color in a B&W photograph that makes it beautiful.  Or more precisely, it’s the millions of shades of gray that make it beautiful.

My featured photograph is a good example of my ideal summertime scene. I captured “Fog in the Forest” anticipating a much different picture when I left the house that morning. The heavy fog wafting among the oaks was a happy surprise (fog anytime in Virginia is a happy surprise). The bright sunlight shining through the leaves and across the landscape created an enormous range of brightness, from very dark shadows to delicate highlights. This moment in time really fit my criteria for capturing it on B&W film: simple composition, plenty of light, plenty of shade, and a bit of mystery.

When I select a scene to capture in B&W, I’m always thinking about the grays that will be in the exhibition print, not the pure blacks or pure whites. For example, in the exhibition print of “Fog in the Forest,”  only the deepest crevices in the tree trunks are truly black; only the brightest center of the sunlight coming through the fog is truly white. Everything else is a delicate shade of gray. It’s the grays, not the black or white, that provide the realism and sense of depth in such a scene, inviting us in.

The next time you stand in front of a large B&W exhibition print, take a minute and see if you agree with me about the beauty of the grays. I’ve always thought the term “B&W” for such fine art photographs sells them short; nothing could be further from the truth.

________________________

Technical note: I captured “Fog in the Forest” on 4″x5″ B&W film along Cannonball Gate Road in Fauquier County Virginia, scanned it to extremely high resolution, and printed it on heavy 100% cotton paper using a warm-tone pigment ink set. I then hand coated the print with an archival varnish. Prints are available up to 32×40 inches, framed or unframed. This title can be found in my “Pastorals” Collection.